True Bias Roscoe Blouse

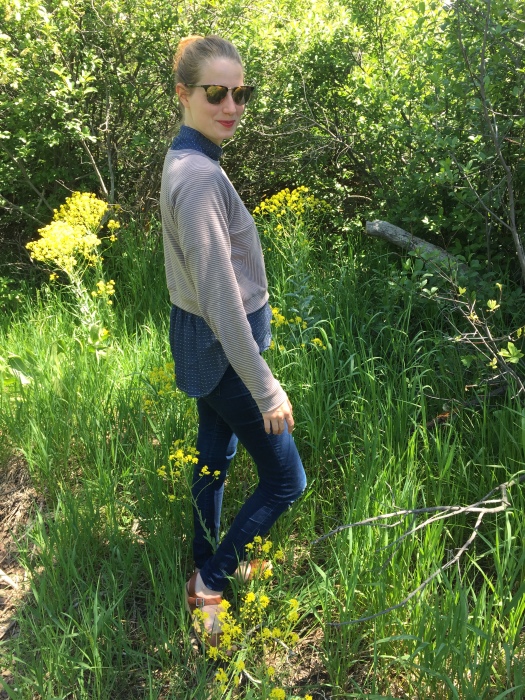
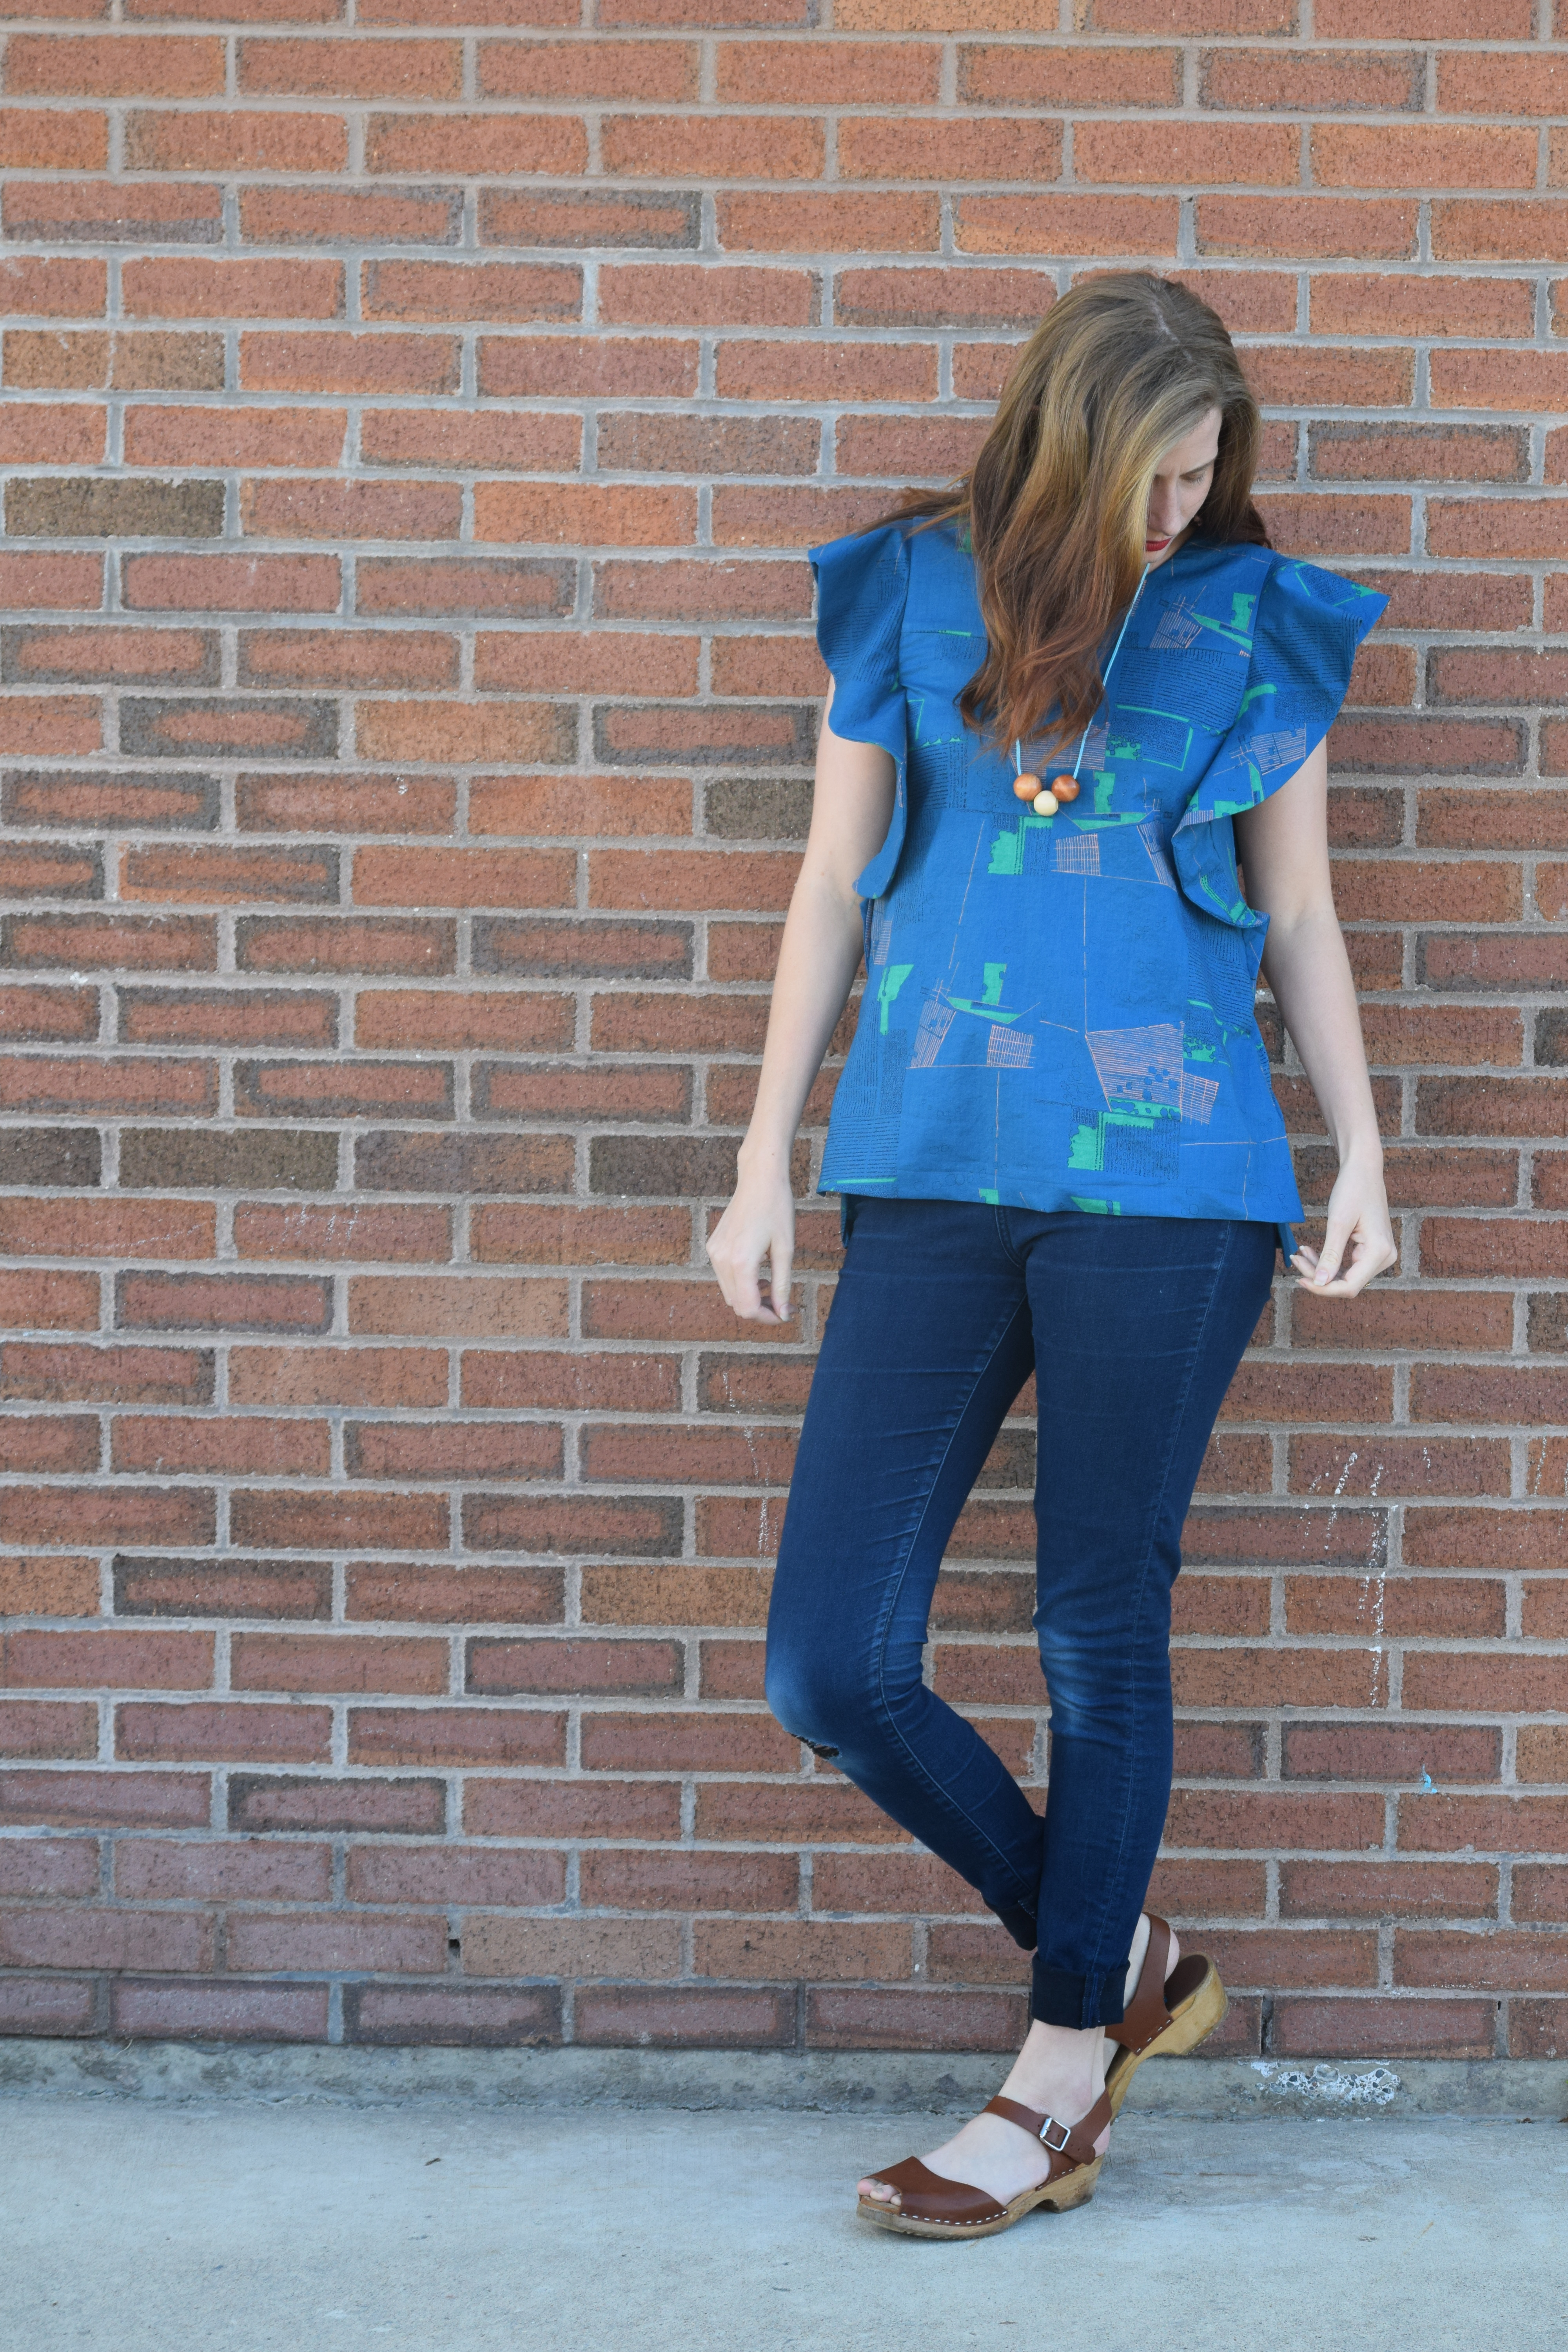
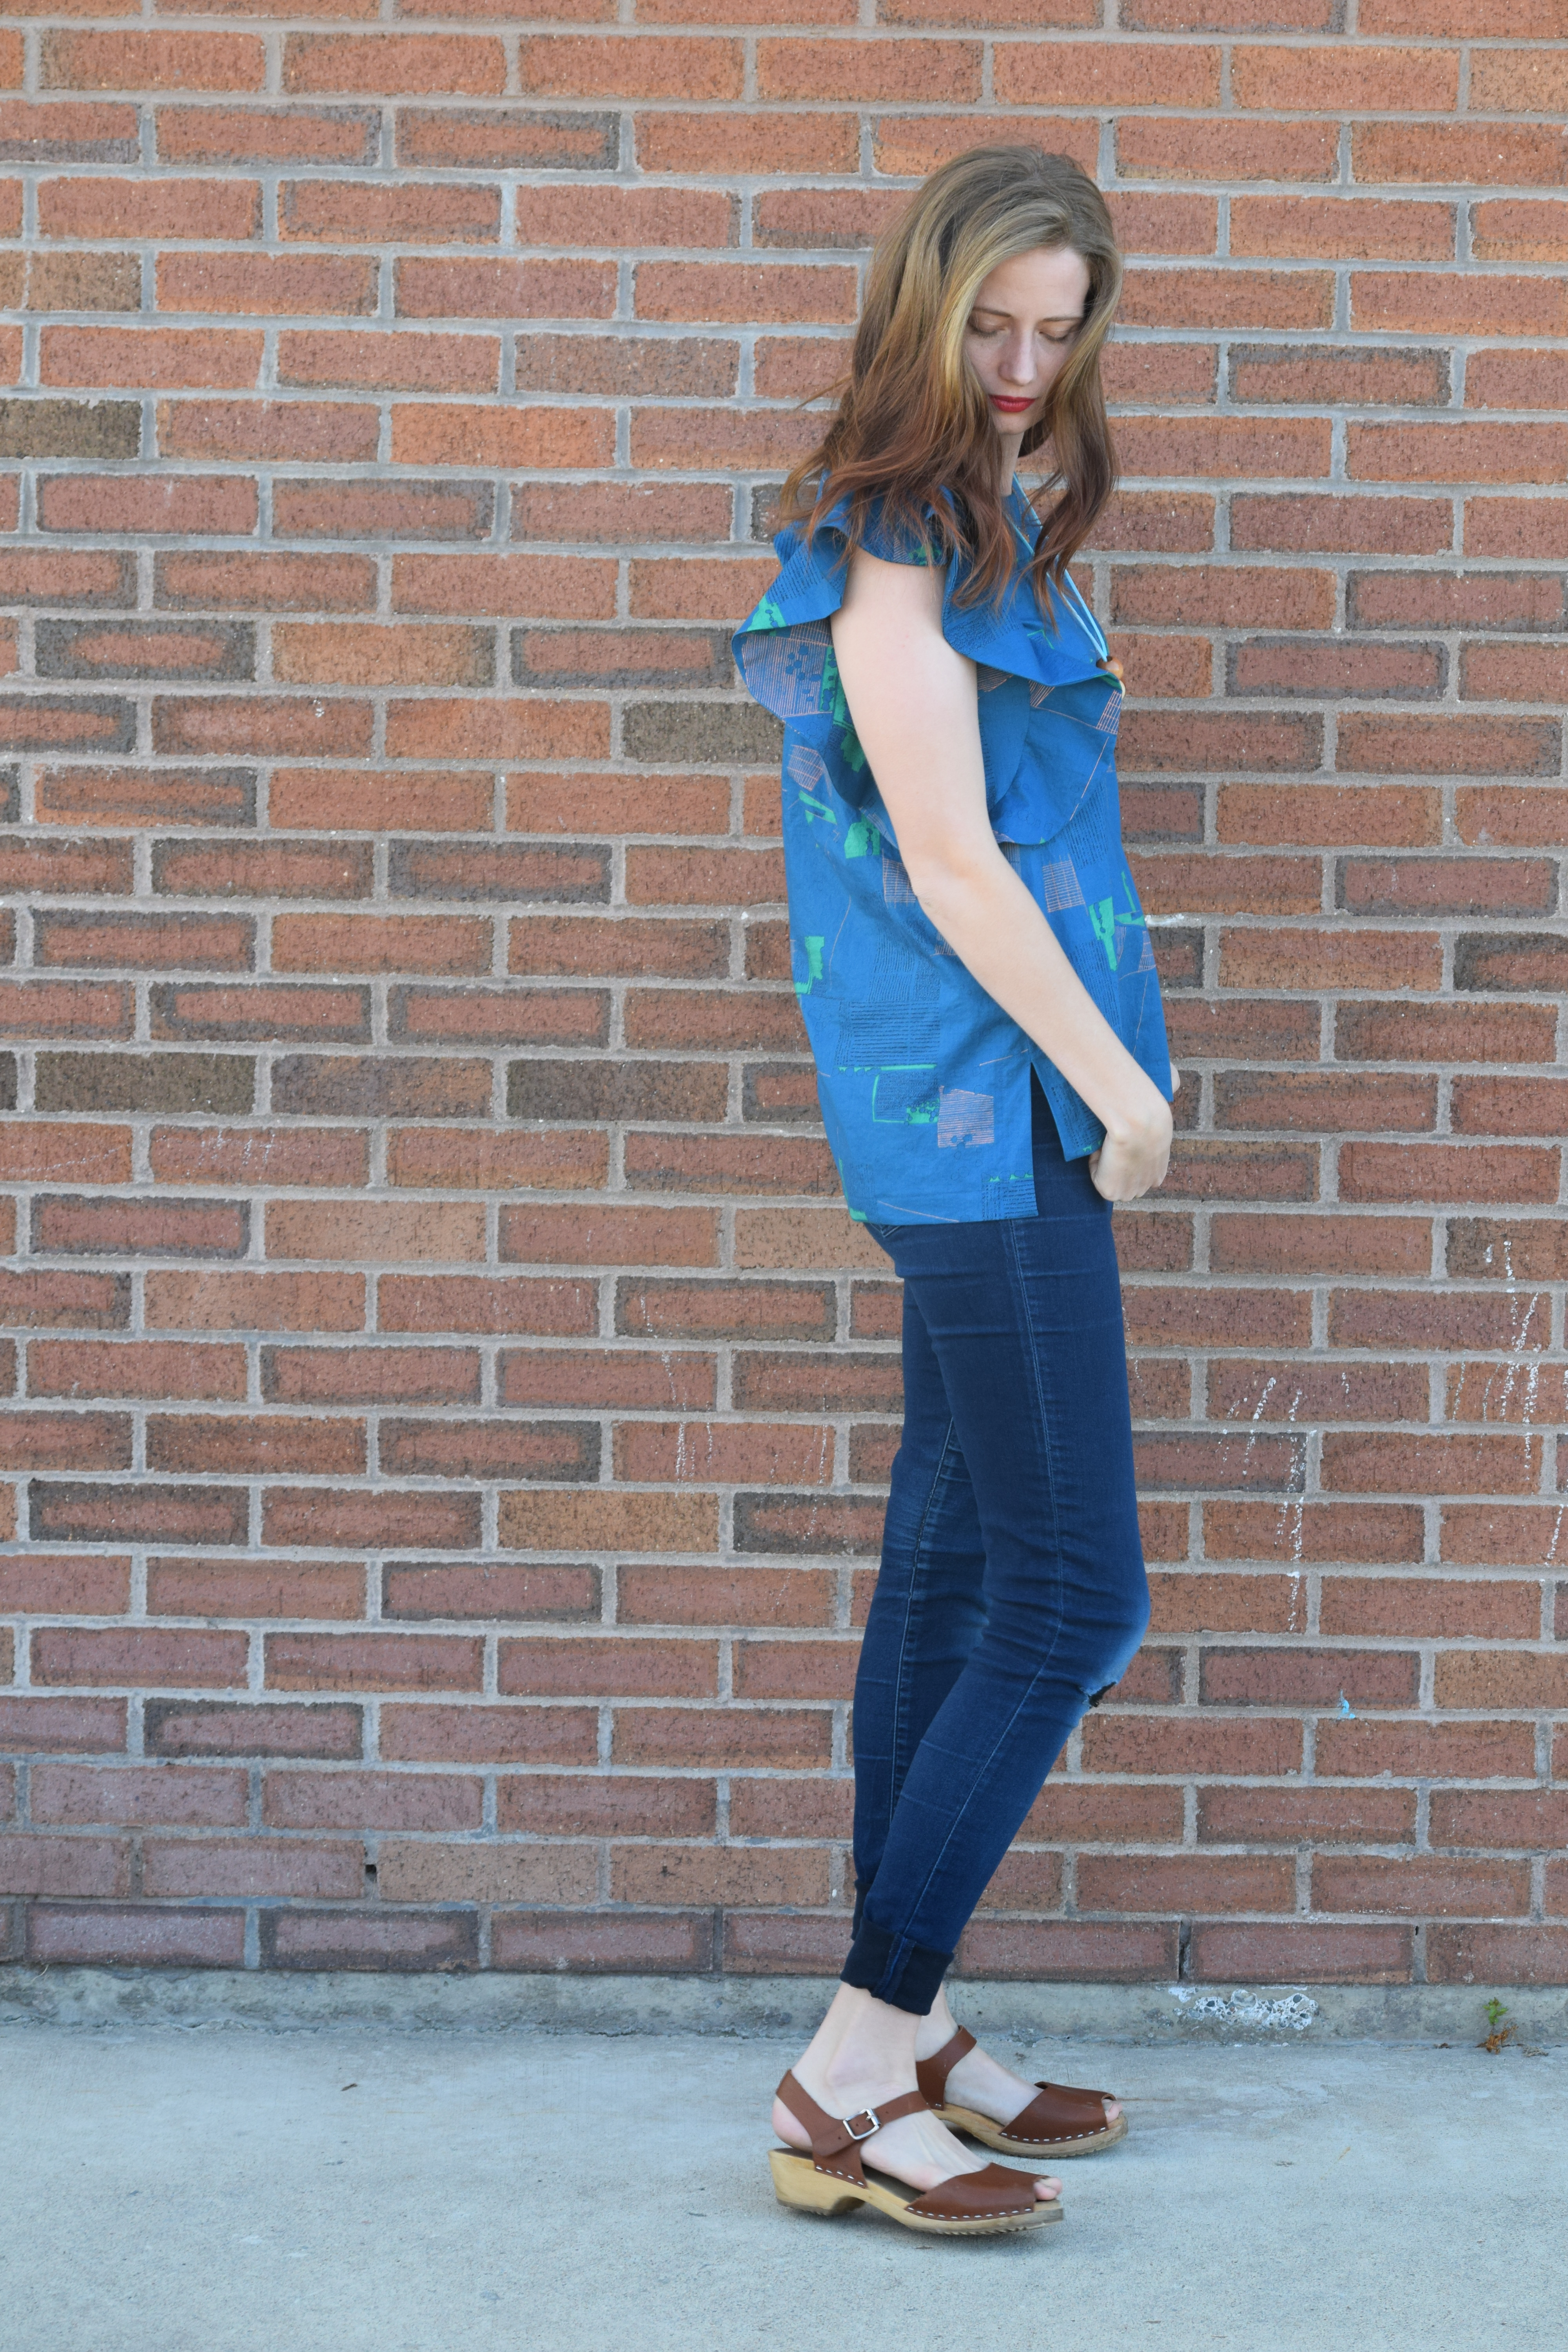
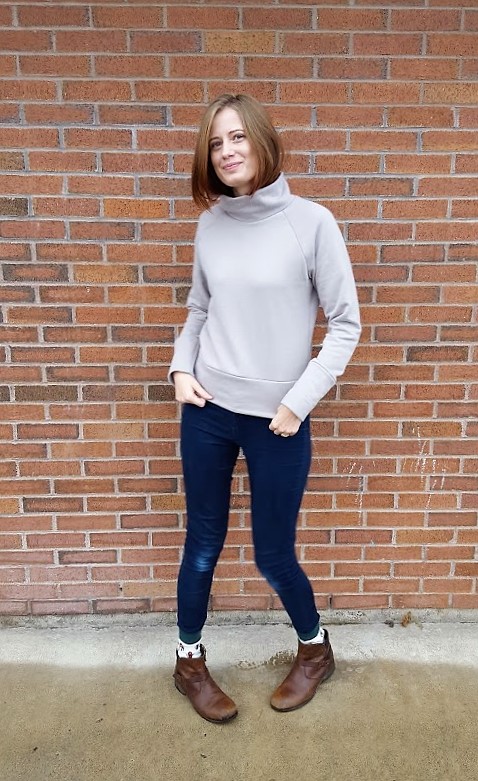
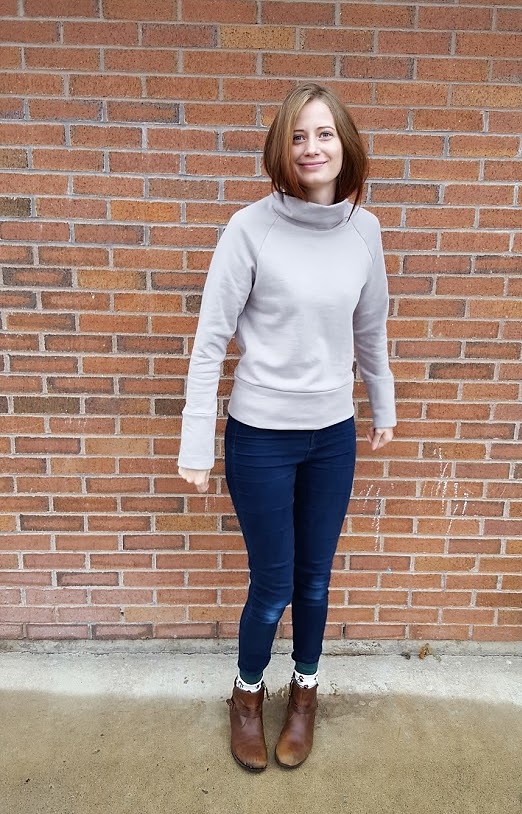
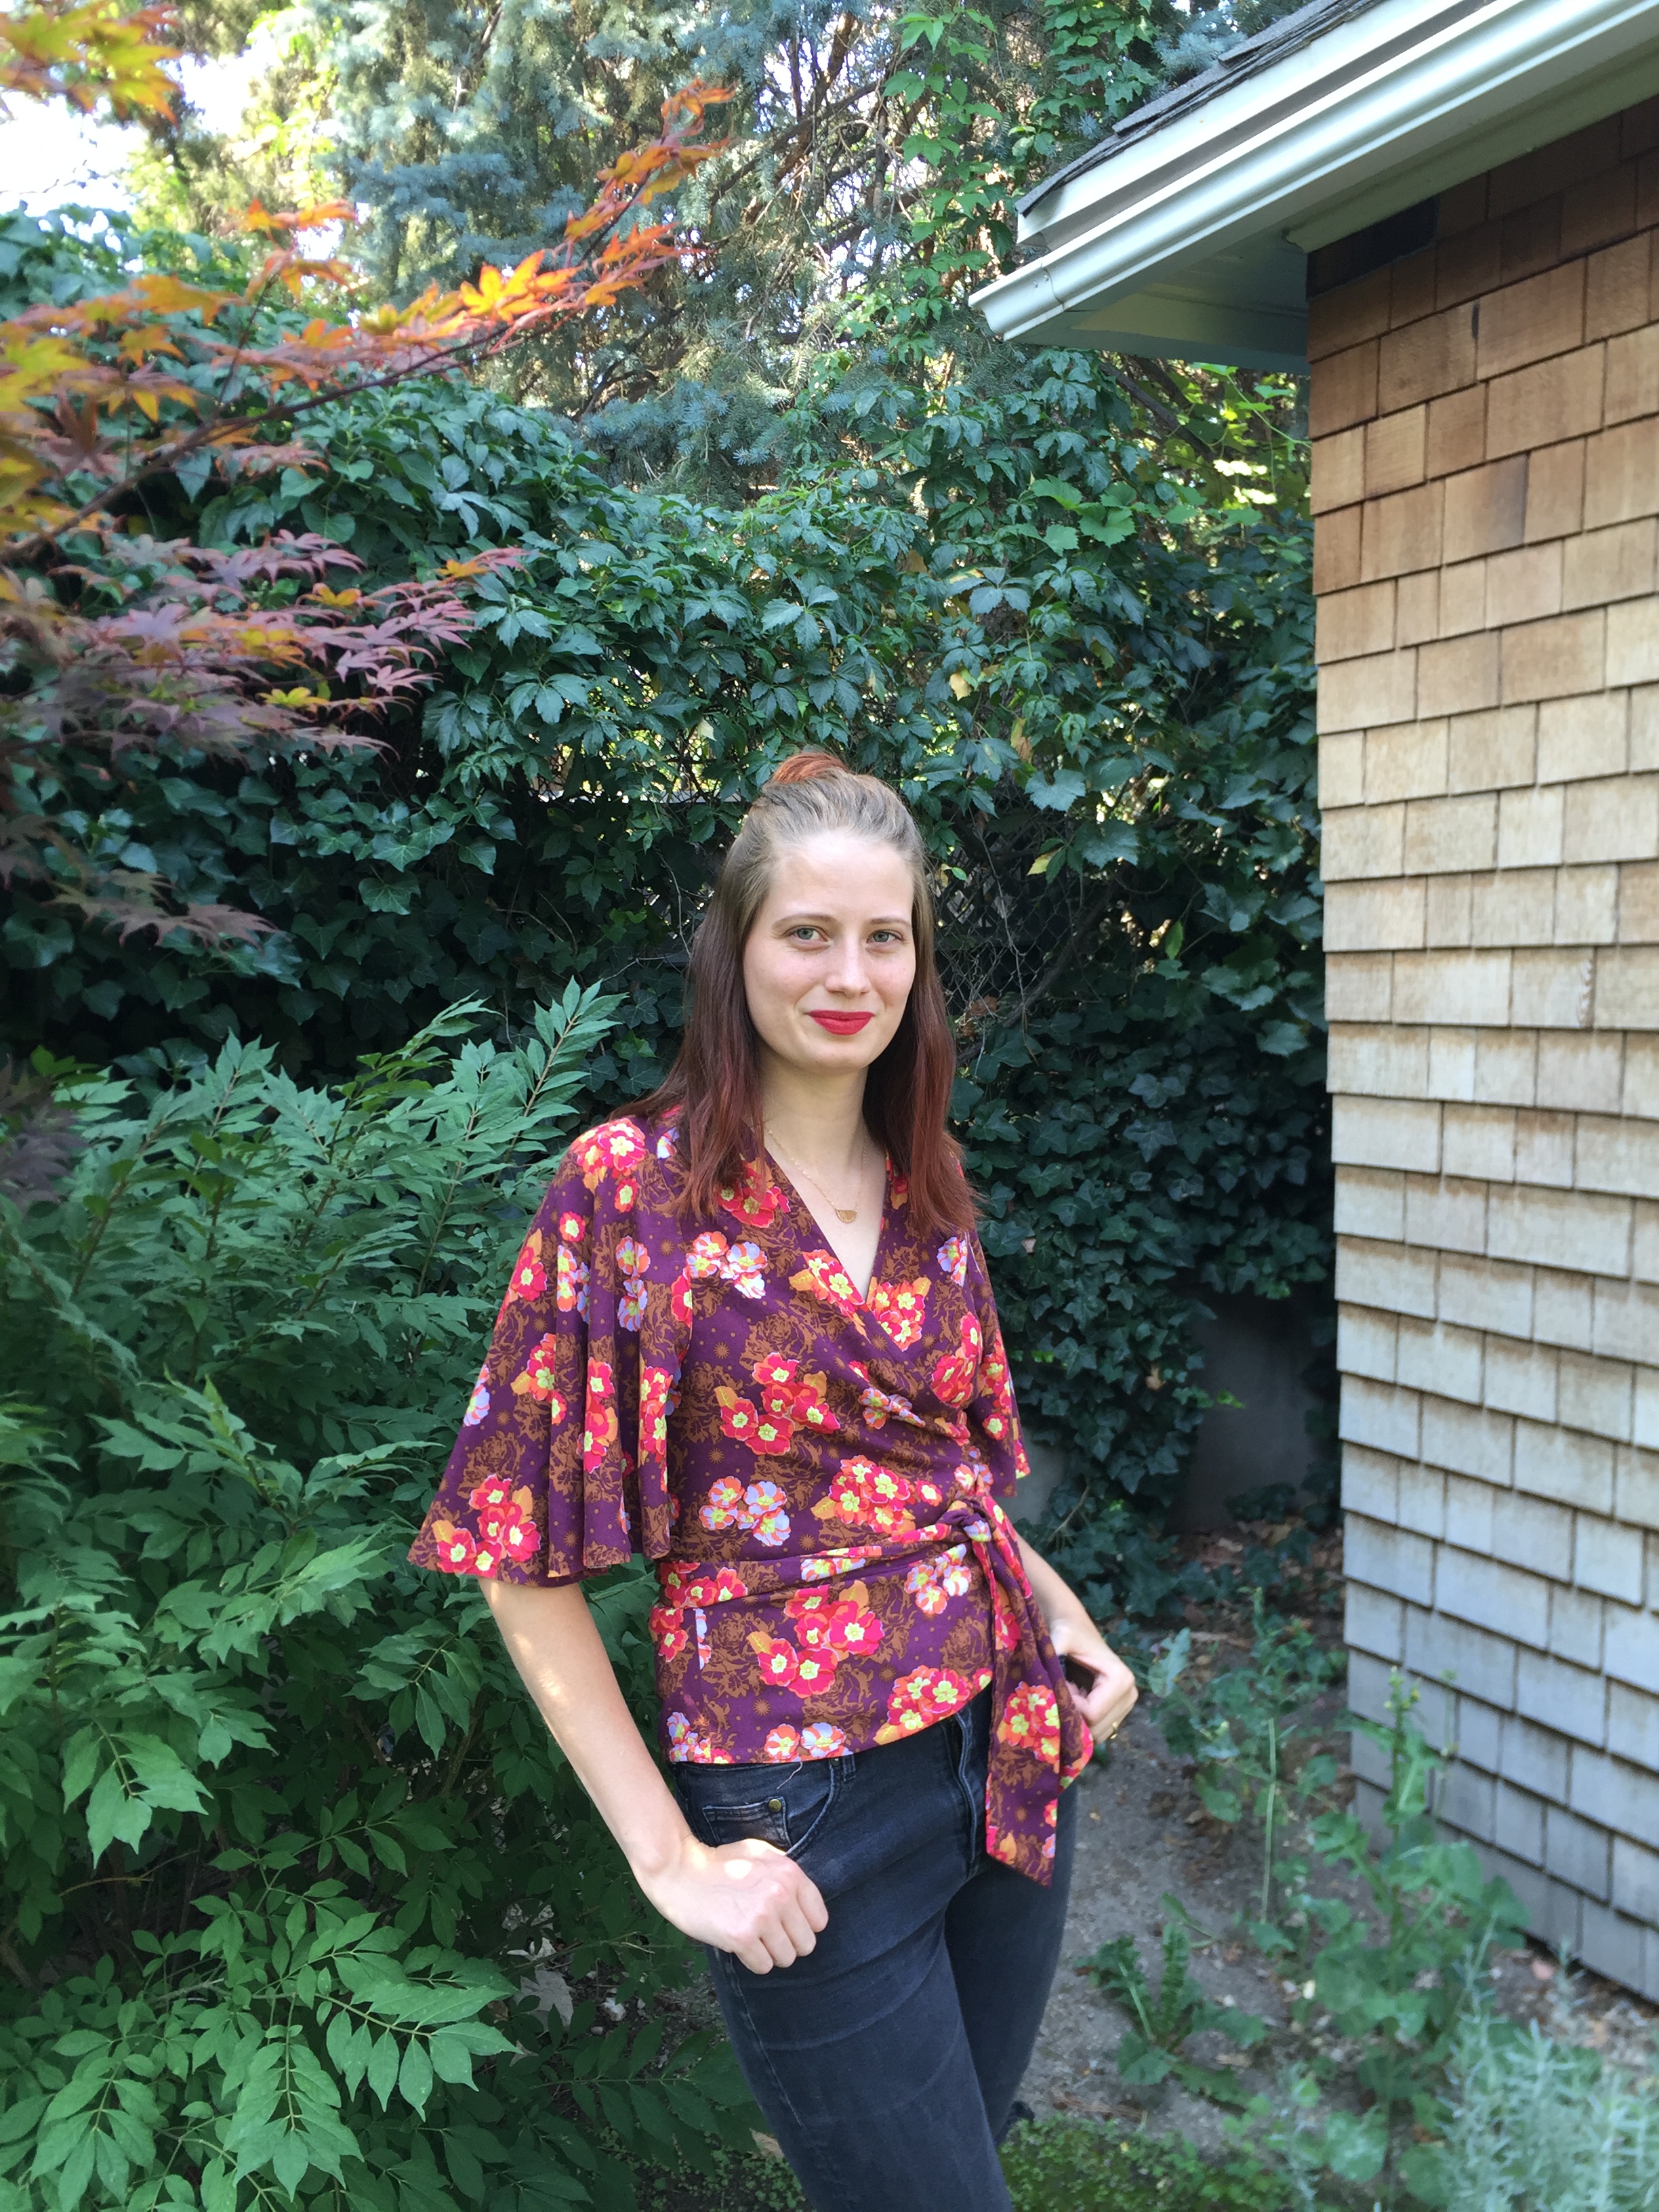
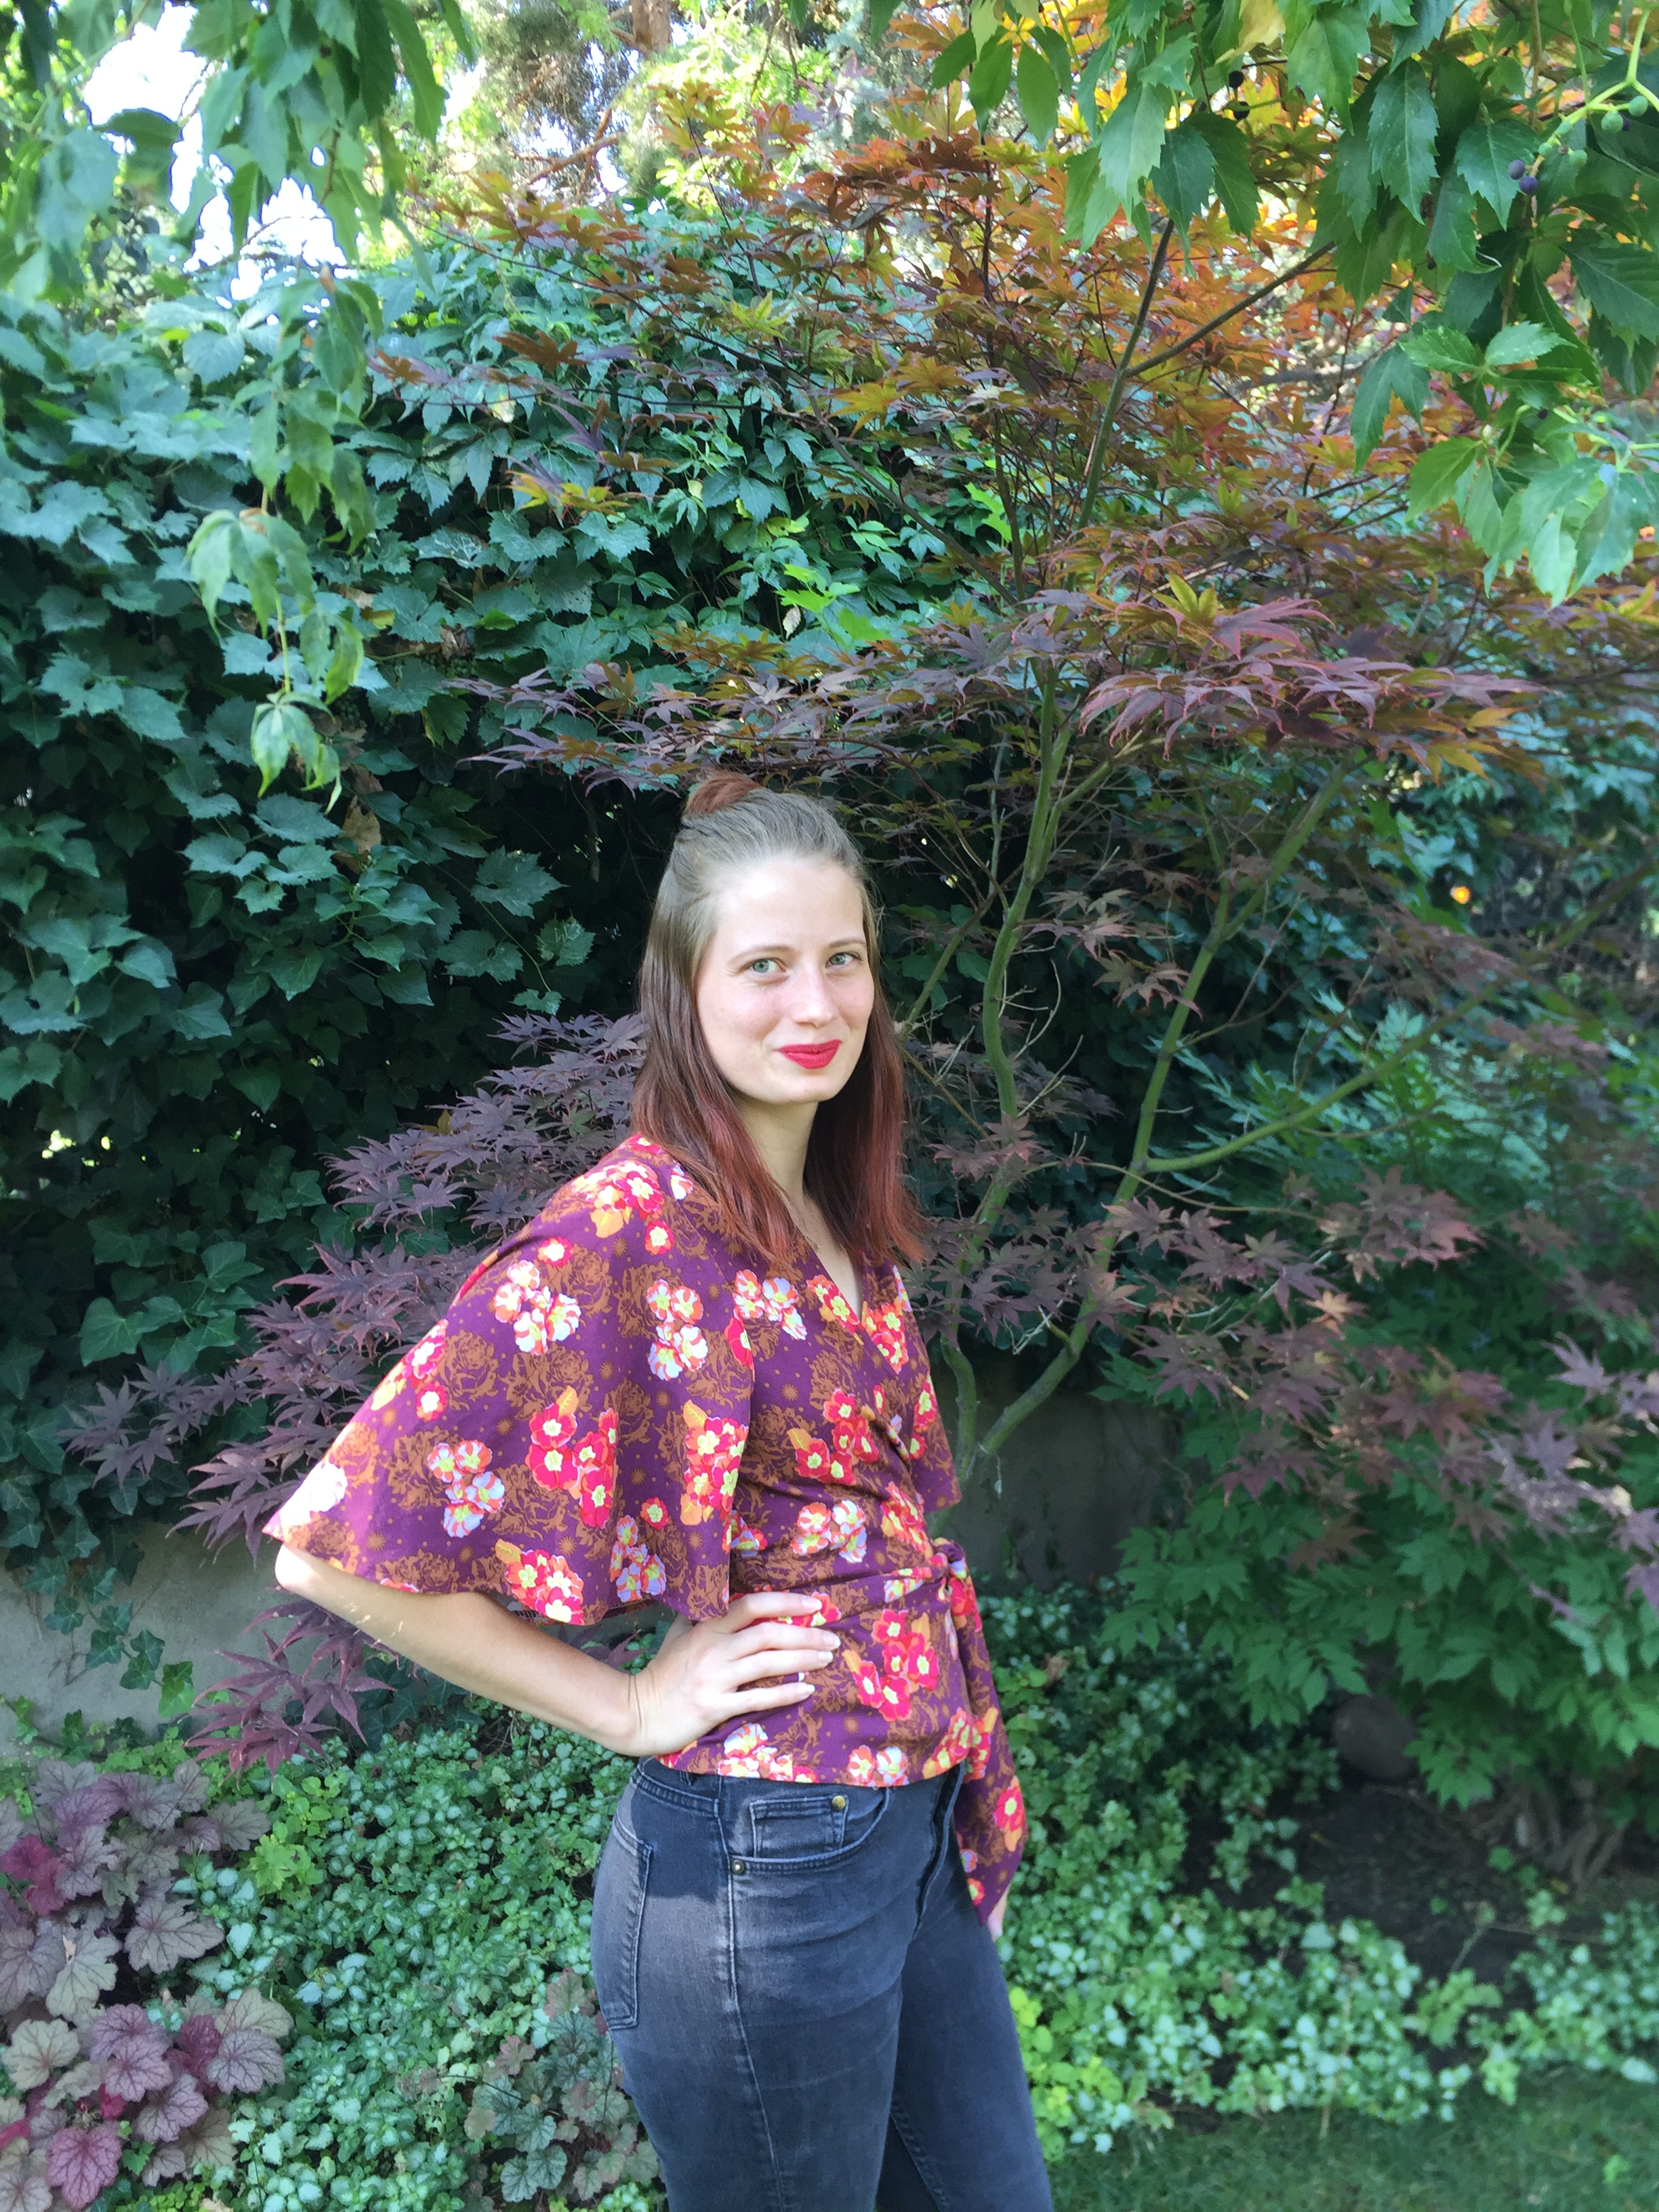
Hello and Happy Monday! My family and I took a mini vacation this weekend and decided to escape to the cabin owned by my husband’s grandparents. I used our weekend plans as motivation to finally finish sewing my True Bias Roscoe Blouse (purchase here). This Mountain Mirror rayon by April Rhodes (purchased from Imagine Gnats) was basically begging to be photographed in front of the mountains. Perhaps I just couldn’t resist the opportunity to photograph a mountain print top in front of all this beautiful scenery.

IMG_2244

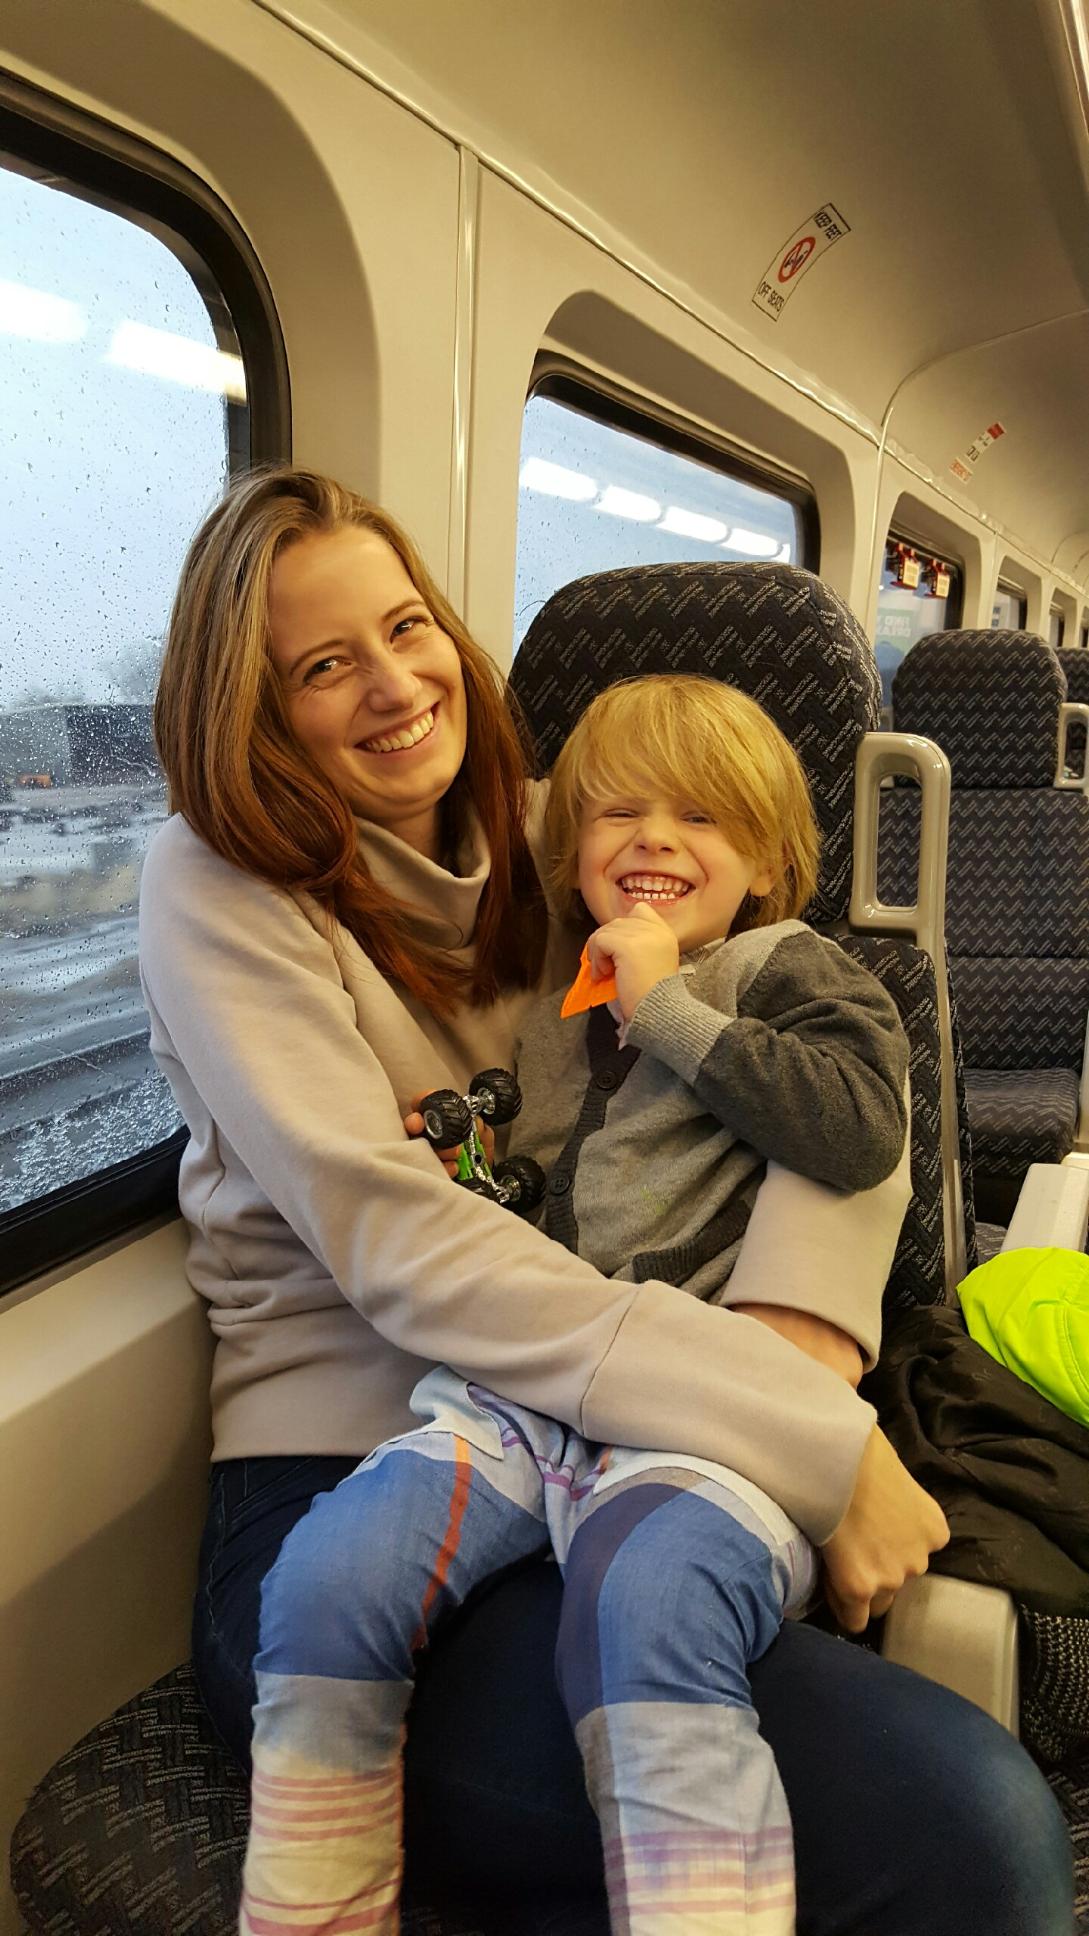
We love spending weekends at the cabin because it always gives us time to reconnect as a family. There’s no internet and minimal to no cell service depending on where you stand on the property. We always come back home feeling refreshed and happy to have a break from our work and devices. Our four year old loves exploring and fighting imaginary monsters so that’s pretty much the only item on the itinerary when we visit. This last weekend we were greeted by snow covered mountains and frost dusting the ground. Once we got a fire started, we played my son’s version of Monopoly and cuddled while watching Spongebob. Not a bad evening if you ask me.

IMG_2249IMG_2253

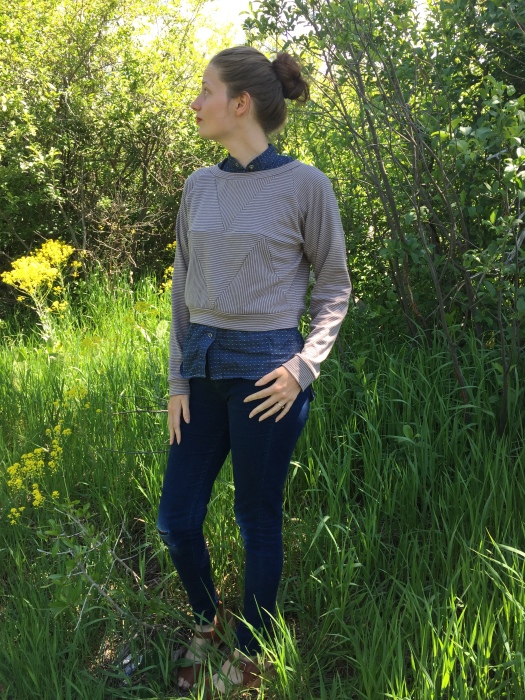
We woke up the next morning, got ready for the day, and headed outside to snap these photos. As evidenced by the snow and frost on the ground, it was freezing outside. My son was bundled in his winter coat and having the time of his life chasing monsters. My husband and I, on the other hand, didn’t pack the appropriate outerwear and were a bit cold. If you look closely at the photos you may see my fingers turning red from the cold and goosebumps on my arms and neck. I did bring this rtw cardigan along and it made finishing this 15 minute photo session a lot more cozy. I love having items like this Roscoe Blouse in my wardrobe that are easily made cold-weather appropriate with the addition of a cozy cardigan or stylish jacket.

IMG_2291IMG_2270

While layering over the Roscoe to make it more winter appropriate was rather easy, I may have had more time to wear this sans layers had I finished it back when I originally started. I purchased this fabric and pattern sometime around the end of August as I intended to finish it before my early September trip to Colorado. Clearly, that did not happen. I had just started to sew my blouse and was on step 2 of the pattern when I made a HUGE mistake. I had attached the neckline facing and was cutting the neck slit. Feeling pretty accomplished, I lifted the fabric to realize that I had unwittingly cut a large hole into the middle of my blouse front. I pulled out my extra fabric and found that it was about 3 inches too short to cut a new front. I was frustrated to realize that I would need to purchase another yard to finish the blouse. I set the fabric and pattern aside and decided to revisit it at a later date.

IMG_2232IMG_2229  When I returned from Colorado, I hit the ground running and finished my Highlands Wrap Dress (here), Hampton Jean Jacket (here), and family Halloween costumes (here). I had all but forgotten about my Roscoe Blouse fail until a few weeks ago when Imagine Gnats announced a great sale on their rayons. I searched through their sale section and found this Mountain Mirror rayon which reminded me of my unfinished project. I quickly ordered a yard and waited for it to arrive.

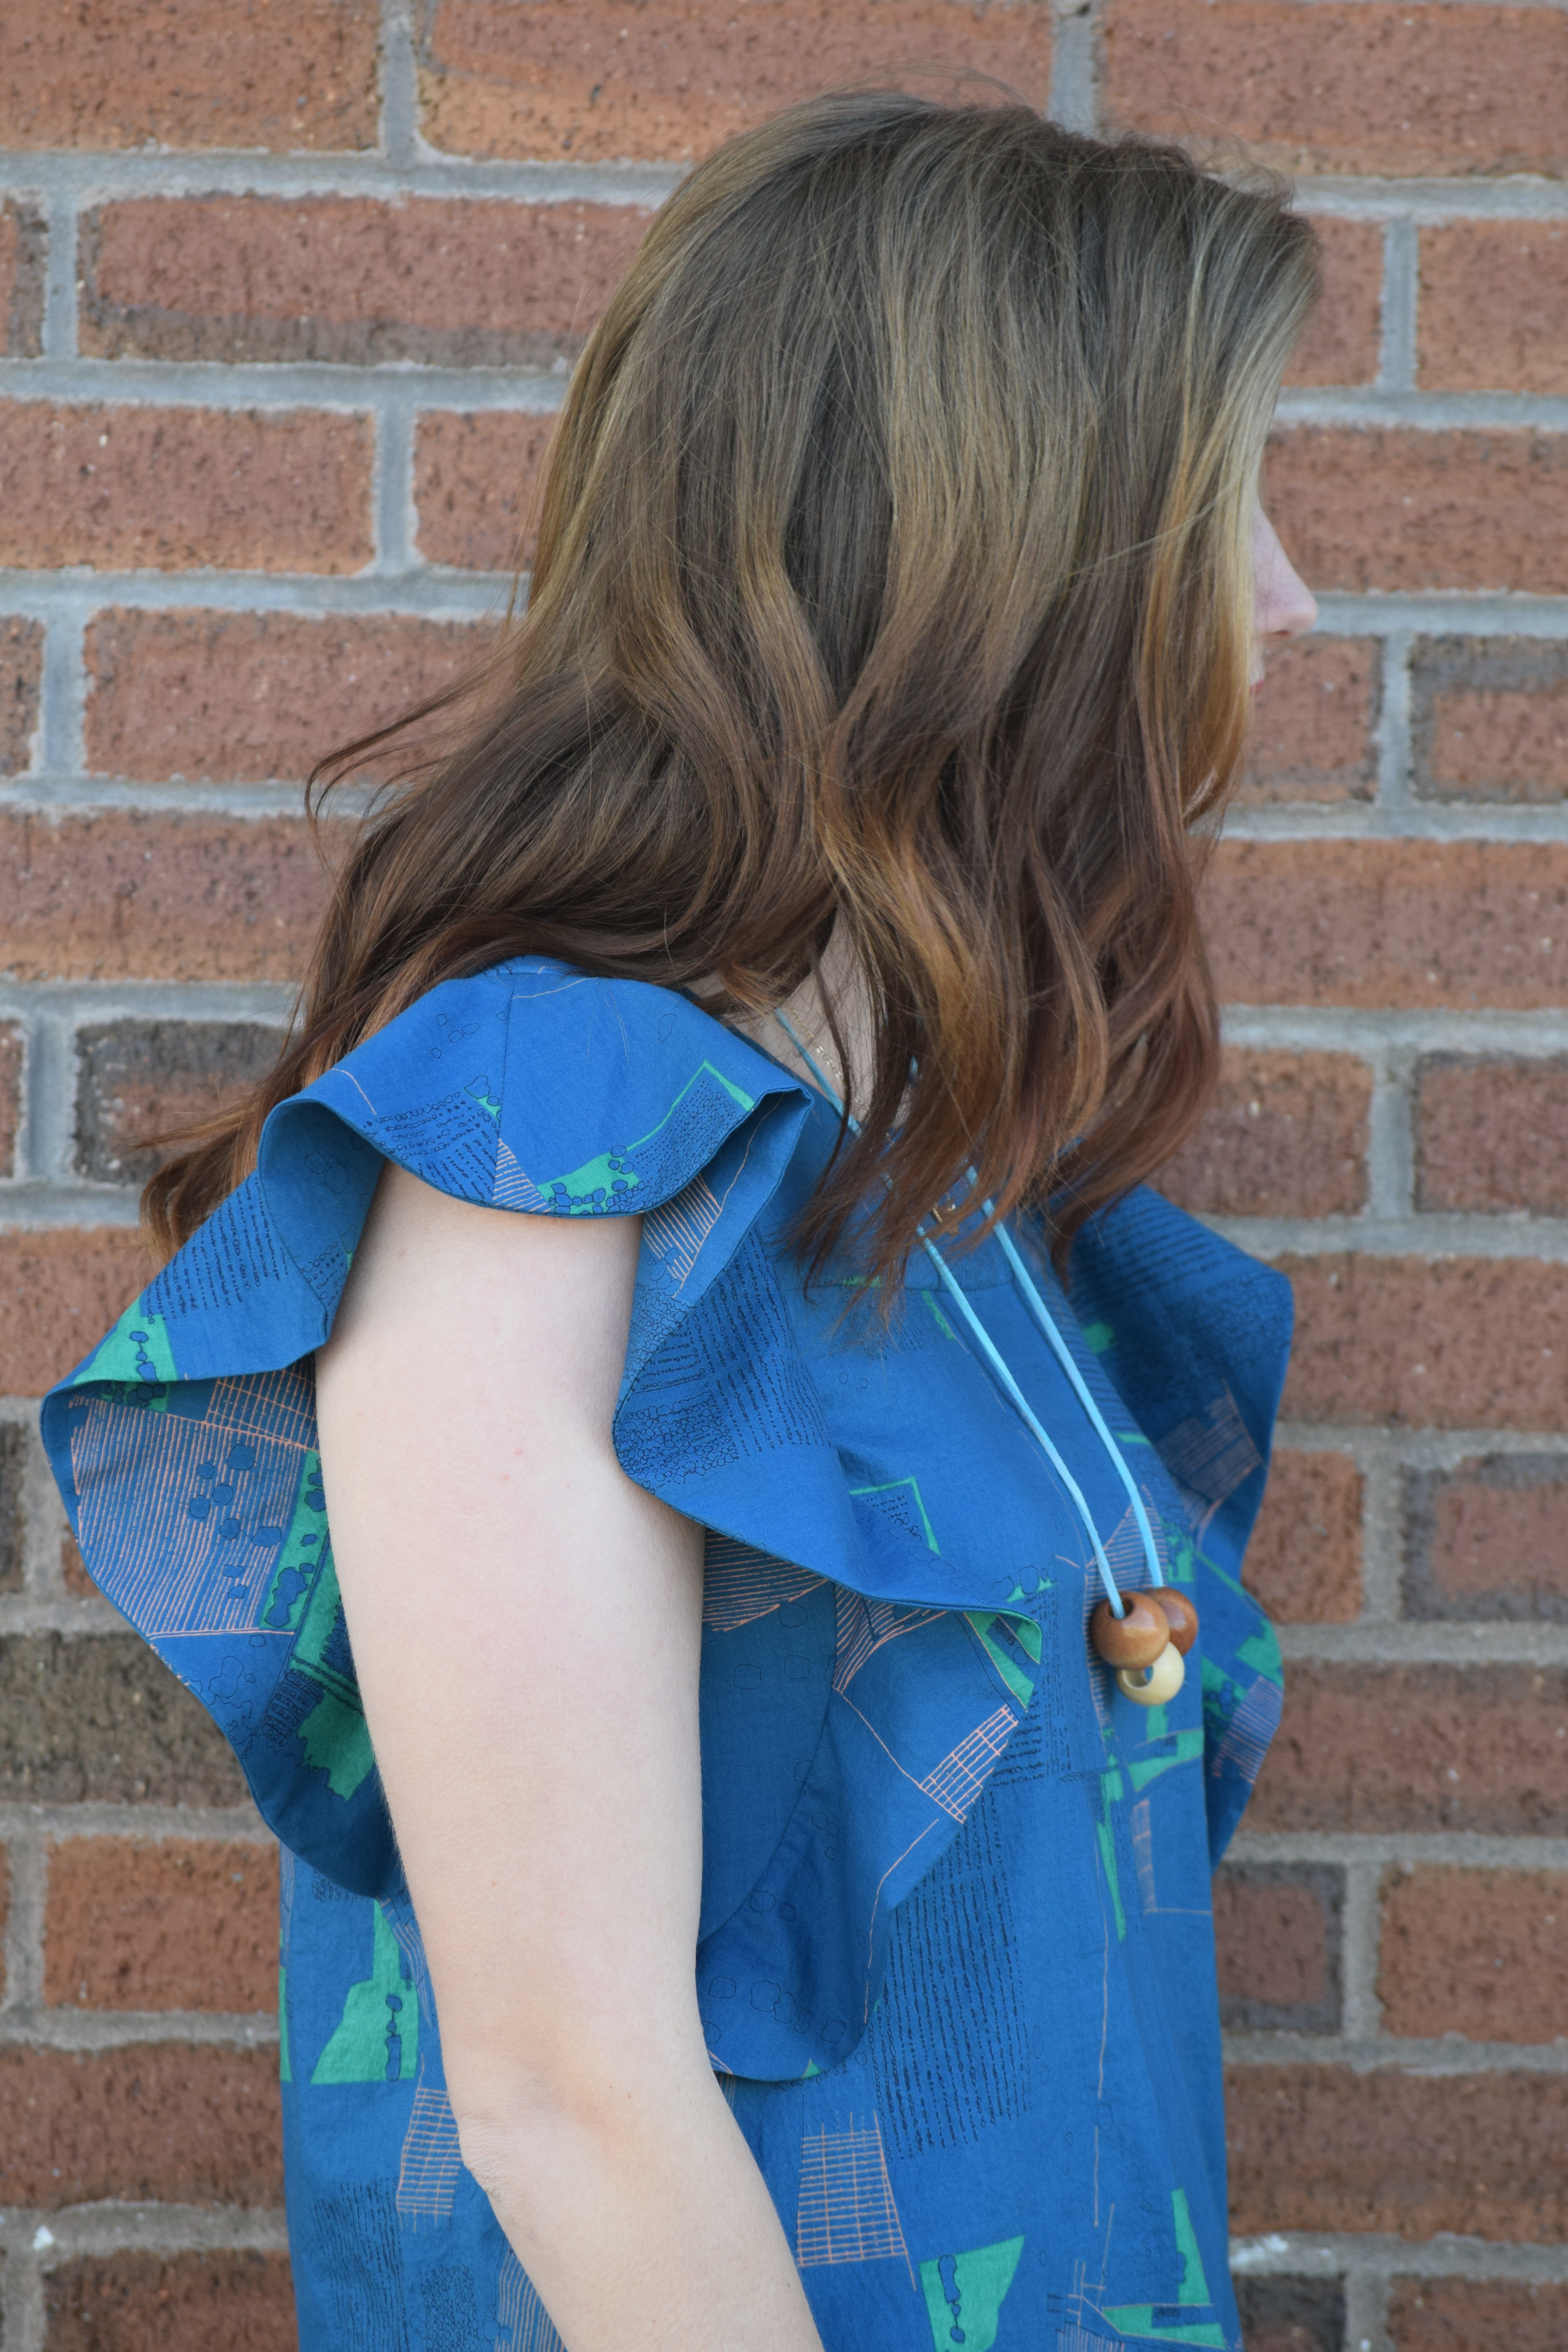
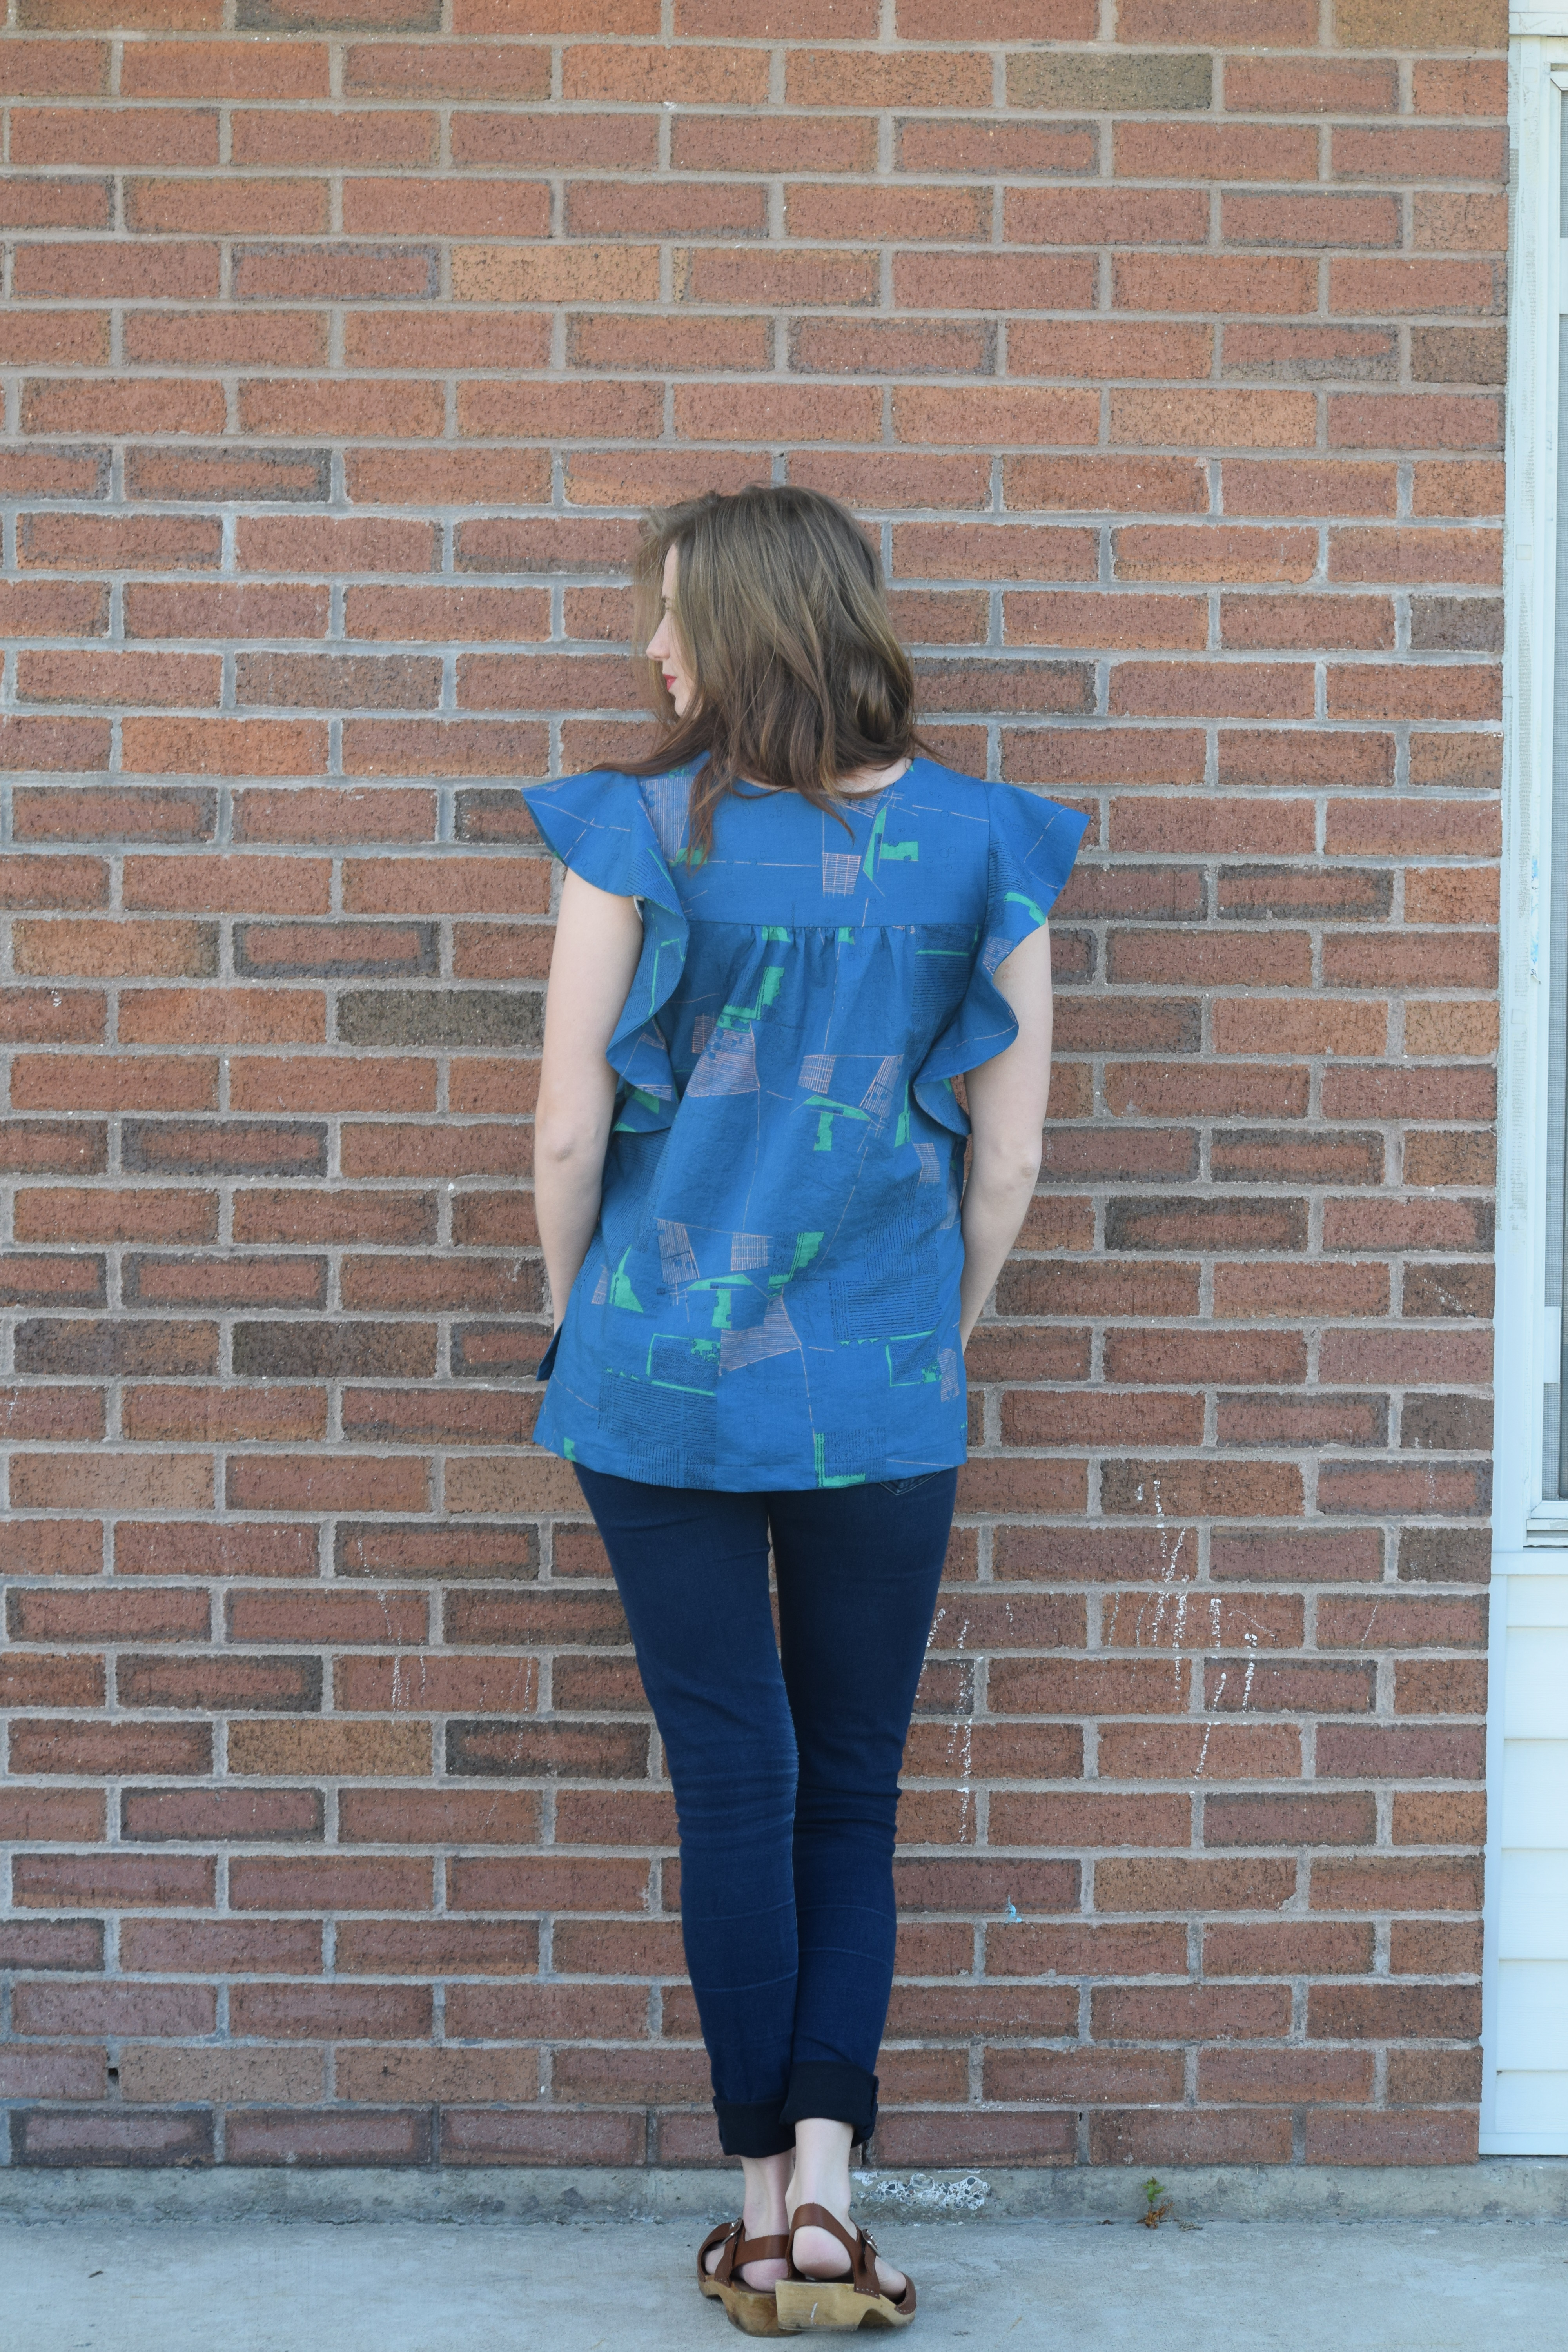
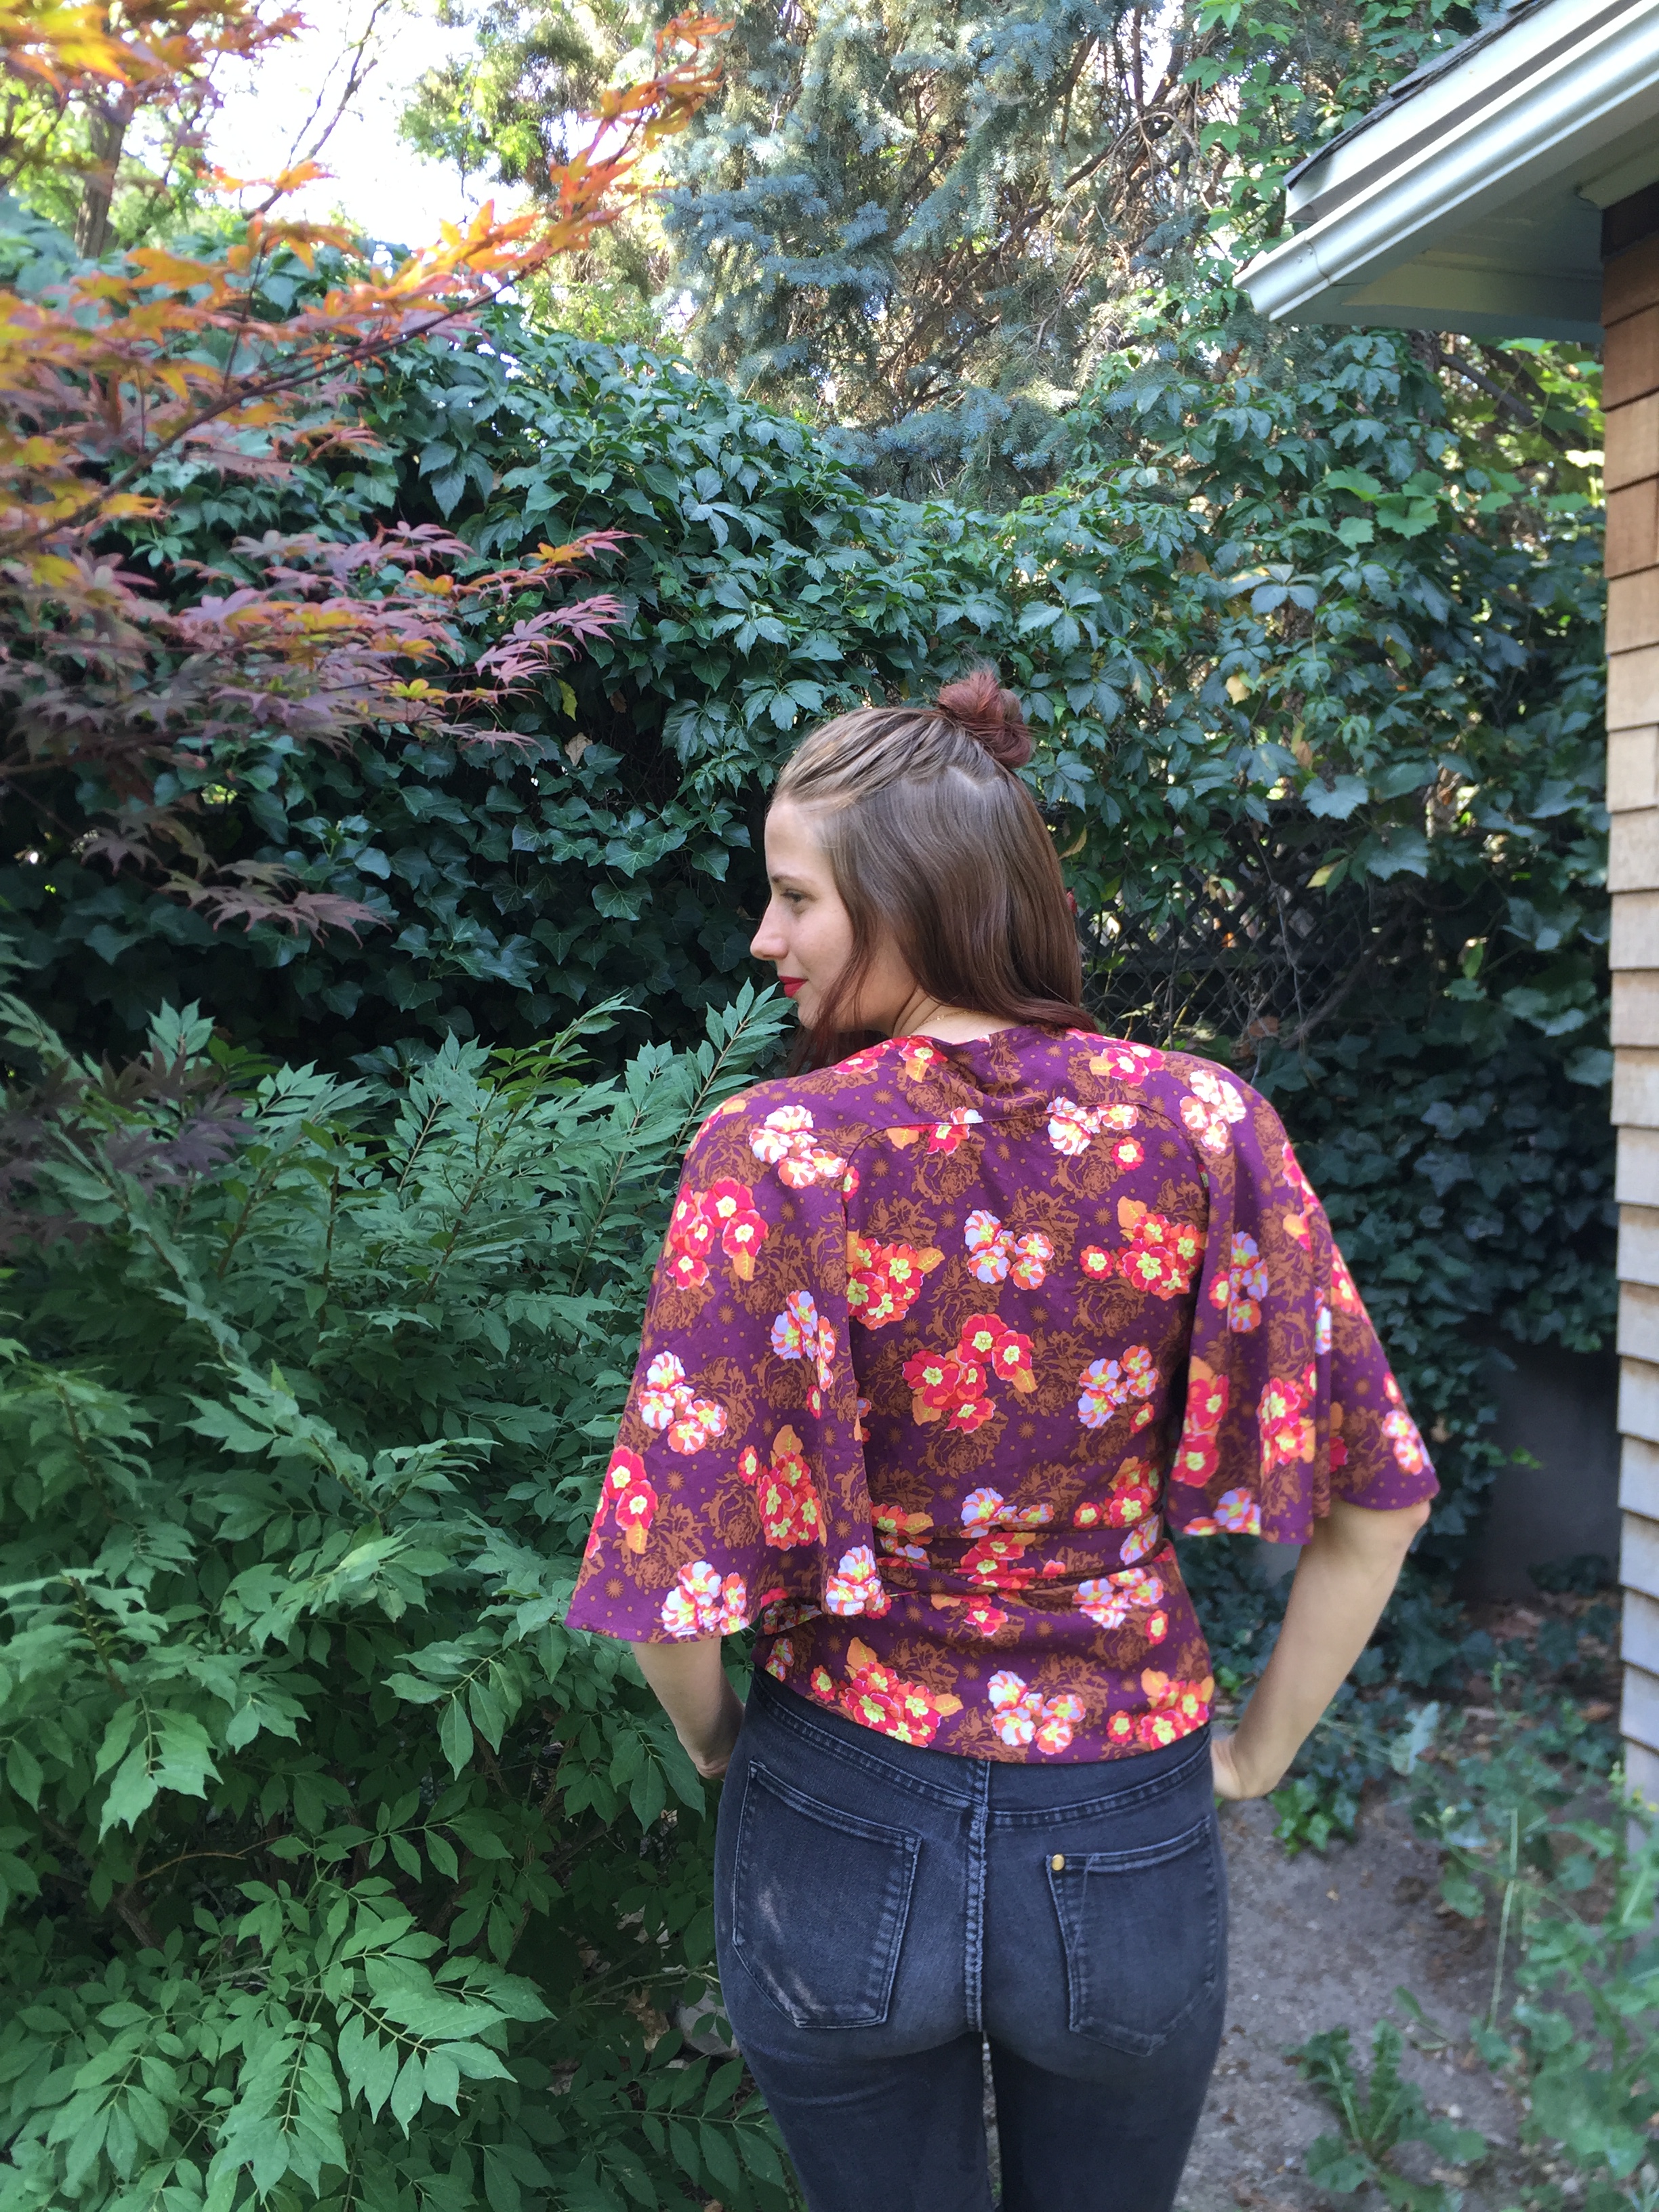
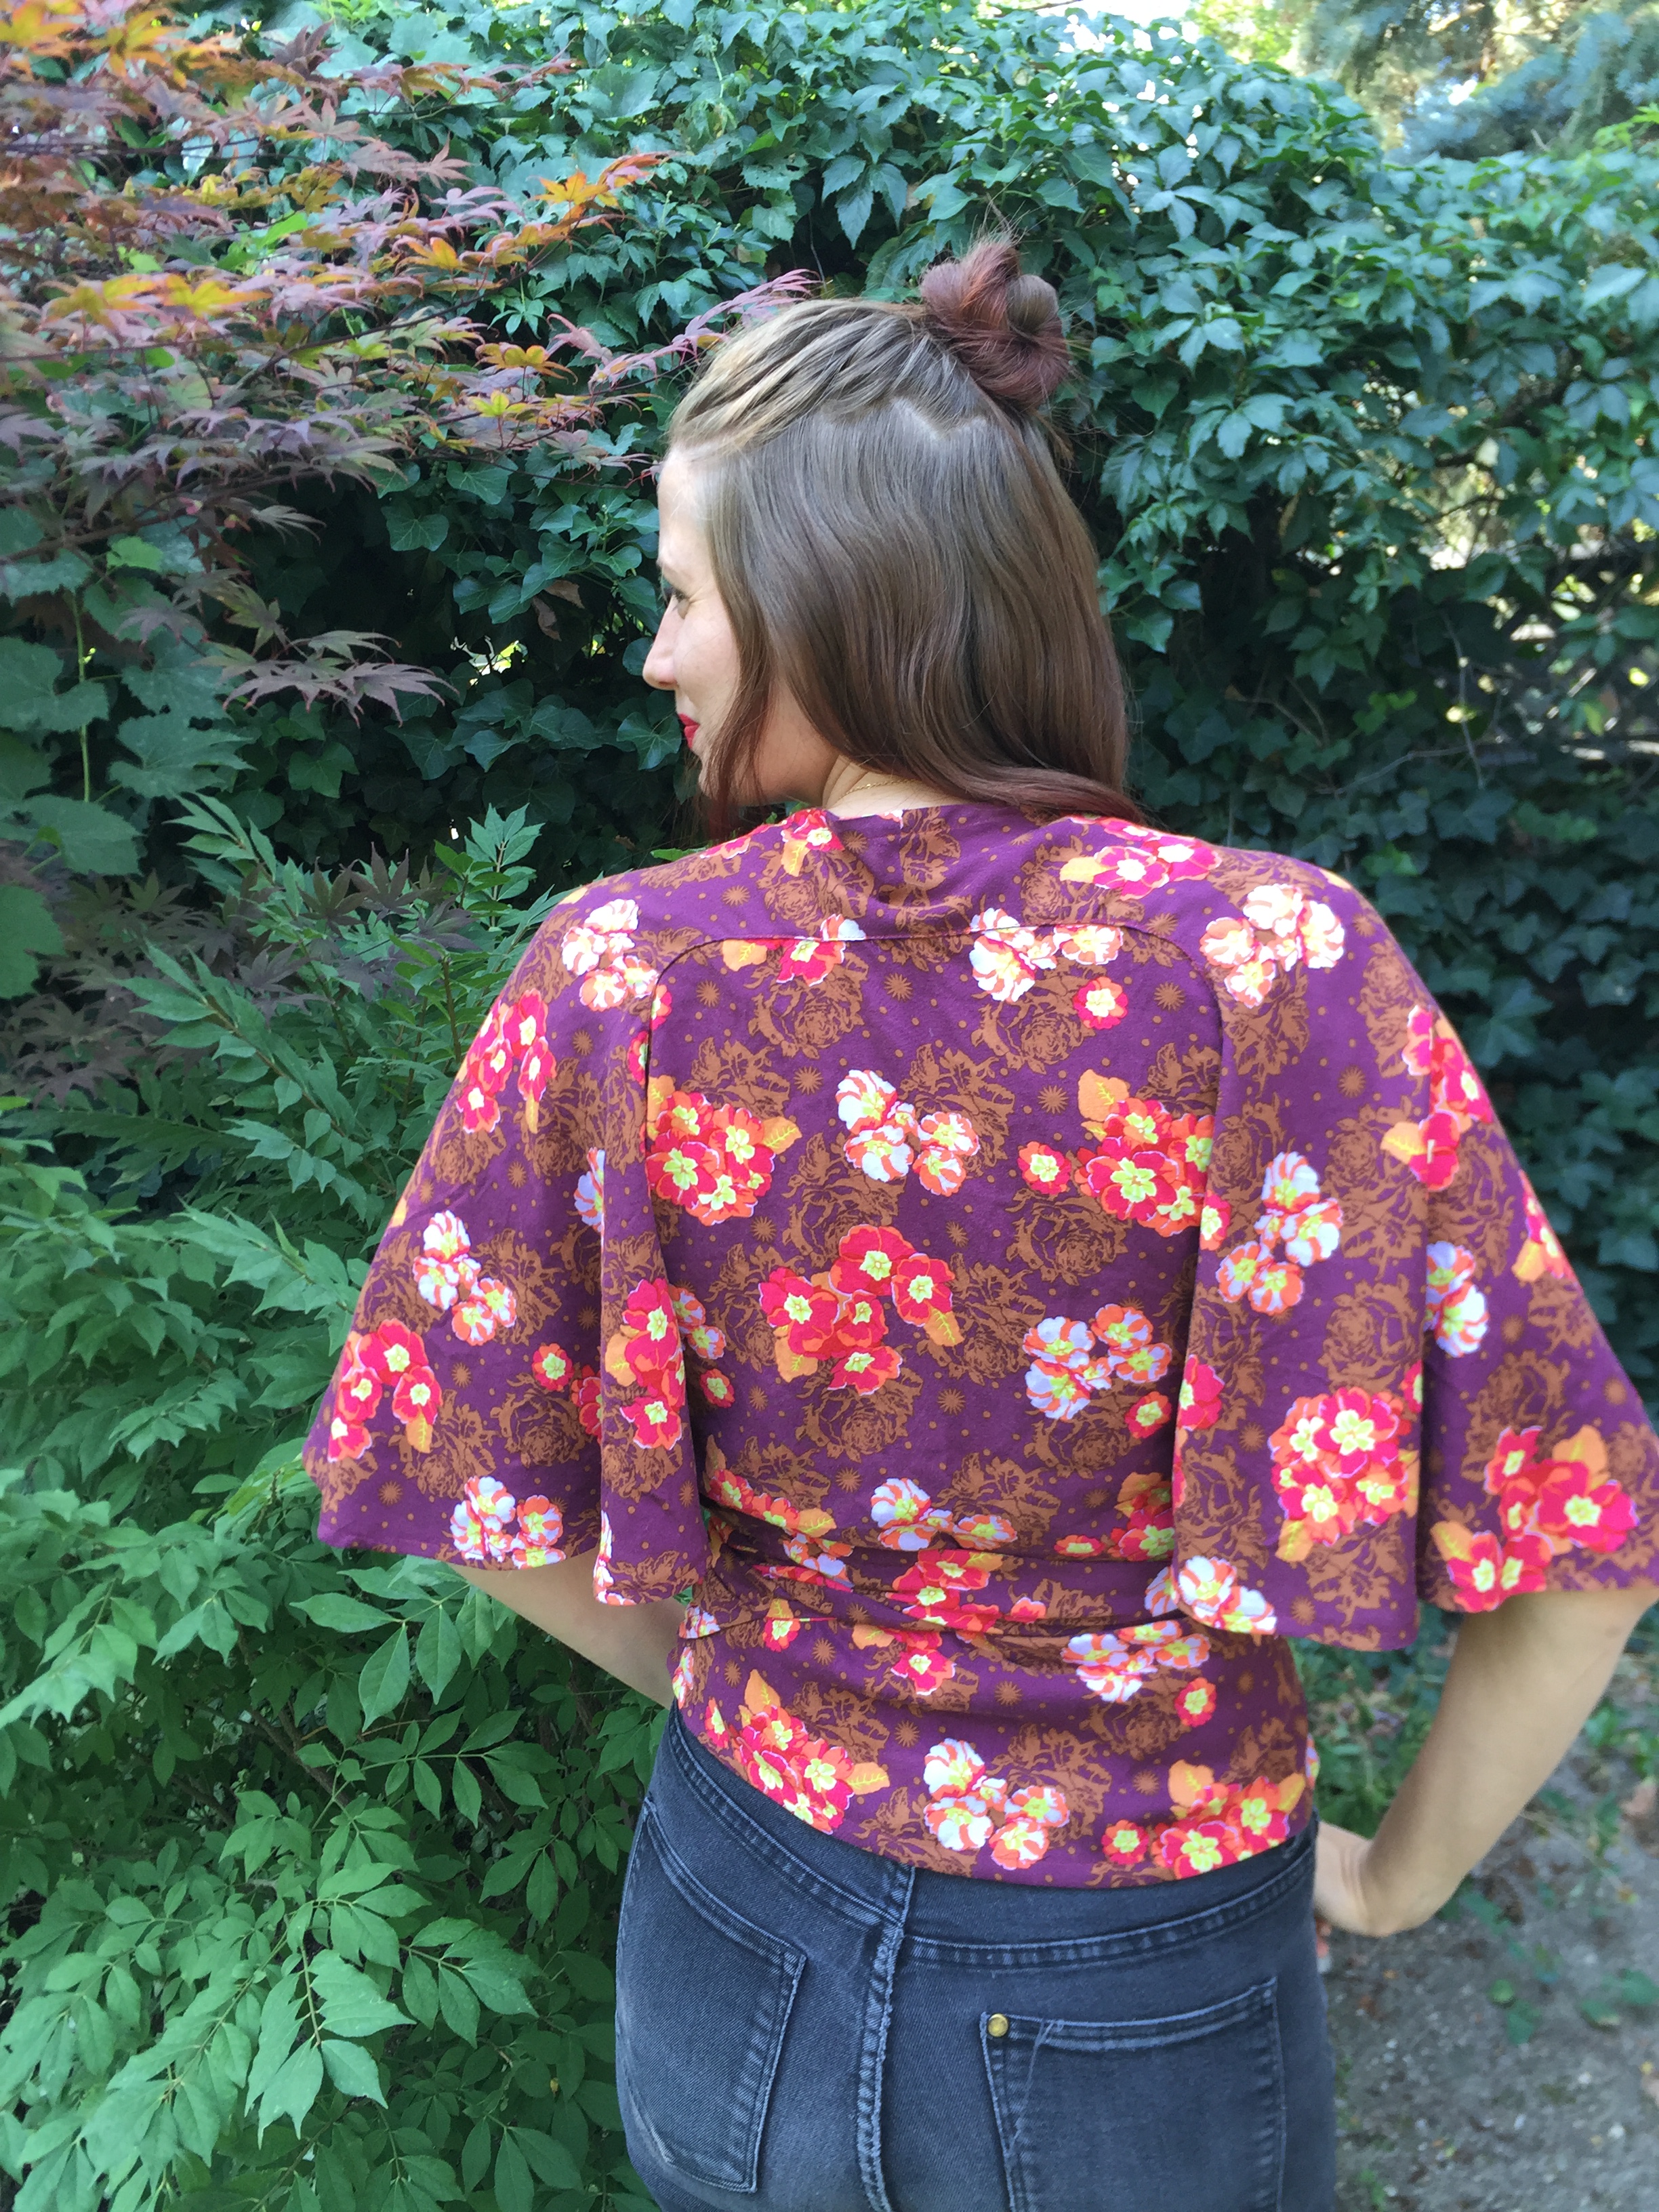
I almost immediately cut out a new blouse front and waited for an opportunity to sew it up. This time I paid careful attention when cutting the neck slit and avoided my earlier mistake. I sewed this up in a time frame of about 3 days. I didn’t keep track of my actual sewing time, but I would estimate this took me somewhere around 3 hours total. It was a quick, easy sew and I love its relaxed, flowy fit. The voluminous raglan sleeves are one of my favorite design features and will make it perfectly breezy for eventual summer wear.

IMG_2260IMG_2258

I’ll leave you with a quick note on sizing. I sewed up a size 4 with the only alte,ration being 1″ added to the sleeve length and blouse length. I’ve sewn several True Bias patterns over the last year ( Lodo Dress, Hudson Pants, and Lander Pants) and have found the sizing on each pattern to be accurate according the measurements included. I’ve only made minimal length alterations to each and would highly recommend Kelly’s patterns.

IMG_2282

Thanks so much for reading!


Itch to Stitch Blog Tour: Hepburn Turtleneck

I’m thrilled today to be part of the Itch to Stitch Love Blog Tour.  Kennis of Itch to Stitch has quite the repertoire of well-drafted patterns under her belt and I’ve enjoyed sewing her patterns in the past (see those here, here, and here).  Recently, Kennis was on vacation and came home to find that her home had been burglarized. Thieves took her computers, machines, and many other things essential to her and her husband’s businesses. This tour came about because the sewing community joined together to support one of our own. Read to the end of the post for information on all the generous sponsors and talented bloggers joining together this week.

When I was invited to join, I searched the website to find inspiration and decide on a project. Upon seeing and buying the Hepburn Turtleneck pattern, I knew I had the perfect fabric/pattern combination.  I purchased this soft striped rayon french terry from Indiesew and it’s been sitting in my stash for months waiting for inspiration to strike.
IMG_2182

IMG_2199

Today I’m sharing my Hepburn Turtleneck styled two different ways. It’s been several years since I owned a fitted turtleneck and I wasn’t quite sure how to style it. The first look is a slightly dressed up classic look that I envision wearing for a night out or even to Thanksgiving dinner. I pulled my hair into a low bun, painted on red lipstick, and paired my new top with these denim Lander Pants (more about those here).

IMG_2183IMG_2193

This first look seemed like a simple and natural styling choice. I love the understated elegance of this outfit, but likely won’t dress up quite this much on a regular basis. My second look is a casual one that is less classic and more trendy. When styling this outfit, I pulled my hair into a top knot, applied minimal makeup, grabbed my Rifle Paper Co. Keds, and pulled out my vintage Levi’s 550 jeans.

IMG_2149IMG_2155

These jeans are my literal mom jeans because I took them from my mom’s closet. I’m pretty picky about jeans and only own one pair besides these. My mom wore these jeans when I was younger, and it seems only natural that I would wear them now that I’m a mother. They’re worn to comfortable perfection and have completely sold me on the mom jeans trend. I wasn’t sure how to feel about this outfit until I put it on and realized that it’s likely to become my winter momiform.

IMG_2173IMG_2175

My Hepburn Turtleneck has been worn at every opportunity since it was finished a few days ago. It’s the perfect fit and weight for winter layering and wearing as a transition piece in late fall and early spring. I’m already envisioning new ways to style this top and keep it in constant rotation. How would you style a fitted turtleneck? Which look do you prefer?

IMG_2195IMG_2166

A quick note on sizing: My bust measurement fell between the size 2 and size 4 with my hip measurement being a size 6. I opted to make a size 4 and grade to a 6 at the hips. I’m 5’10” and added 2″ to the body length and 1.5″ to the arm length.

Read below for more inspiration and instructions on entering a couple of great giveaways. 

Your ITS Love bloggers are:

Monday: Sew Sophie Lynn, Merritts Makes, Sewing with Sarah, Sewing with D

Tuesday: Shalini’s Blog, Auschicksews, Rebel and Malice, Sewing Vortex

Wednesday: Replicate Then Deviate, mahlicadesigns, Sewing with D, The Petite Sewist, kreamino

Thursday: Sewing Curves, Creative Counselor, Sew Mariefleur, Fairies, Bubbles & Co, Sewing by Ti

Friday: Harper+Lu, MeMade, On Wednesdays We Sew, Heather Handmade, Bellevi, and visit by mooglii on IG

The ITS Love Tour sponsors have been so generous in support of Kennis of Itch to Stitch that we’ve been able to put together several prize packages to share with you.
First, you may enter our giveaway to win one of three prize packs:

Prize Pack #1 includes:

5 Itch to Stitch patterns

$25GC to Simply By Ti

$50 Raspberry Creek Gift Card

$50 Bella Sunshine gift card

                  Prize Pack #2 includes:

$50 Knit Pop GC

$25 Designer Stitch GC

$25 Chalk and Notch GC

3 patterns of choice from Coffee And Thread

Prize Pack #3 Includes:

$15 Thread & Grain store credit

$25 Maker Mountain Fabrics GC

3 patterns from Halla Patterns

A Rafflecopter Giveaway

Your second way to win is to share with us your recent Itch to Stitch creations (made between October and November 2017). Add your creations to our Link Up Party before Nov. 20th for a chance to win one of two prize packs.

LinkUp Prize Pack #1 includes:

5 Itch to Stitch patterns

A $40 value PFRE Sly Fox Fabrics.

$25 Maker Mountain Fabrics GC

$50 Love Notions GC

LinkUp Prize Pack #2 includes:

$25 Stylish Fabric GC & sewing box kit

$25 Chalk and Notch GC

5 patterns from Rad Patterns

Pattern of choice from DG Patterns

Click here to view and add your links.

Matching Loungewear: Brilliant Idea or Fashion Blunder?

Way back in August, my son decided that he wanted to be Spongebob for Halloween and requested that I dress up as Squidward. Part of me was rather proud as I was a Spongebob fan back in the day. In the sixth grade I even got a Spongebob alarm clock for Christmas (It sang the “F.U.N.” song to wake me up and was a real treasure. I’m sure my parents were delighted when it finally broke).  I had spent a few weeks puzzling on how to execute my Squidward costume until I was in Denver and Emily made this Blueprints for Sewing Geodesic Sweatshirt. The wheels in my head started turning and I came up with the idea of a matching mint colored loungewear set.

IMG_2048

Emily’s lovely mauve french terry inspired me to check the Raspberry Creek Fabrics Etsy shop where I found this solid dark mint french terry. I knew that I would use the Geodesic pattern because I already owned it and had been planning to make the longer version eventually (see my cropped version here). I decided to purchase the True Bias Hudson Pants pattern (here) and the two together make a perfect pair.

IMG_2096IMG_2085

I sewed up a size C/D with no alterations in the Geodesic and it all came together rather quickly. My background in quilting is what drew me to the fun geometric lines of the Geodesic and I think it made the construction a little easier as well.

When cutting and sewing the Hudsons, I made a size 10 with the only alteration being an added 4″ in length. I only needed to add 3″ to the length, but I prefer my sweats a little extra long. It probably has something to do with the fact that nearly all rtw sweats are a few inches too short for my legs. Perhaps I’m just making up for years of wearing sweats that look like I’m expecting a flood.

IMG_2070IMG_2069

While I’m satisfied with both pieces individually, I’m still not sure that I’m sold on wearing them together. They kind of remind me of the blush velour sweatsuit I owned in middle school and I’m still trying to decide whether or not that’s a good thing. The comfort level of this outfit is unreal. I have been wearing it around the house all day today. I guess the point of loungewear is actual lounging though, so I will certainly wear these together during those times. My biggest question is whether or not I would wear matching loungewear out and about during everyday activities. How do you feel about matching loungewear? Is it something you would wear? How and where would you wear it?

IMG_2107

Thanks for reading! I’ll leave you with a quick iPhone shot of our Halloween costumes so you can see how I incorporated these matching separates into my Squidward costume.

IMG_3964.jpg


Cali Faye Collection Valley Blouse

Last fall, I was working on a children’s clothing collection to show at Utah Fashion Week. I made a children’s unisex top using this gorgeous double gauze by Cotton & Steel and couldn’t help being a bit jealous of the kids who got to wear it. I rarely make clothing in solid colors, but this teal gauze was too good to ignore. I finally settled on the idea of a using the fabric to make myself a Cali Faye Collection Valley Blouse.

IMG_1149

Overall, I really liked the style of the pattern. I did make a few small adjustments to simplify and tailor it to my liking. First, I cut two of the back yoke pieces instead of one as instructed. My reasoning for this was that I wanted the back yoke lined just as the front. When sewing, I sewed the front yoke to the back yoke at the shoulder seams and did the same for the front yoke linings and back yoke lining. I then placed the yoke linings and yoke pieces right sides together and stitched them together along the neckline.

IMG_1135

Second, I omitted the front key hole. The neckline is nice and wide which makes the key hole unnecessary as anything but a design feature. To accomplish this, I simply didn’t cut out the key hole. This allowed me to skip a few steps in the construction and attach the bottom front the same way as instructed for the bottom back.

IMG_1145IMG_1114
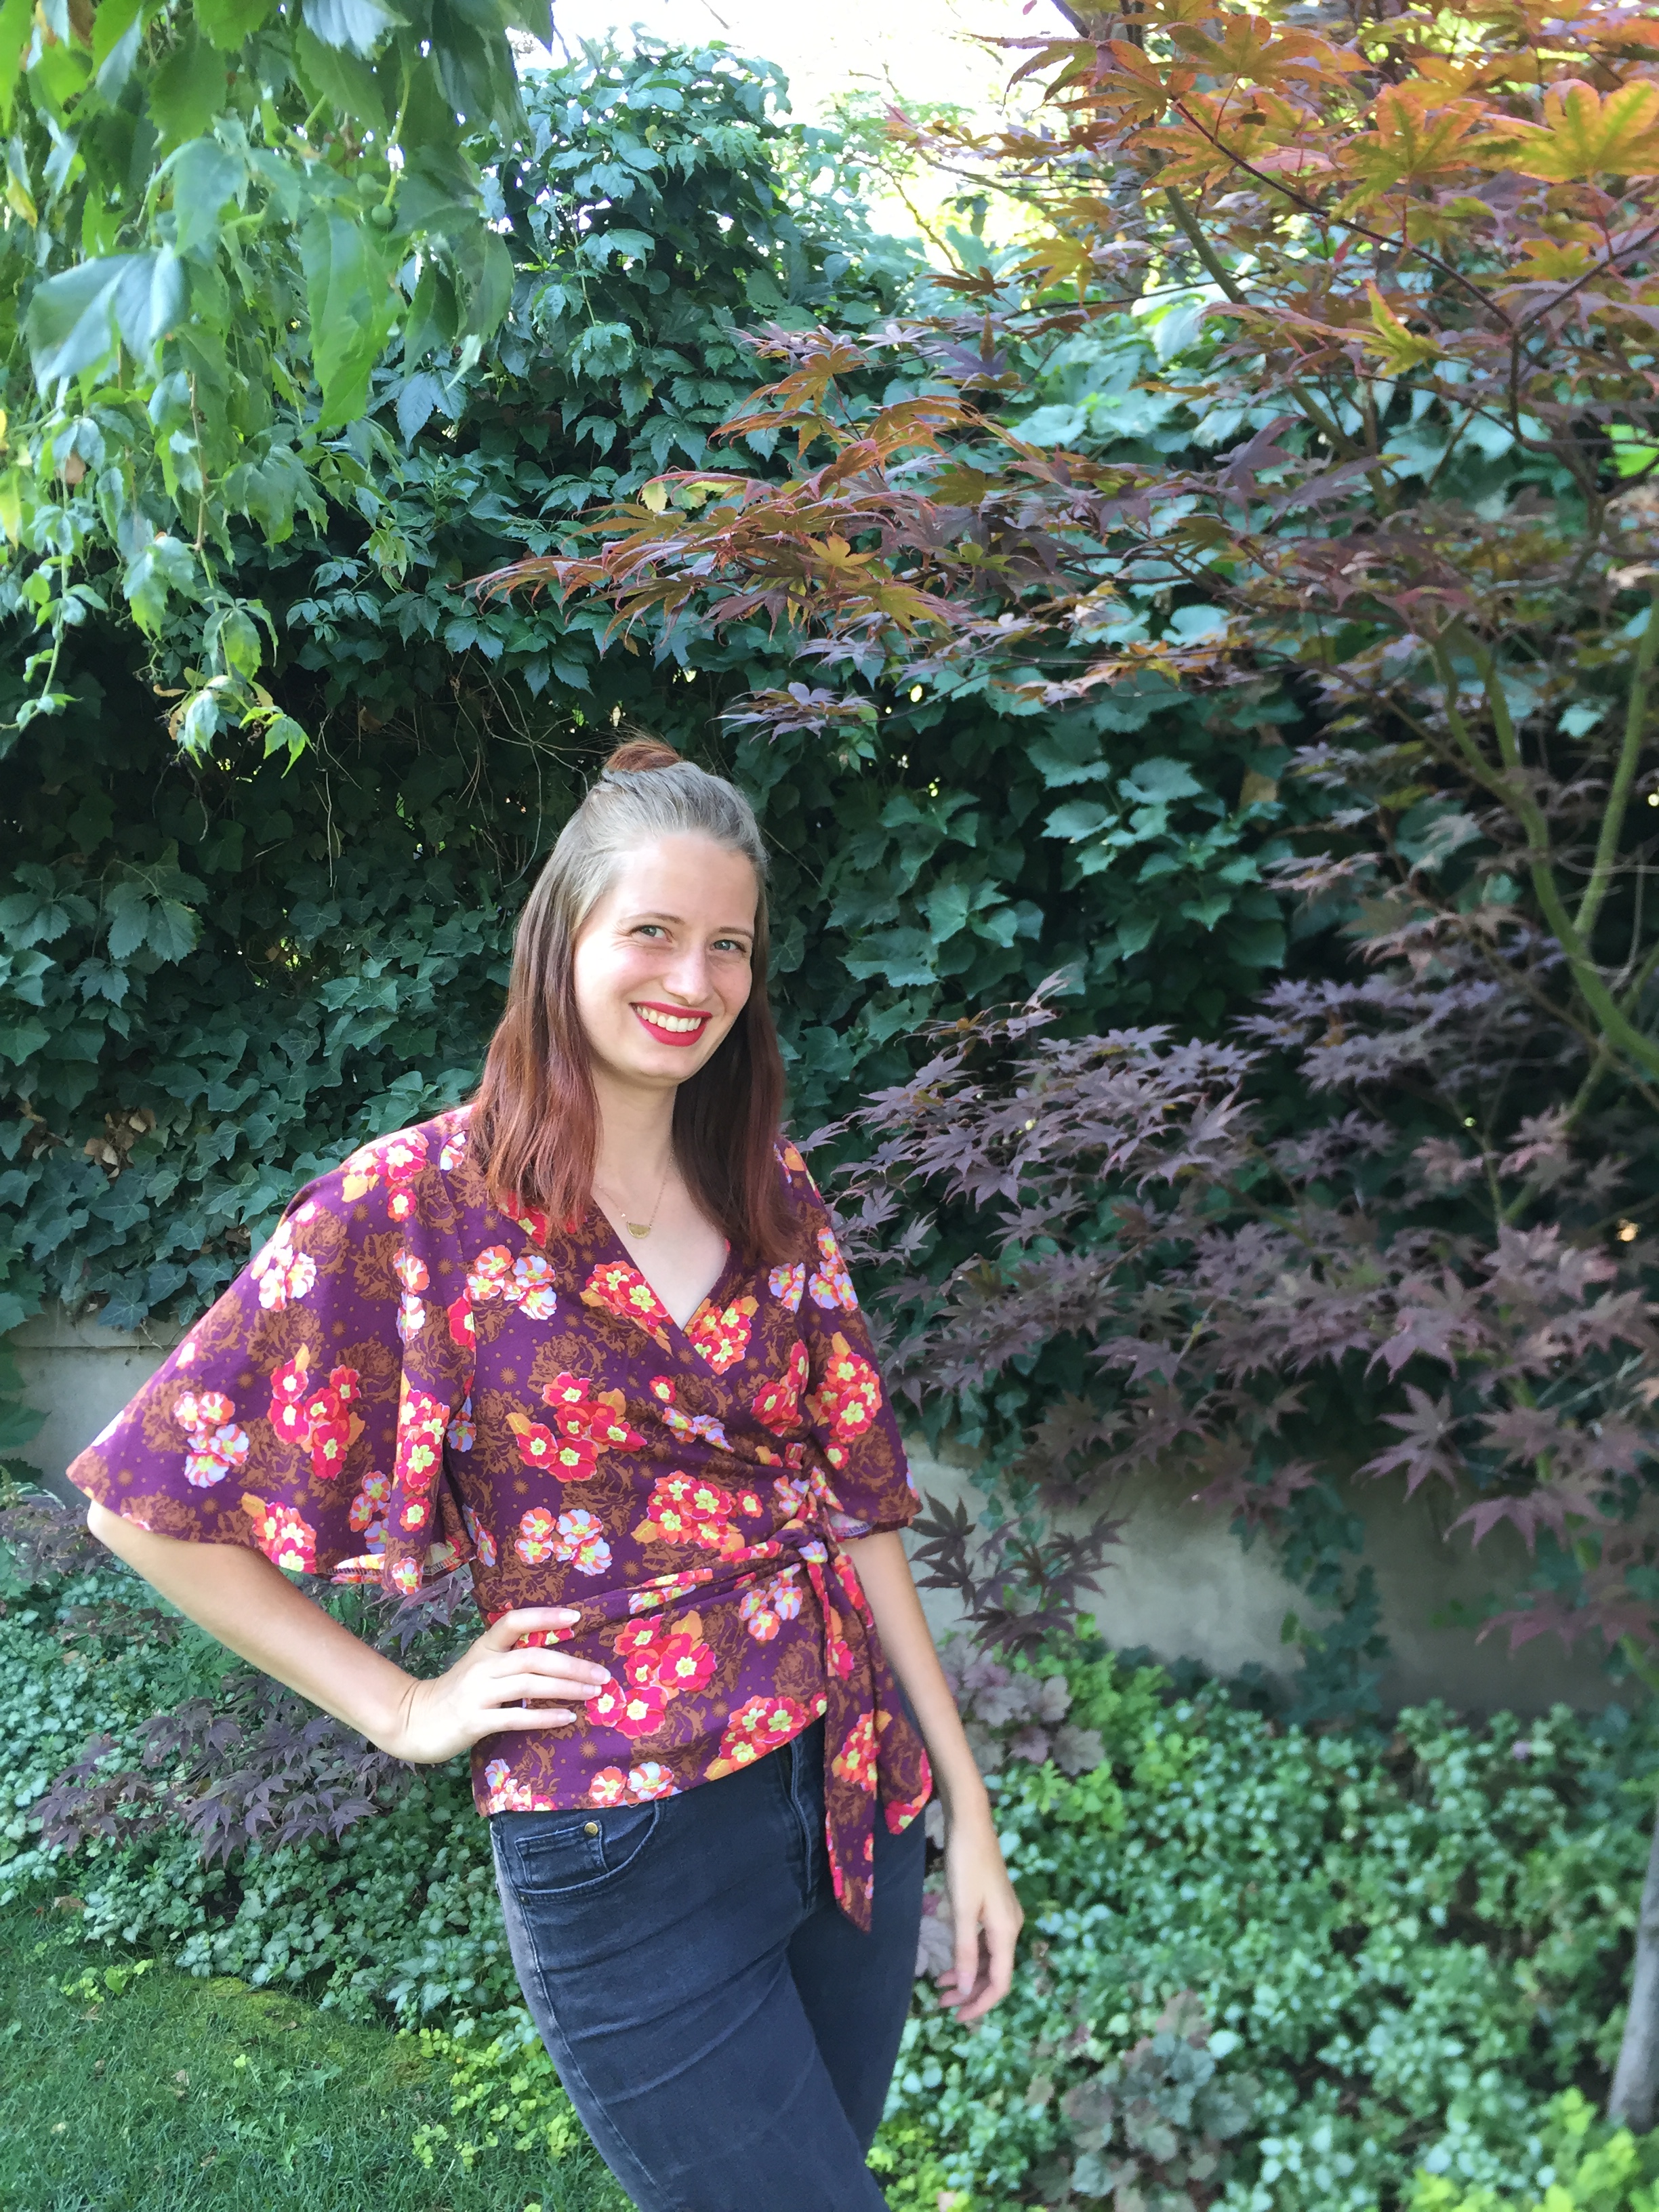
I finished this blouse about a month ago and haven’t had too many chances to wear this top due to the summer heat. This morning I felt a bit of a chill in the air. It made me hopeful that fall is coming soon. I plan to make a nice fitting pair of Ginger Jeans to pair with this top in the cooler months.

IMG_1101

Side Note: Did you notice that embarrassingly large crease in the center front and center back? I cut out the pieces about a month before sewing up my top and left thee pieces folded. My poor old cheap iron couldn’t press out those dang creases. I have washed my top a couple of times since taking these photos and the creases are now gone. Any suggestions for a new fairly inexpensive iron? Do I need to look at something more high end?


A Weekend Retreat and My Driftless Cardigan

image1

Way back in October of last year, I purchased this gray jersey knit from Suppose and cut out my Driftless Cardigan (find the pattern here). I was clearly getting ahead of myself because I had approximately one billion other deadlines at the time. April came around and I thought to myself, “Life has finally slowed down, I can now finish all of those other projects that I started last fall.” I was wrong. My husband ended up applying for and accepting an amazing new job which meant life was about to get crazy again.

image3

Meanwhile, I attended a blogger meet up in SLC and Sara and I came up with the idea for a small weekend sewing retreat. I spent the next few weeks stressing about my upcoming move and finally decided to pull the trigger on planning a retreat. This mama needed a break. Sara and I set a date, I got permission to use the family cabin, and we began counting the days.

image2

The weekend finally arrived and it turned out to be both rejuvenating and productive. My sewing weekend goal was finishing a pile of unfinished projects so that they would no longer clutter my sewing area. Each of my projects were only a few steps away from completion, but had been sitting unfinished for months. Sewing for an entire weekend allowed me to complete a couple of baby quilts, a quilted pillow cover, two simple baby dresses, and my Driftless Cardigan.

IMG_1888

While setting aside time to actually sew this took months; the actual time it took to sew this cardigan was roughly 3 hours. One of those hours was used to hand stitch the neckband. I have loved Grainline Studio patterns for years because of the clean lines and well-executed details. The Driftless Cardigan is a great example of this with its hidden pockets and optional split bottom band. This was completed a month ago and it’s gotten quite a bit of use despite the blazing summer temperatures. It’s perfect for an extra layer at the movie theater (ours is always freezing) or for wearing on chilly evenings.

IMG_1889

A quick note on sizing: I sewed up a size 4 and added 2.5 inches to the length at the lengthen/shorten line. I also added about 1.5 inches to the sleeve length because I like my sleeves extra long.

Special thanks goes to Kim of Sweet Red Poppy for taking these lovely photos.

Blueprints Geodesic and “Letting it Go”

I’ve been admiring the Blueprints for Sewing Geodesic Sweatshirt pattern for quite a while now. I just couldn’t get myself to pull the trigger on buying the PDF version, so I nearly jumped for joy when a printed version was announced. I purchased my pattern the day they arrived at Suppose and couldn’t wait to get started.

IMG_0970

I chose to to make a cropped version for easy layering on cool summer mornings/evenings. The fabric used is an organic cotton interlock made by Cloud 9 fabrics and purchased from Suppose. I would consider it a medium weight which is perfect for this pattern. It’s not quite as bright as the fabrics that I’d usually select, but I’m making a concerted effort to add more neutrals into my wardrobe.

IMG_0980

Let’s talk a bit about my construction process. This sweatshirt was sewn in small snippets of time over the course of about two weeks. The last month has been chaotic to say the least, and I needed a simple stress-free project. When cutting the triangles, I decided to alternate the stripe direction in order to add a bit more interest and eliminate the need for stripe matching.

You may notice that my version has a slightly different layout than the illustration on the pattern cover. Can you spot the difference? Look at this photo and see if you can find it. Found it? My version has the bottom row of triangles upside down. This was a blunder I found only after sewing up the side seams. Whenever I make a sewing mistake, I ask myself three questions: Does this ruin the fit? Can I live with it? Will I still wear it? If the answer to the first question is yes, then I immediately work to remedy the issue. If not, I move on to the other two questions. Often I can justify keeping the mistake if it doesn’t affect the actual fitting of the garment. This was one of  those times.

IMG_0960

Anxiety sometimes tries to get the best of me when I goof up. In order to calm myself, I repeat two phrases:

“Done is Fun”- Alison Faulkner (The Alison Show)

“Let it Go” (Can’t say that one without singing the “Frozen” theme)

These phrases remind me that my errors often aren’t as glaring as they may initially seem. Life is really too short to waste time fixing an error that doesn’t have to be seen as an error. It’s a design decision, right? It is likely that the only people who may notice the error are those who are familiar with the pattern. Overall, I’m happy with the look of my Geodesic and isn’t that what matters in the end?

IMG_0978

These photos were snapped during a short getaway to the cabin. My husband proposed to me in this place and our wedding reception was held on the property. I always leave wishing we could spend just a little more time here. My clothes are a bit wrinkly because my son and I woke up and walked the property while watching the sunrise. By the time my husband was available to help take pictures, I’d spent half the day wearing this outfit. I’ll leave you with a blurry, but lovely self-timer photo snapped during our sunrise walk.

IMG_0942

Itch to Stitch Anza Jumpsuit

Last spring, I purchased a gorgeous Anna Maria fabric fully intending to make a jumpsuit. Life got busy and many of my sewing plans got pushed aside. By the time summer ended, I had given up on finding and making my perfect jumpsuit and used the fabric to make a pattern hack of another Itch to Stitch pattern. You can find that dress here. Luckily, Kennis of Itch to Stitch is not only a talented and detailed pattern designer, she is also some sort of mind-reading wizard who is releasing the perfect jumpsuit pattern just when I needed it. Today I’m thrilled to show you my tester version of the Anza Jumpsuit.

DSC_0323

I was browsing the selection of fabrics at my local fabric store Suppose when Kennis annouced a tester call for the Anza Jumpsuit and dress. I immediately put down the bolts I had been carrying around the store, borrowed a measuring tape, took my exact measurements, and filled out the application form. I purchased 4 yards (only ended up needing 3) of this Lizzy House Printmaking lawn and crossed my fingers that I’d be chosen. The next morning when I received an email inviting me to the tester group, I excitedly told my husband that I’d be making myself a literal birthday suit as a gift to myself (my birthday was coming up the following week). Sometimes, I think that I’m hilarious until I remember that not even my  3 year old laughs at my jokes.

DSC_0408

Let’s bring it back to talking about the jumpsuit and pretend like I didn’t just write several sentences detailing my own lame joke. Now we’re going to talk details and features. Itch to Stitch patterns often include well thought out details that add interest without stealing the show and overwhelming the wearer. The Anza pattern is no exception. It includes cuffed sleeves, pleated chest pockets, drawstring waistband, elastic at the ankles, and pants pockets. Basically, this is the jumpsuit I was preparing to draft for myself until I saw that Itch to Stitch had made a pattern even better than what I’d imagined in my own mind.

DSC_0393DSC_0409DSC_0388

Speaking of details, can we talk about these amazing Arrow Mountain buttons? These are the Minimalist buttons in Arctic Ice. I used the wooden version of the Minimalist buttons on maxi dress also made from Lizzy House lawn that you can find here. In fact, If you’d like to see more of the Arrow Mountain buttons in my handmades, check out my Itch to Stitch Bonn Shirt and Bonn Shirt Turned Maxi Dress posts found here and here. I’ve ordered from Arrow Mountain several times now and only found great quality and excellent customer service.

DSC_0340

A quick note on alterations:

This pattern is drafted for the height of 5’6″ and may some require some lengthening or shortening if you are not  5’6″. Since I am somewhere between 5’9″ and 5’10” I ended up adding 1.5″ to both the bodice and the rise.

One great thing about Itch to Stitch patterns is that Kennis includes pieces for cup sizes A-DD. This means less alteration time and more sewing time. Which is always a good thing. Let’s all make sure to applaud Kennis for taking the extra time and effort to make our lives easier.

DSC_0337

Overall, I am 100% satisified with my Anza Jumpsuit and cannot wait to wear it again and again all summer long. Now, go grab your copy here.

Farrah Top by Chalk and Notch

Today I’m looking forward to showing you my version of the newest release by Gabriela of  Chalk and Notch. The Farrah Pattern has top and dress options for two different views. I opted to make the top in View A. I sewed a straight size 4 with no alterations. This is an intermediate level pattern with sleeve ruffles, underarm gusset, and a mitered split hem. I was unsure about whether or not this style would suit me, but now I’m thrilled to say it’s my new favorite.

DSC_0276

Let’s talk fabric for a minute. I selected a cotton lawn by Carolyn Friedlander. I’ve been anxiously awaiting the release of these lawns since they were announced last fall. I bought it almost immediately once it Arrived at Suppose. Lawn has a lightweight, almost silky hand. It doesn’t have the same graceful drape as a rayon, but it is much easier to sew. Lawn presses beautifully and I love the way it exaggerates the ruffles in this design.

DSC_0291

DSC_0301

The fact that this top slips over the head and has no closures, doesn’t make it any less interesting. It’s a great skill builder with the ruffles, gusset, and mitered hem. My favorite is the mitered high-low hem. I’ve only sewn a mitered hem once before this top, but I love it. It makes the finish look and feel professional. Gabriela’s clear pictures and tutorials make trying new techniques less intimidating and more satisfactory.

DSC_0285

The pattern releases exclusively on UpCraft Club today and will be available through Chalk and Notch later this week. Be sure to check out the #farrahpattern on Instagram for more inspiration and to see more of the fantastic tester versions.

DSC_0289

Toaster Sweater #1


November and December were hectic months in the Merritts household. My husband and I both had exciting interviews, he graduated college and started his career, my baby sister got married, and I finished up a decent amount of commission sewing work. I got far too little sleep and most of those months are a bit of a blur, but I’m proud of what we were able to accomplish and the lessons we learned in those challenging months. During especially busy weeks/months, I find that my sanity is restored with a bit of “just for fun” sewing. This Toaster Sweater #1 by Sew House Seven was one of my sanity saver projects in December.

20161216_092742

One morning I had just dropped off the last of my commission quilts at the quilter and was waiting for fabric to arrive for my next assignment. My husband and I were going on our first date in months that evening and I wanted something new to wear. I remembered that I had already traced and cut the pieces for a Toaster Sweater and assembly was the last step. Sewing it together took me about two hours including the time taken to feed my 3 year old and assist with potty breaks. The assembly could probably be finished in about an hour with no distractions.

20161216_092750

The fabric I used for my sweater is an organic cotton fleece made by Birch Fabrics. It feels even cozier than my favorite over sized sweatshirt, but looks a bit more stylish. After completion, I tried on my Toaster Sweater and basically didn’t take it off  for the next three days. It kept me warm in my freezing apartment, cozy while waiting for a train in a snowstorm, generally feeling much less sloppy when running errands. I honestly just feel like I need to make several more of the exact same sweater so that I can use it as my winter uniform. I always struggle with feeling stylish in winter because I only want to wear cozy sweats and my husband’s sweatshirts in the freezing weather. A Toaster Sweater uniform just may be the solution to my dilemma. Does anyone else find themselves wearing a “winter uniform?”

20161216_092746

Just a couple quick notes on sizing and alterations:

-I sewed up a size small and added 3 inches to the bodice length. When making this again, I would probably add another inch to the bodice to make a total of 4 inches added. The current length is great with my high waist jeans, but just a bit short for my lower rise jeans.

– I added 1.5 inches to the sleeve length and am very happy with the finished length because I like my sleeves extra long.

20161216_092752

img_8718


1930’s Butterfly Blouse

In July, I fell into a bit of a sewing rut. I felt like I’d been sewing the same few projects and needed something new and exciting. I convinced my husband to take a day trip to Provo, UT so that I could visit Harmony. Harmony turned out to be the perfect place to regain my sew-jo.
image

After spending at least 45 minutes admiring everything in store, I finally settled on this gorgeous Pretty Potent rayon by Anna Maria Horner and the 1930’s Butterfly Blouse pattern by Decades of Style. Until this top, I’d never actually made a wrap style blouse and thought it would be an unexpected addition to my wardrobe full of Scout Tees, sweatshirts, and button-ups. Upon returning home, I immediately pre-washed my fabric and started cutting.

image

Tracing and cutting went pretty quickly as there are only 4 different pattern pieces (left and right front bodice pieces are mirror images). Sewing was not terribly difficult, but did take a little concentration because of the rayon’s drape and the top-stitching technique used to attach the sleeve pieces to the bodice. I’ve top-stitched plenty of times, but using top-stitching as a way to attach pieces was new to me. This technique combined with the shape of the pattern creating these gorgeous style lines you see on the back. The curves took a bit of patience, but the final product was worth it.

image

image

Now that I’ve had this blouse for nearly four months, I can say that it’s become somewhat of a staple. I find myself reaching for it every time I want to feel especially feminine or pretty. The wrap neckline is just low enough to feel a bit sexy without being overly revealing which also makes it very practical for most occasions. It’s been worn for multiple date nights and it’s even comfortable enough to wear while chasing my son at the park.

image

I’m hoping one day I’ll find time to hack this pattern into a dress because it’s basically begging to be one. Don’t you think?