Highlands Wrap Dress by Allie Olson

Last weekend, I was finally able to finish this maxi length Highlands Wrap Dress. I originally intended to finish it back in June but moving and life in general just got in the way. Way back in late winter/early spring, I had the opportunity to test this pattern for Allie. I ended up making a midi length version using gray rayon chambray. I loved the fit of the dress, but the fabric just wasn’t my favorite. I knew I needed to make a second wrap dress in fabric more suited to my style (aka: more color/print).

IMG_1701

IMG_1757

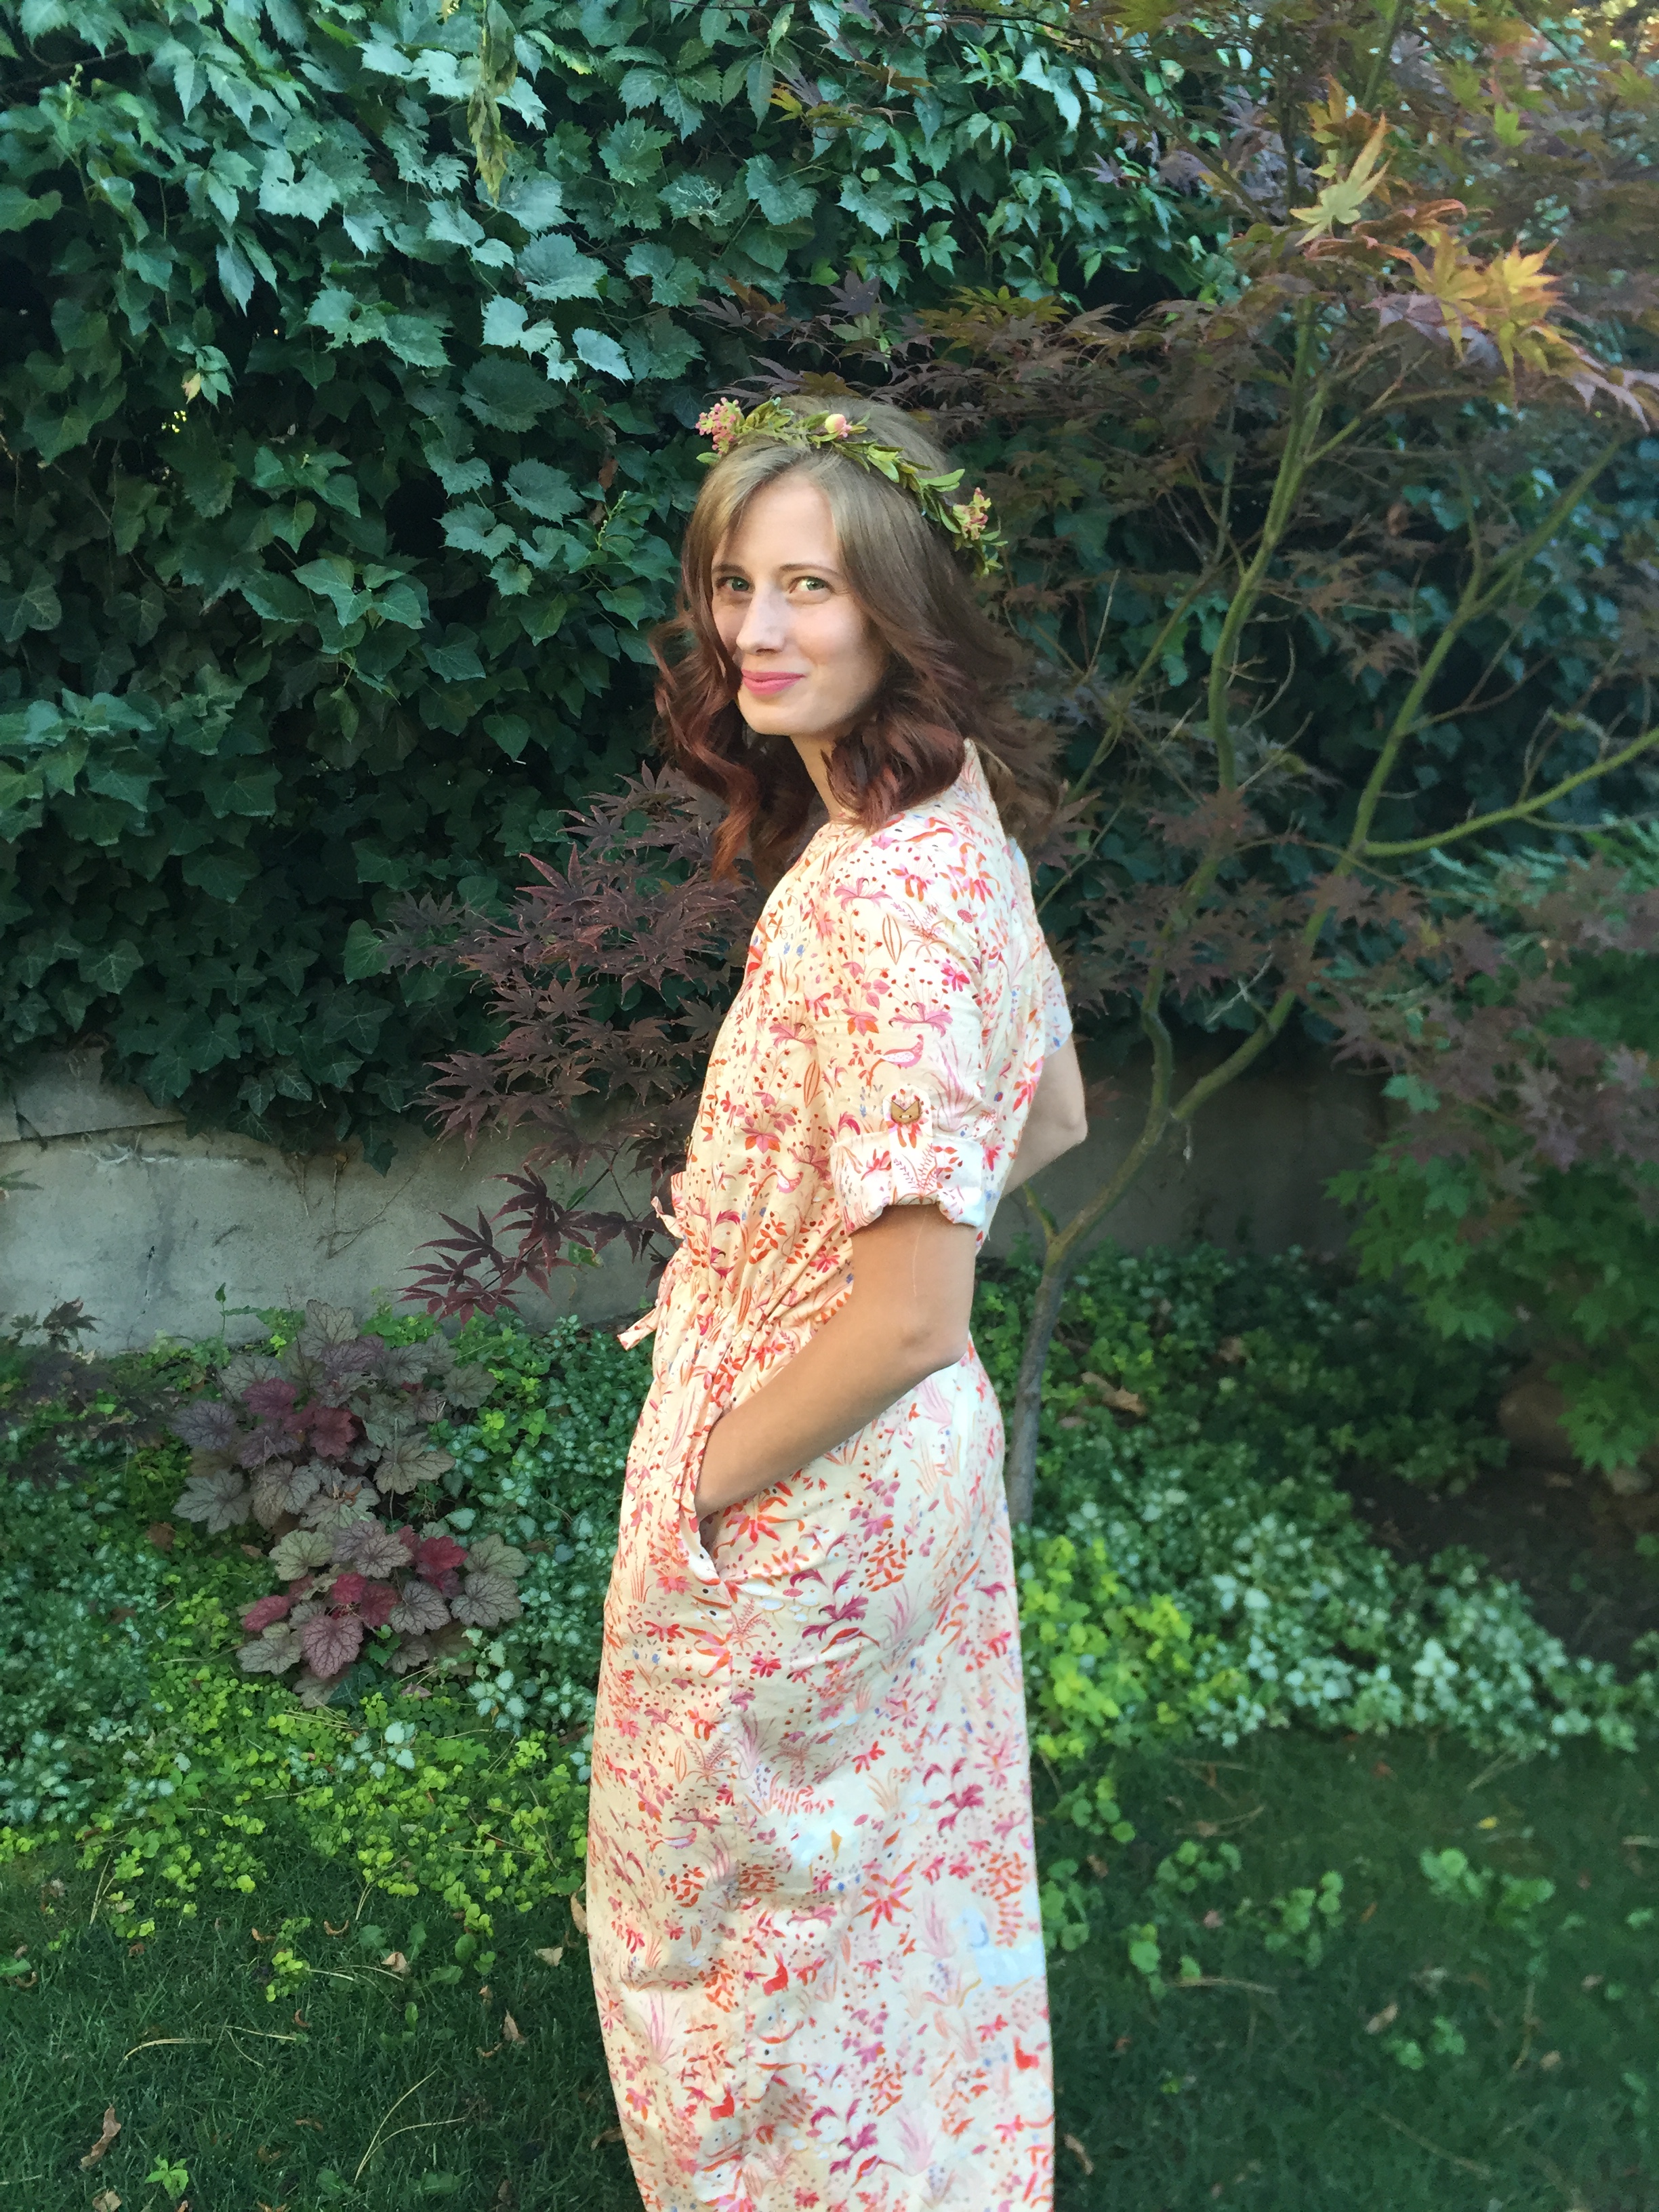
I’ve literally been in love with this Anna Maria Horner rayon challis print for years. This fabric was originally printed back in 2014 so I thought I’d missed my chance to buy more until a bolt showed up at Suppose. I immediately knew it was meant for a Highlands Wrap Dress and purchased a few yards.

IMG_1714IMG_1740

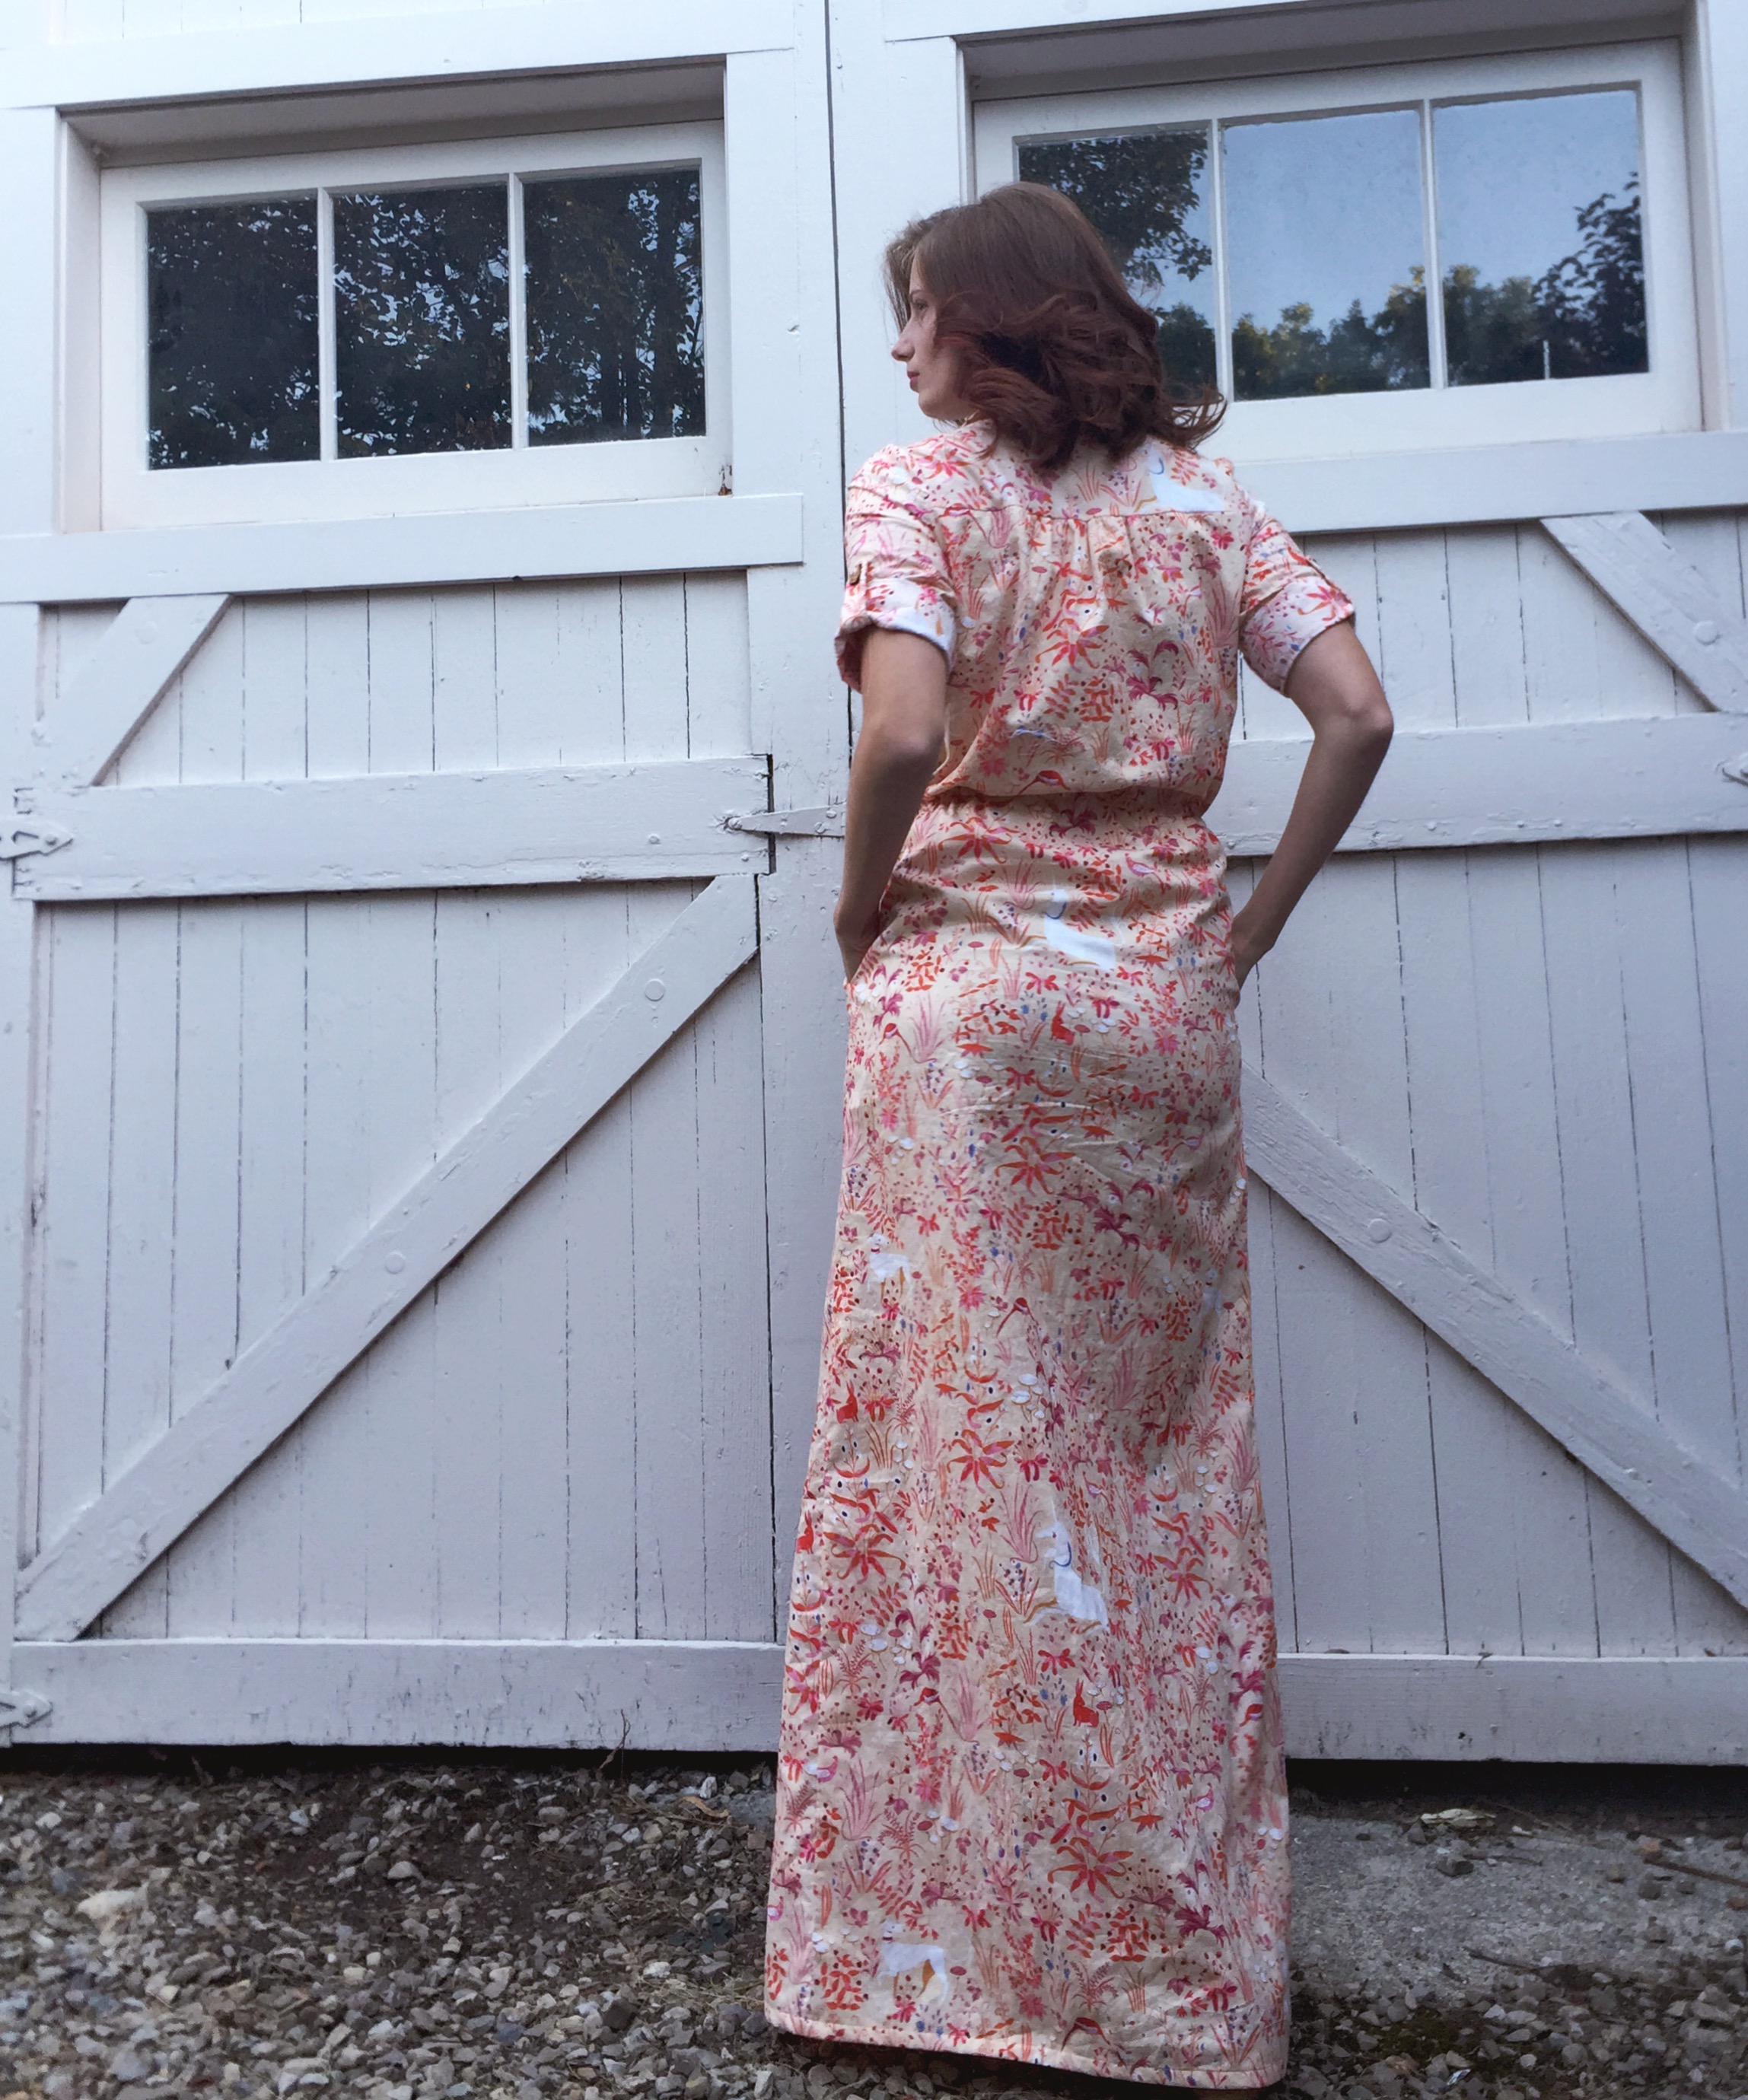
When tracing the pattern I selected a size 4 and graded to a 6 in the hips. I added a total of 4 inches to the length to accommodate my height (2″ at the hips and 2″ below the slit). In retrospect, I probably should’ve added all 4 of those inches above the slit because it is cut just a bit high for my personal preference. I plan to unpick a bit of the side slits and resew them to hit right above my knee. The high slits are a lovely design feature, just not quite as practical for my lifestyle.

IMG_1761IMG_1753

Back when I made my original test version, I didn’t add interfacing to the front facings. That was a terrible mistake and made top-stitching the facings a real pain in the you know what. This time, I decided to make a better choice and chose to interface them. I chose a tricot knit interfacing and it worked like a dream. Stitching the facings in place was about 100 times easier and I totally kicked myself for not using it on my first Highlands. I was originally introduced to knit interfacing when sewing a pattern by Gabriela of Chalk and Notch. She recommends it in many of her patterns, and that chick really knows her stuff. I know it’s going to be good if it’s recommended by Gabriela.

IMG_1729

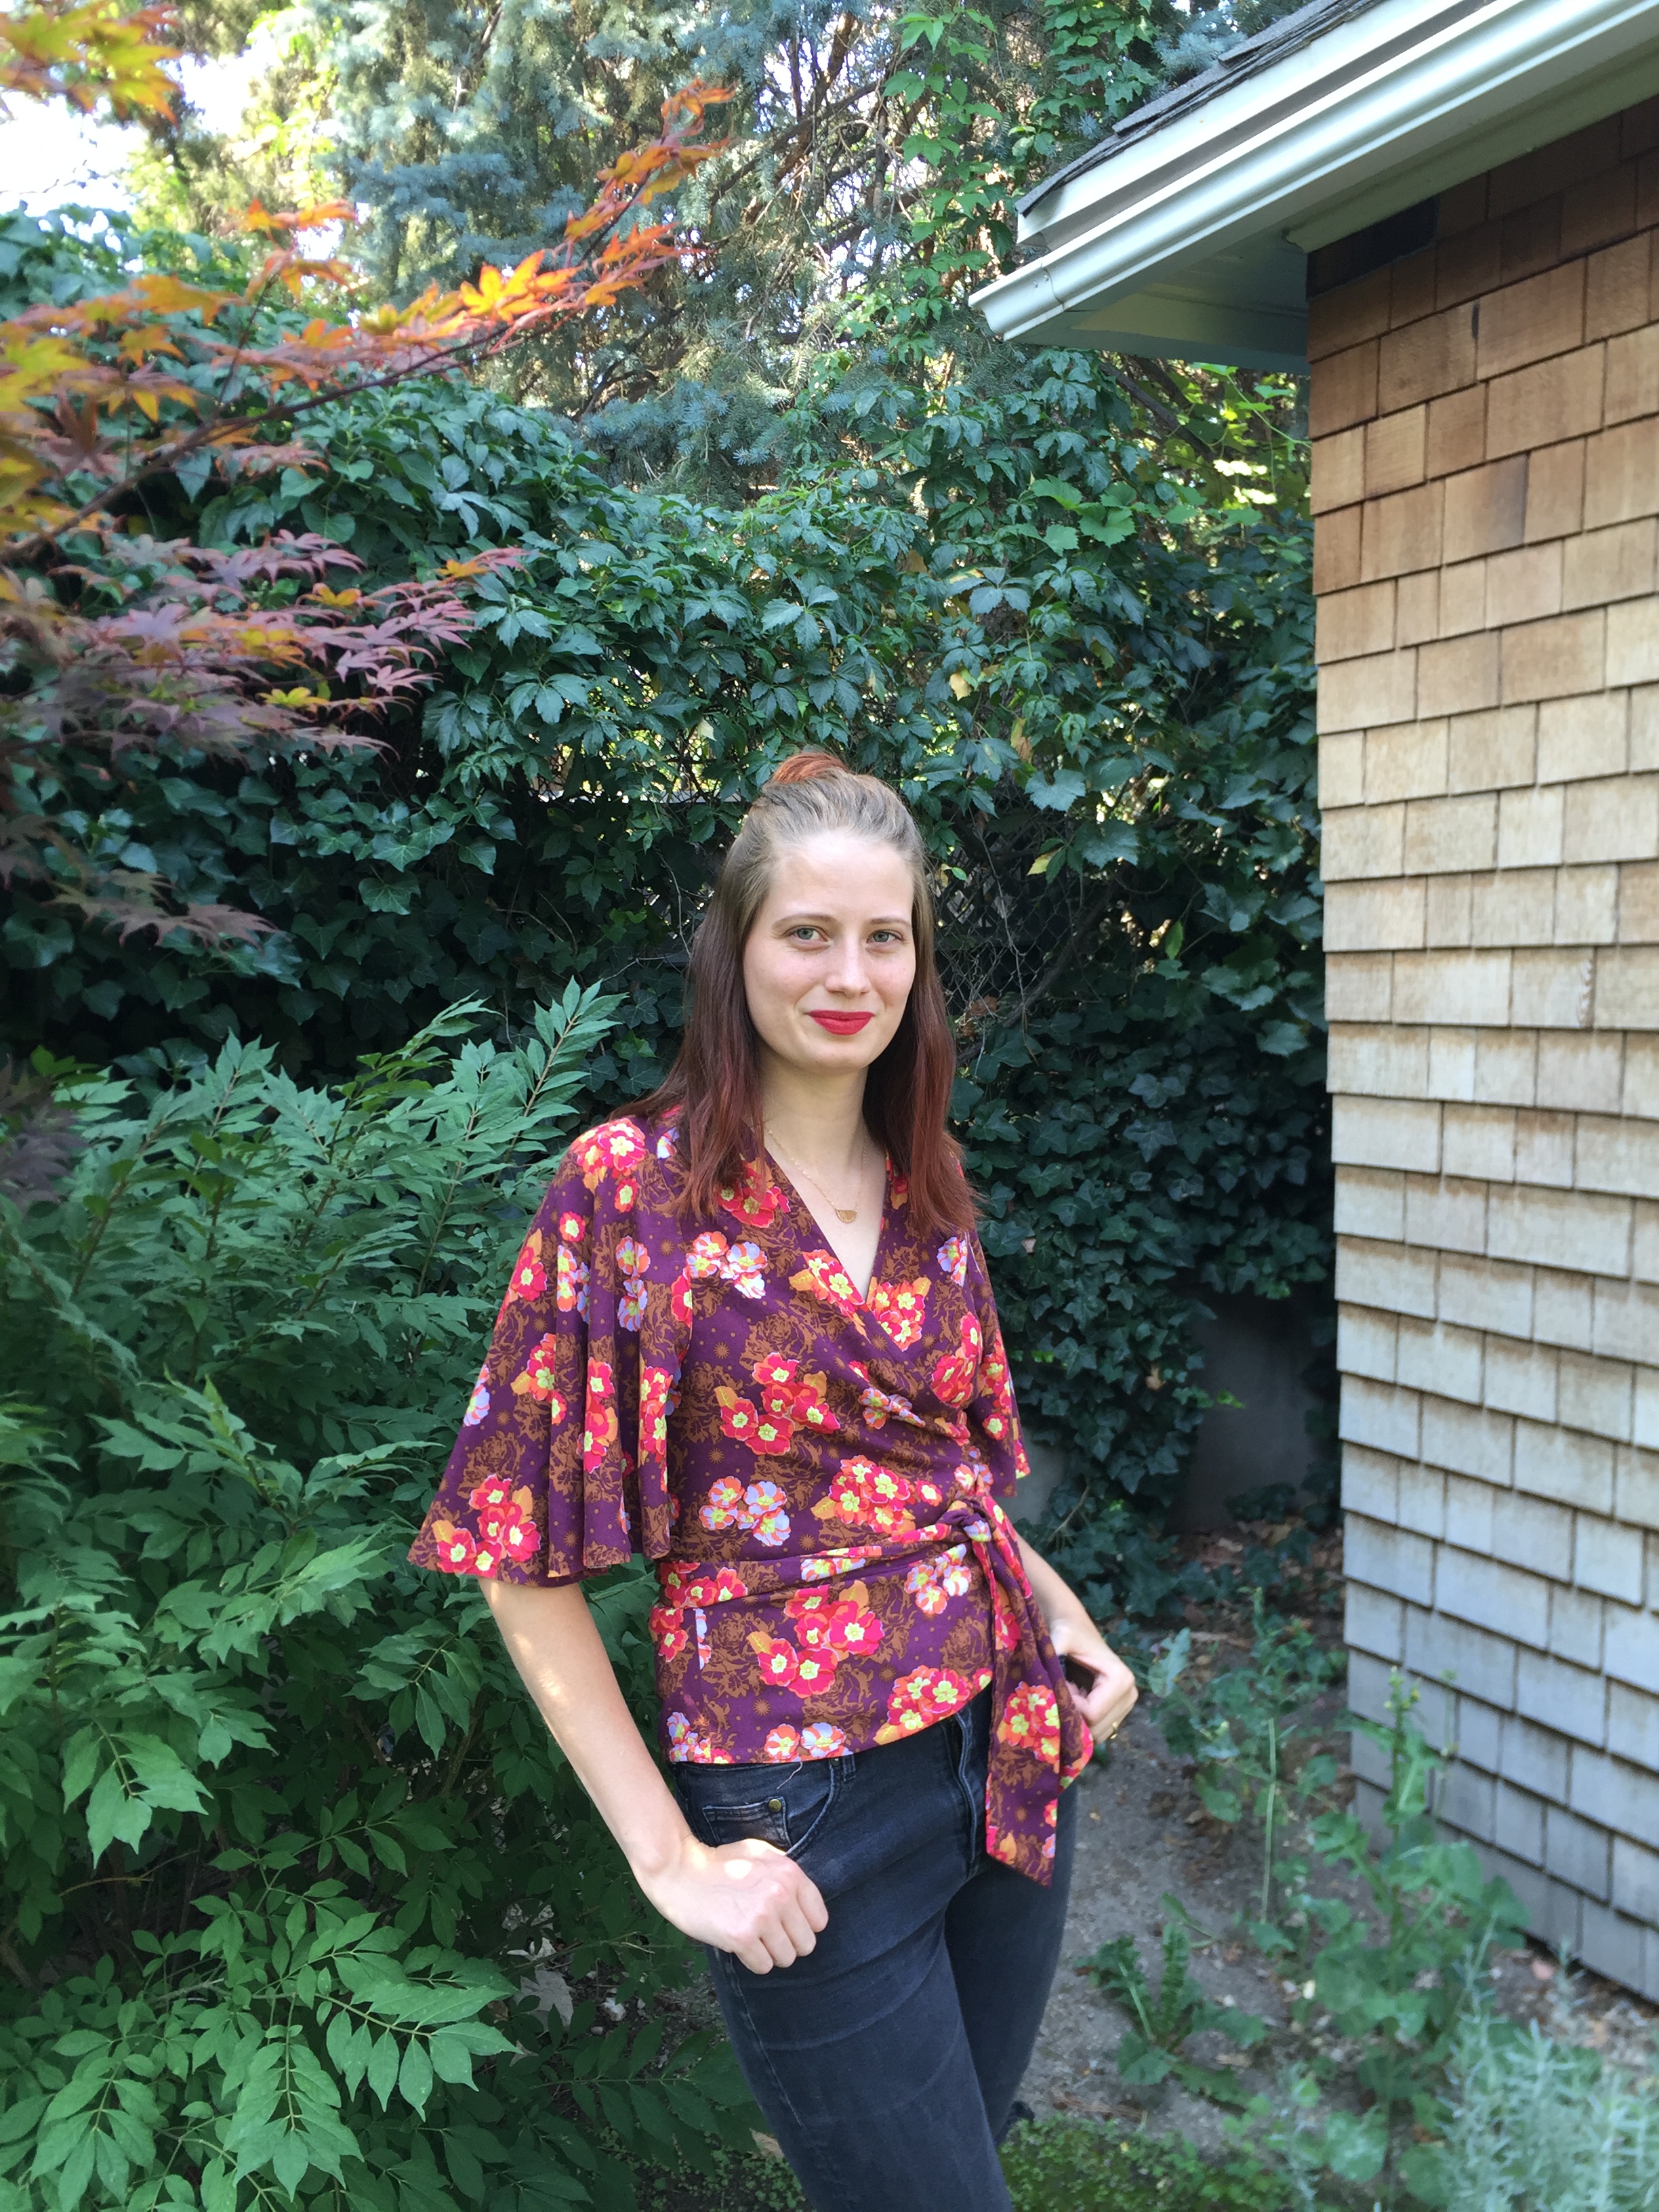
Saying that I’m happy with this dress would be an understatement. There’s just something about a flowy, floral print dress that makes me feel put together and pretty. Now excuse me while I go experiment with ways to style this dress for fall and winter. It’s far too lovely to wear only during the summer months.

Note: You might notice that the darts are looking a bit high in these photos. I noticed this when I got home and started editing these. I made the mistake of wearing a different bra when fitting the dress than I was wearing the day I took these photos. Until I started sewing my own clothing, I never realized how much wearing the right undergarments matters (it matters a lot). Now that I’ve made this mistake, I’ll hopefully remember which bra to wear when taking photos in the future.

Noodlehead Range Backpack or My Weekend at the Church of Sewing

Last weekend I had the pleasure of traveling to Denver to spend the weekend with some amazing sewing friends old and new. Gabriela of Chalk and Notch found this beautiful AirBnB and I was lucky enough to stay there with Sara of The Sara Project, Michelle of SewJourners, Leslie of Threadbear Garments, Emily of Enjoyful Makes, my project twin Fleurine of Sew MarieFleur and honorary house guest Adrianna of Hey June Handmade. We also got to spend time hanging out with Kelli of True Bias, Erin of SewBon, and Allie of IndieSew. Basically, I spent last weekend feeling like a fan girl hanging out with her sewing idols.
DSC_8801

DSC_8780

Ok, sorry, I’ll stop name dropping and “fan girling” now and get back to talking about sewing. Several of the girls decided to sew the Range Backpack during the weekend and I hopped on the bandwagon because it seemed like the perfect retreat project. Besides the thread and notions listed on the pattern, I only needed a rotary cutter, mat, ruler, and my sewing machine to complete the project. The mats and rulers were thankfully provided by local ladies so we didn’t have to figure out how to get those on a plane. When we arrived in Denver, Fleurine and I realized that we’d both chosen the same Rifle Paper Co. canvas for our exteriors. I used an Essex Linen for my straps, lining, and contrast bottom, while Fleurine used a lovely waxed canvas for the contrast bottom and straps. Once we realized that our bags would match, we decided we had to finish our backpacks in order to take photos together.

DSC_8733

DSC_8818

In the beginning, we only had one ruler and mat, so I woke up early on Friday morning to cut out my bag. There are plenty of pieces, but cutting went pretty quick and I was able to cut out everything in about an hour. This included the time it took to soak in the beauty of the morning in our light filled AirBnB.

I’ve sewn a handful of bags in my years of sewing and always wonder why I don’t sew them more often. They’re a great middle ground for quilters and apparel sewists alike. They provide the quick satisfaction of an apparel project with the simpler seaming of a beginner to intermediate quilt. They’re also great for building skills like zipper insertion without the stress of garment fitting. If you’re looking to learn some bag making skills, I would highly recommend Noodlehead patterns because Anna’s instructions are clear and detailed.

DSC_8878

DSC_8855

Once I began sewing the Range Backpack, it came together fairly quickly. I can’t give you an exact estimate of time, because I sewed intermittently throughout the day and evening on Friday. Sewing time was broken up by outings for brunch, a visit to Fancy Tiger Crafts, and just general chatting. I finished the exterior of my backpack on Friday and completed and inserted the lining on Saturday morning.

DSC_8789

DSC_8747

I’ll leave you with a quick note about my fabric and notions. My fabric was purchased from (no surprise here) Suppose. I ordered the Range Backpack hardware kit from Noodlehead. My zipper was purchased from Zipit on Etsy. The zippers had to be purchased in a pack of five (only $5 for all five), which turned out to be advantageous when both Fleurine and Adrianna, were in need of zippers to match their bags and hardware.

DSC_8875

Thanks for reading! If you haven’t already, be sure to check out Fleurine’s post about our bags here. For more Range Backpack inspiration check out Adrianna’s leather version (here) or Leslie’s made from Pendleton Wool (here)


A Dress for Date Night: Lodo Dress by True Bias

IMG_1566

I fell in love with the Lodo Dress almost immediately after it was introduced (here) in April. I quickly purchased the pattern and ordered some fabric to make my first Lodo Dress. You can check out my first one here. I’ve gotten so much wear out of that first Lodo Dress and knew I needed another. My first dress is a bit more casual so I wanted my next one to look a bit dressier. I selected this red scuba knit from Indie Sew after seeing Allie’s blue version. The solid red was a bit of a bold choice, but I think it was the right one.

IMG_1559

My husband and I got the rare opportunity to go out on a date last week and I had him snap a few photos in my parents’ backyard before we left. Never thought I’d love sage brush, but I’ve started to see the beauty in it after living in Utah most of my life. The promise of a date was all the motivation needed for me to get working on my Lodo Dress. Our date was on Wednesday so naturally, I started cutting out my project on Monday. Tuesday night I sewed a few hours after bedtime and was able to complete the dress. There’s just something satisfying about finishing a project that is both quick and stylish. It never gets old and I see another Lodo or two in my future.

IMG_1543

This was my first time working with scuba and I was a bit nervous to use a new fabric. It was surprisingly easy. The only difficulty I had was when sewing the back slit. The fabric shifted a bit more than expected, so my stitching isn’t quite as perfect as I’d like. It is, however, such a small imperfection that I decided it was not worth the time it would take to fix it. I made one small modification to the instructions and sewed bar tacks at the top of the back slit and at the underarms. Hoping that the bar tacks will further secure the seams in areas where they’ll experience the most strain. So far, so good.

IMG_1529

My red scuba Lodo Dress turned out to be the perfect date night dress. It’s stylish enough for a night out, but simple enough to wear to the local dive. This dress feels like wearing a light, soft sponge. It’s also got plenty of room for indulging in the large amounts of food I  may or may not consume. What I’m trying to tell you is that it checks all boxes for an essential date night dress. Do you have anything specific you love wearing for date night? What do you require in clothing for a night out?

IMG_1541

Just a quick note on sizing: My dress is a size 2 graded to a 4 in the hips. I made the midi length and added just 1″ to the length.

IMG_1540

Named Clothing Ronja Dungarees

I’ve loved overalls for as long as I can remember. In fact, last time I was at my parents’ house, I looked through old photo albums and found two first day of school pictures in which I’m wearing overalls. I even brought my newborn son home from the hospital in a tiny pair of overalls because teeny tiny overalls will always win my heart. Every time overalls come back in style I find myself poring over photos and planning all the possible outfits. Basically, I have a love affair with overalls and will likely continue to wear them long after they’re no longer “in style.” With that said, I’d like to introduce you to my Named Clothing Ronja Dungarees (find them here). The Ronja Dungarees feature front and back pockets, button closures, a cropped ankle-length, plenty of top-stitching, and tie straps. There’s no shortage of details and I love that about this pattern.

IMG_1642IMG_1654

I added these lovely flower buttons (purchase here) from Arrow Mountain. I’ve almost exclusively used Arrow Mountain buttons since discovering them over a year ago. Good quality, stylish buttons are sometimes hard to find, but I find myself wanting to buy ALL the Arrow Mountain buttons (see more ways I’ve used them here, here, and here).

IMG_1648IMG_1676 
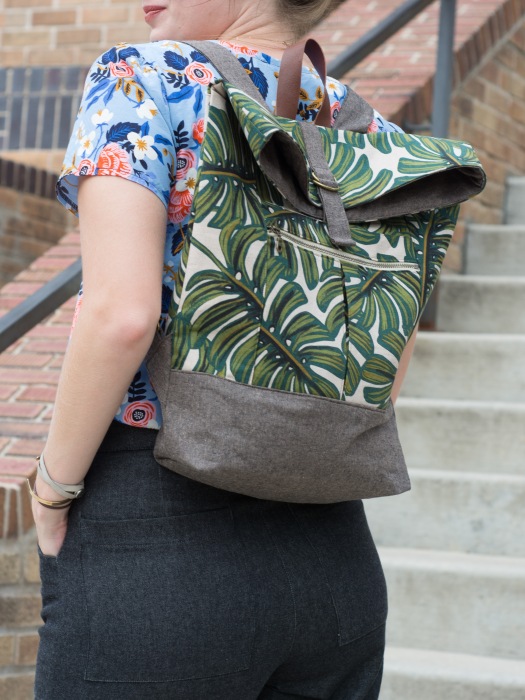
When choosing my fabric, I was presented with the dilemma of whether to use a print or a solid. I waffled back and forth between the two until I remembered that I had some of this Euclid fabric in my stash. This is a print designed by Carolyn Friedlander for Robert Kaufman Fabrics. It is printed on their Essex Linen which is a cotton/linen blend. The weight of the fabric is somewhere between a canvas and a quilting cotton. It doesn’t have much drape which makes it great for a bit more structured pants and skirts. As per usual, I purchased the fabric from Suppose.

IMG_1665IMG_1645

These are constructed in a way that makes it a bit difficult to test garment fit as you sew, because of this I would highly recommend sewing a muslin first. Sometimes, out of pure laziness, I ignore my own advice.  This was one of those times.  I pretty much just held my breath and hoped the overalls would fit in the end. I was expecting my Ronja Dungarees to be fun but; I did not expect that they would actually flatter my back side. This was a pleasant surprise. My husband even remarked that these overalls were “very flattering.” I’m almost certain that the words “overalls” and “flattering” are rarely used in the same sentence. I mean, I definitely don’t usually reach for overalls and think “Man, I look good in these.” These Ronjas make me feel that way and it’s a fun change from my regular momiform of loose flowy dresses.

IMG_1659IMG_1641

The challenge of sewing something a bit more advanced after many simple projects, was a great refresher for me. It’s sometimes nice to change the pace and sew something one small step at a time instead of all at once. This pattern reignited my love of overalls, and I’ve already purchased the Burnside Bibs pattern by Sew House Seven. How do you feel about overalls? Are you over them?

IMG_1592

I’ll leave you with a few notes on my sizing and alterations: I am close to 5’10” and sewed a size 38 with few length modifications. Named Clothing drafts for a height of 5’8″ so I decided not to add any length to the rise and add elsewhere instead. I added 1/2″ of length at the bust, 1″ of length at the thigh, and 1″ of length at the knee. I’m really happy with the length and think it will be great for late summer and transition well into early fall.

Cali Faye Collection Valley Blouse

Last fall, I was working on a children’s clothing collection to show at Utah Fashion Week. I made a children’s unisex top using this gorgeous double gauze by Cotton & Steel and couldn’t help being a bit jealous of the kids who got to wear it. I rarely make clothing in solid colors, but this teal gauze was too good to ignore. I finally settled on the idea of a using the fabric to make myself a Cali Faye Collection Valley Blouse.

IMG_1149

Overall, I really liked the style of the pattern. I did make a few small adjustments to simplify and tailor it to my liking. First, I cut two of the back yoke pieces instead of one as instructed. My reasoning for this was that I wanted the back yoke lined just as the front. When sewing, I sewed the front yoke to the back yoke at the shoulder seams and did the same for the front yoke linings and back yoke lining. I then placed the yoke linings and yoke pieces right sides together and stitched them together along the neckline.

IMG_1135

Second, I omitted the front key hole. The neckline is nice and wide which makes the key hole unnecessary as anything but a design feature. To accomplish this, I simply didn’t cut out the key hole. This allowed me to skip a few steps in the construction and attach the bottom front the same way as instructed for the bottom back.

IMG_1145IMG_1114
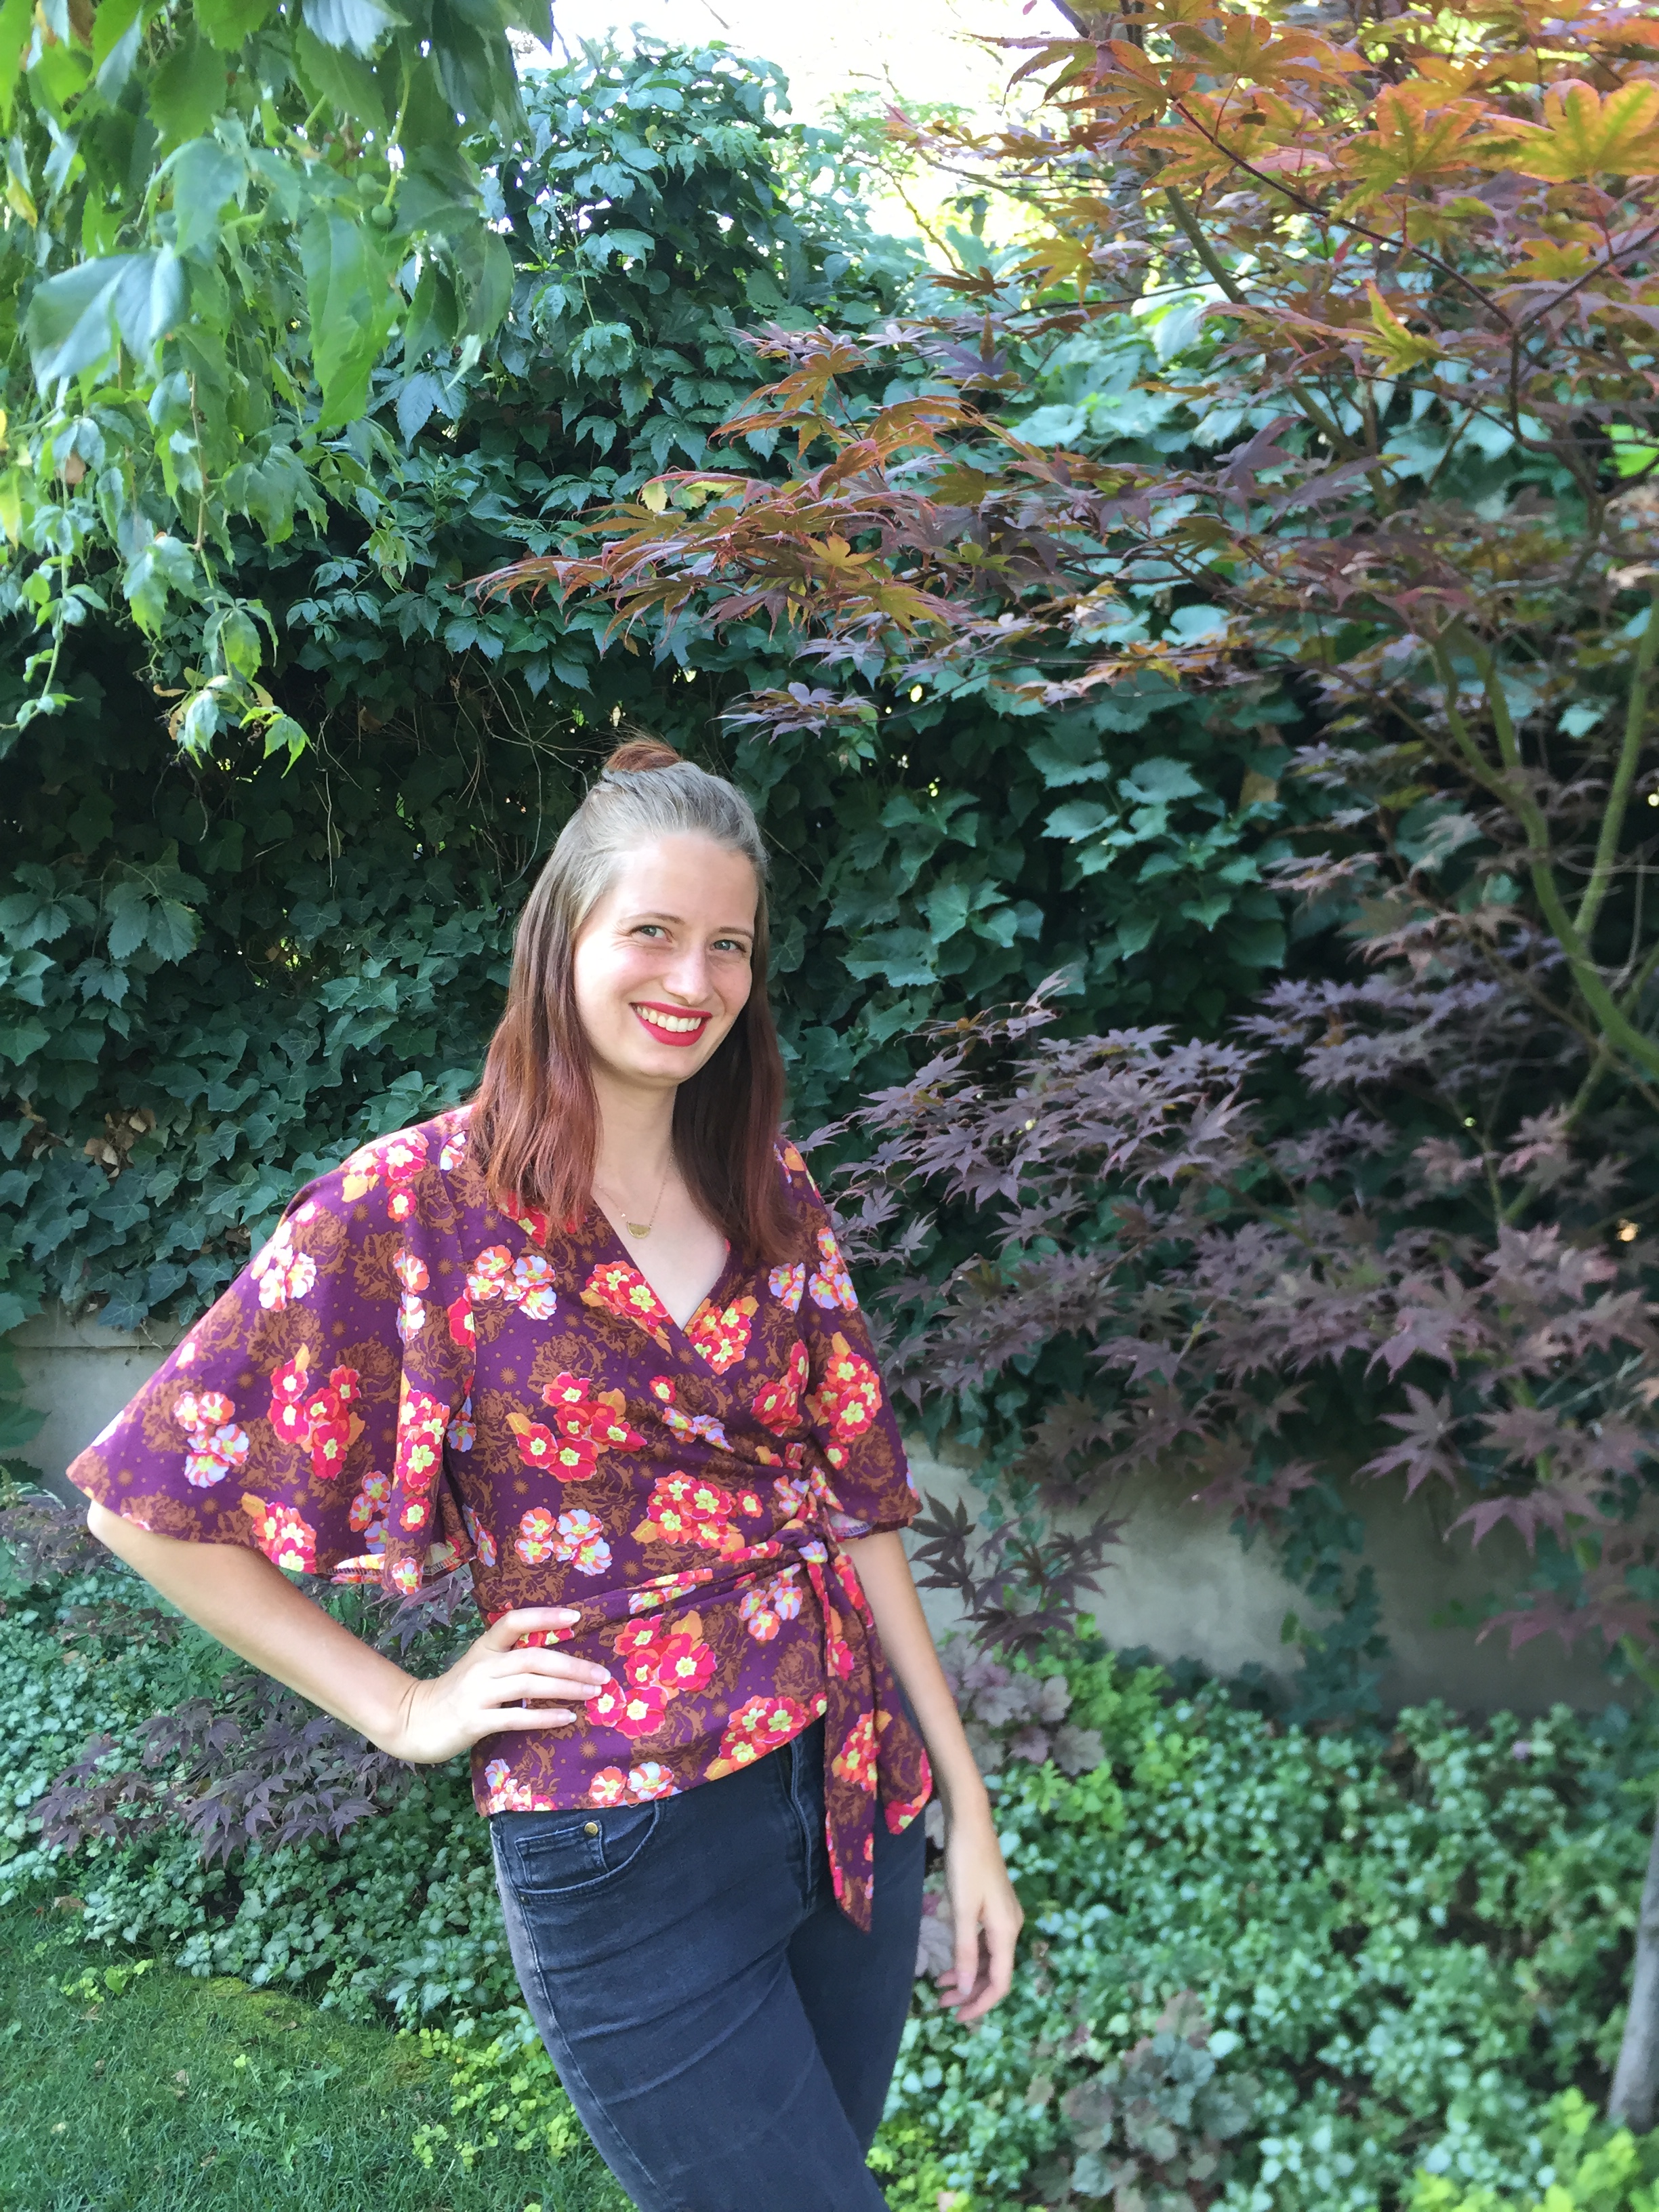
I finished this blouse about a month ago and haven’t had too many chances to wear this top due to the summer heat. This morning I felt a bit of a chill in the air. It made me hopeful that fall is coming soon. I plan to make a nice fitting pair of Ginger Jeans to pair with this top in the cooler months.

IMG_1101

Side Note: Did you notice that embarrassingly large crease in the center front and center back? I cut out the pieces about a month before sewing up my top and left thee pieces folded. My poor old cheap iron couldn’t press out those dang creases. I have washed my top a couple of times since taking these photos and the creases are now gone. Any suggestions for a new fairly inexpensive iron? Do I need to look at something more high end?


Tea House Dress by Sew House Seven

It’s not often that my husband and I can both agree that a dress is stylish AND flattering. My Tea House Dress, however, is one on which we can both agree.  My style tends to gravitate towards dresses that are cool, flowy, and functional (aka: muumuus). This pattern by Sew House Seven piqued my interest from the first time I saw it.
IMG_1337

A few weeks ago, I attended a dinner with bunch of sewing friends and bloggers. I need deadlines to keep me motivated; so I used the dinner as my deadline for my Tea House Dress. The dinner was to be held on a Monday evening. Naturally, this meant that I started tracing the pattern and cutting my fabric on Friday. It came together pretty quickly and I managed to finish it by sewing for a couple of hours each night of the weekend. I finished the hem and gave it a final press just hours before the dinner. That dinner was two weeks ago. I’ve already worn this dress four times since that evening.

IMG_1289

The Tea House Dress includes a few style details that caught my eye and inspired me to purchase the pattern. First, I love a good v-neckline. It’s low enough to be flattering, but high enough to keep from flashing innocent bystanders when I lean over. Second, The seaming of the yoke and front panels add interest and shaping to an otherwise simple slight a-line shape. Third, the wide waist ties define the waist while also allowing for occasional adjustment (i.e. ate too much ice cream). Fourth, the midi length is perfect for keeping cool in the summer without requiring me to shave up above my knees. Fifth, the pockets are the perfect size for holding my phone and keys. They’re also just a nice feature when I’m feeling awkward and don’t know what to do with my hands.

IMG_1334

IMG_1315

I used a double gauze print from the Charms line designed by Ellen Luckett Baker for Kokka. Since this double gauze is 100% cotton it’s both breathable and comfortable. I love wearing double gauze in the summer as it tends to look a bit more casual than a rayon or lawn, but is every bit as comfortable. I had nearly a yard less fabric than the pattern recommended so I had to get a bit creative when it came to laying out and cutting each pattern piece. It was doable, but I certainly wouldn’t recommend it.

IMG_1322IMG_1343

The pullover style of the Tea House Dress appeals to my no fuss style of getting dressed. I plan to make another one for a family member who sometimes has difficulty with fiddly closures. I’m also planning to make a second one for myself as soon as I find a few extra hours in the day.

IMG_1310IMG_1294

Just a quick note about sizing: I sewed up and straight four with the only alteration being that I added two inches of length at the hem. This is a common adjustment for me and I found no issues with the sizing.


A Weekend Retreat and My Driftless Cardigan

image1

Way back in October of last year, I purchased this gray jersey knit from Suppose and cut out my Driftless Cardigan (find the pattern here). I was clearly getting ahead of myself because I had approximately one billion other deadlines at the time. April came around and I thought to myself, “Life has finally slowed down, I can now finish all of those other projects that I started last fall.” I was wrong. My husband ended up applying for and accepting an amazing new job which meant life was about to get crazy again.

image3

Meanwhile, I attended a blogger meet up in SLC and Sara and I came up with the idea for a small weekend sewing retreat. I spent the next few weeks stressing about my upcoming move and finally decided to pull the trigger on planning a retreat. This mama needed a break. Sara and I set a date, I got permission to use the family cabin, and we began counting the days.

image2

The weekend finally arrived and it turned out to be both rejuvenating and productive. My sewing weekend goal was finishing a pile of unfinished projects so that they would no longer clutter my sewing area. Each of my projects were only a few steps away from completion, but had been sitting unfinished for months. Sewing for an entire weekend allowed me to complete a couple of baby quilts, a quilted pillow cover, two simple baby dresses, and my Driftless Cardigan.

IMG_1888

While setting aside time to actually sew this took months; the actual time it took to sew this cardigan was roughly 3 hours. One of those hours was used to hand stitch the neckband. I have loved Grainline Studio patterns for years because of the clean lines and well-executed details. The Driftless Cardigan is a great example of this with its hidden pockets and optional split bottom band. This was completed a month ago and it’s gotten quite a bit of use despite the blazing summer temperatures. It’s perfect for an extra layer at the movie theater (ours is always freezing) or for wearing on chilly evenings.

IMG_1889

A quick note on sizing: I sewed up a size 4 and added 2.5 inches to the length at the lengthen/shorten line. I also added about 1.5 inches to the sleeve length because I like my sleeves extra long.

Special thanks goes to Kim of Sweet Red Poppy for taking these lovely photos.

Jumpy by Ready to Sew

I’ve never been one to shy away from patterned pants or quirky details. Just ask the middle school girls who giggled when I showed up to school wearing cheetah print pants. With the tie front detail and bold 1″ gingham print these pants definitely make a statement. The pattern used for these pants is the Jumpy pants and shorts pattern by Ready to Sew. Find it here. Fabric used is Checkers fabric by Cotton and Steel. My top is a Grainline Studio Scout Tee made in rayon designed by Rifle Paper Co. for Cotton and Steel. Both fabrics were purchased from Suppose.
IMG_0510

Today I’d like to take little time to tell you about my style motto and a little story about how I developed it. I honestly can’t remember a time in my life when I wasn’t making somewhat bold or different fashion choices. I’ve always been drawn to prints and unique details, but I didn’t always wear them because I was fearful of what others may think or say. After hearing criticism about my style in middle school, I was fearful of being an outcast if I didn’t dress like everyone else. In 9th grade, I started regularly wearing the same American Eagle or Hollister jeans and tees that everyone else wore. I still had some bold things in my wardrobe, I just wore them more sparingly.

IMG_0523

The summer before I was to start 10th grade, my family moved from the tiny town of Spencer, Iowa to the slightly larger town of Brigham City, Utah. I was resistant to the move at first, but decided this was the time to become exactly who I wanted to be. My style motto became, ” Wear what makes you happy and to hell with what anyone else thinks.” I was going to be myself here from the very beginning. For most of my 10th and 11th grade years I did a decent job at wearing what brought me joy and dressing for myself vs. dressing for others.

IMG_0518

In the spring of my 11th grade year I purchased a pair of railroad stripe overall shorts which my then boyfriend (now husband) lovingly referred to as my train conductor overalls. I was ridiculously proud of those things and often wore them with a crisp white button up, navy or white tights/leggings, and heels. After wearing them three or four times, I overheard that some girls had been talking about crazy overall outfit and how silly it looked. At the time, I allowed their comments to get into my head. I stopped wearing those overalls for nearly a year.

Fast forward to the next spring, I was out playing four-square at lunch (believe me it was the cool thing to do in my high school) when my classmate Laney remarked that she liked how I used to style my overalls and asked why I never wore them anymore. I made up some lame excuse about weather, but this got me thinking. That night I went home and pulled my overall shorts out of my closet. I put them on, looked in the mirror, and asked myself why I had stopped wearing them. Did they fit? yes. Did wearing them bring me joy? yes. Did I care what other people thought about them? Kind of, sort of, maybe too much. The next day, I wore the heck out of those overalls and you know what? Some people gave me weird looks and others said nice things. I appreciated the nice things, but the thing I really remember about that day is how liberated I felt wearing something that I loved.

IMG_0544

The moral of my story? Be you. Wear what brings you joy whether it’s jeans, sweatpants, cocoon dresses, gingham pants, wild jumpsuits, all black, or train conductor overalls. Every morning when I get dressed I try my best to dress for myself, not for my friends, family, or strangers that I may encounter (although I do kind of dress for others because nudity isn’t quite socially acceptable). I’m not perfect in sticking to my “to hell with what others may think” style motto, but it does bring me infinitely more confidence and joy when I do.

IMG_0524

Thanks for sticking with me through that novel. A few quick notes on the sizing and pattern. I sewed up a size 38 and found the sizing to be just about spot on based on my measurements. The only adjustment I made was adding 2″ to the length. If I made the pattern again I think that I would add 1/2″ to 1″ to the rise so that the pants would sit just a bit higher above my hips. The construction of these pants is fairly simple and easy enough for a confident beginner to tackle. The only thing that might be difficult for a beginner is understanding the instructions. They are fairly clear, but are not as heavily detailed with illustrations as many other indie patterns. I’d compare the amount of instructions and illustrations to something you may find in a Simplicity or McCall’s pattern. Overall, I’m pretty happy with these bold pants and plan to make the pattern again with a few modifications.

1930’s Butterfly Blouse

In July, I fell into a bit of a sewing rut. I felt like I’d been sewing the same few projects and needed something new and exciting. I convinced my husband to take a day trip to Provo, UT so that I could visit Harmony. Harmony turned out to be the perfect place to regain my sew-jo.
image

After spending at least 45 minutes admiring everything in store, I finally settled on this gorgeous Pretty Potent rayon by Anna Maria Horner and the 1930’s Butterfly Blouse pattern by Decades of Style. Until this top, I’d never actually made a wrap style blouse and thought it would be an unexpected addition to my wardrobe full of Scout Tees, sweatshirts, and button-ups. Upon returning home, I immediately pre-washed my fabric and started cutting.

image

Tracing and cutting went pretty quickly as there are only 4 different pattern pieces (left and right front bodice pieces are mirror images). Sewing was not terribly difficult, but did take a little concentration because of the rayon’s drape and the top-stitching technique used to attach the sleeve pieces to the bodice. I’ve top-stitched plenty of times, but using top-stitching as a way to attach pieces was new to me. This technique combined with the shape of the pattern creating these gorgeous style lines you see on the back. The curves took a bit of patience, but the final product was worth it.

image

image

Now that I’ve had this blouse for nearly four months, I can say that it’s become somewhat of a staple. I find myself reaching for it every time I want to feel especially feminine or pretty. The wrap neckline is just low enough to feel a bit sexy without being overly revealing which also makes it very practical for most occasions. It’s been worn for multiple date nights and it’s even comfortable enough to wear while chasing my son at the park.

image

I’m hoping one day I’ll find time to hack this pattern into a dress because it’s basically begging to be one. Don’t you think?

Simplicity 8084: My Dream Maxi Dress

I’ve been meaning to restart my blog for a couple of years now, but kept finding excuses or other ways to fill my time. After a summer filled with fun and inspiration, I’ve decided to quit making excuses and start blogging again. I’ve got some fun posts planned and cannot wait to share them with you. Today I’m sharing my Simplicity 8084 maxi dress.

IMG_6737
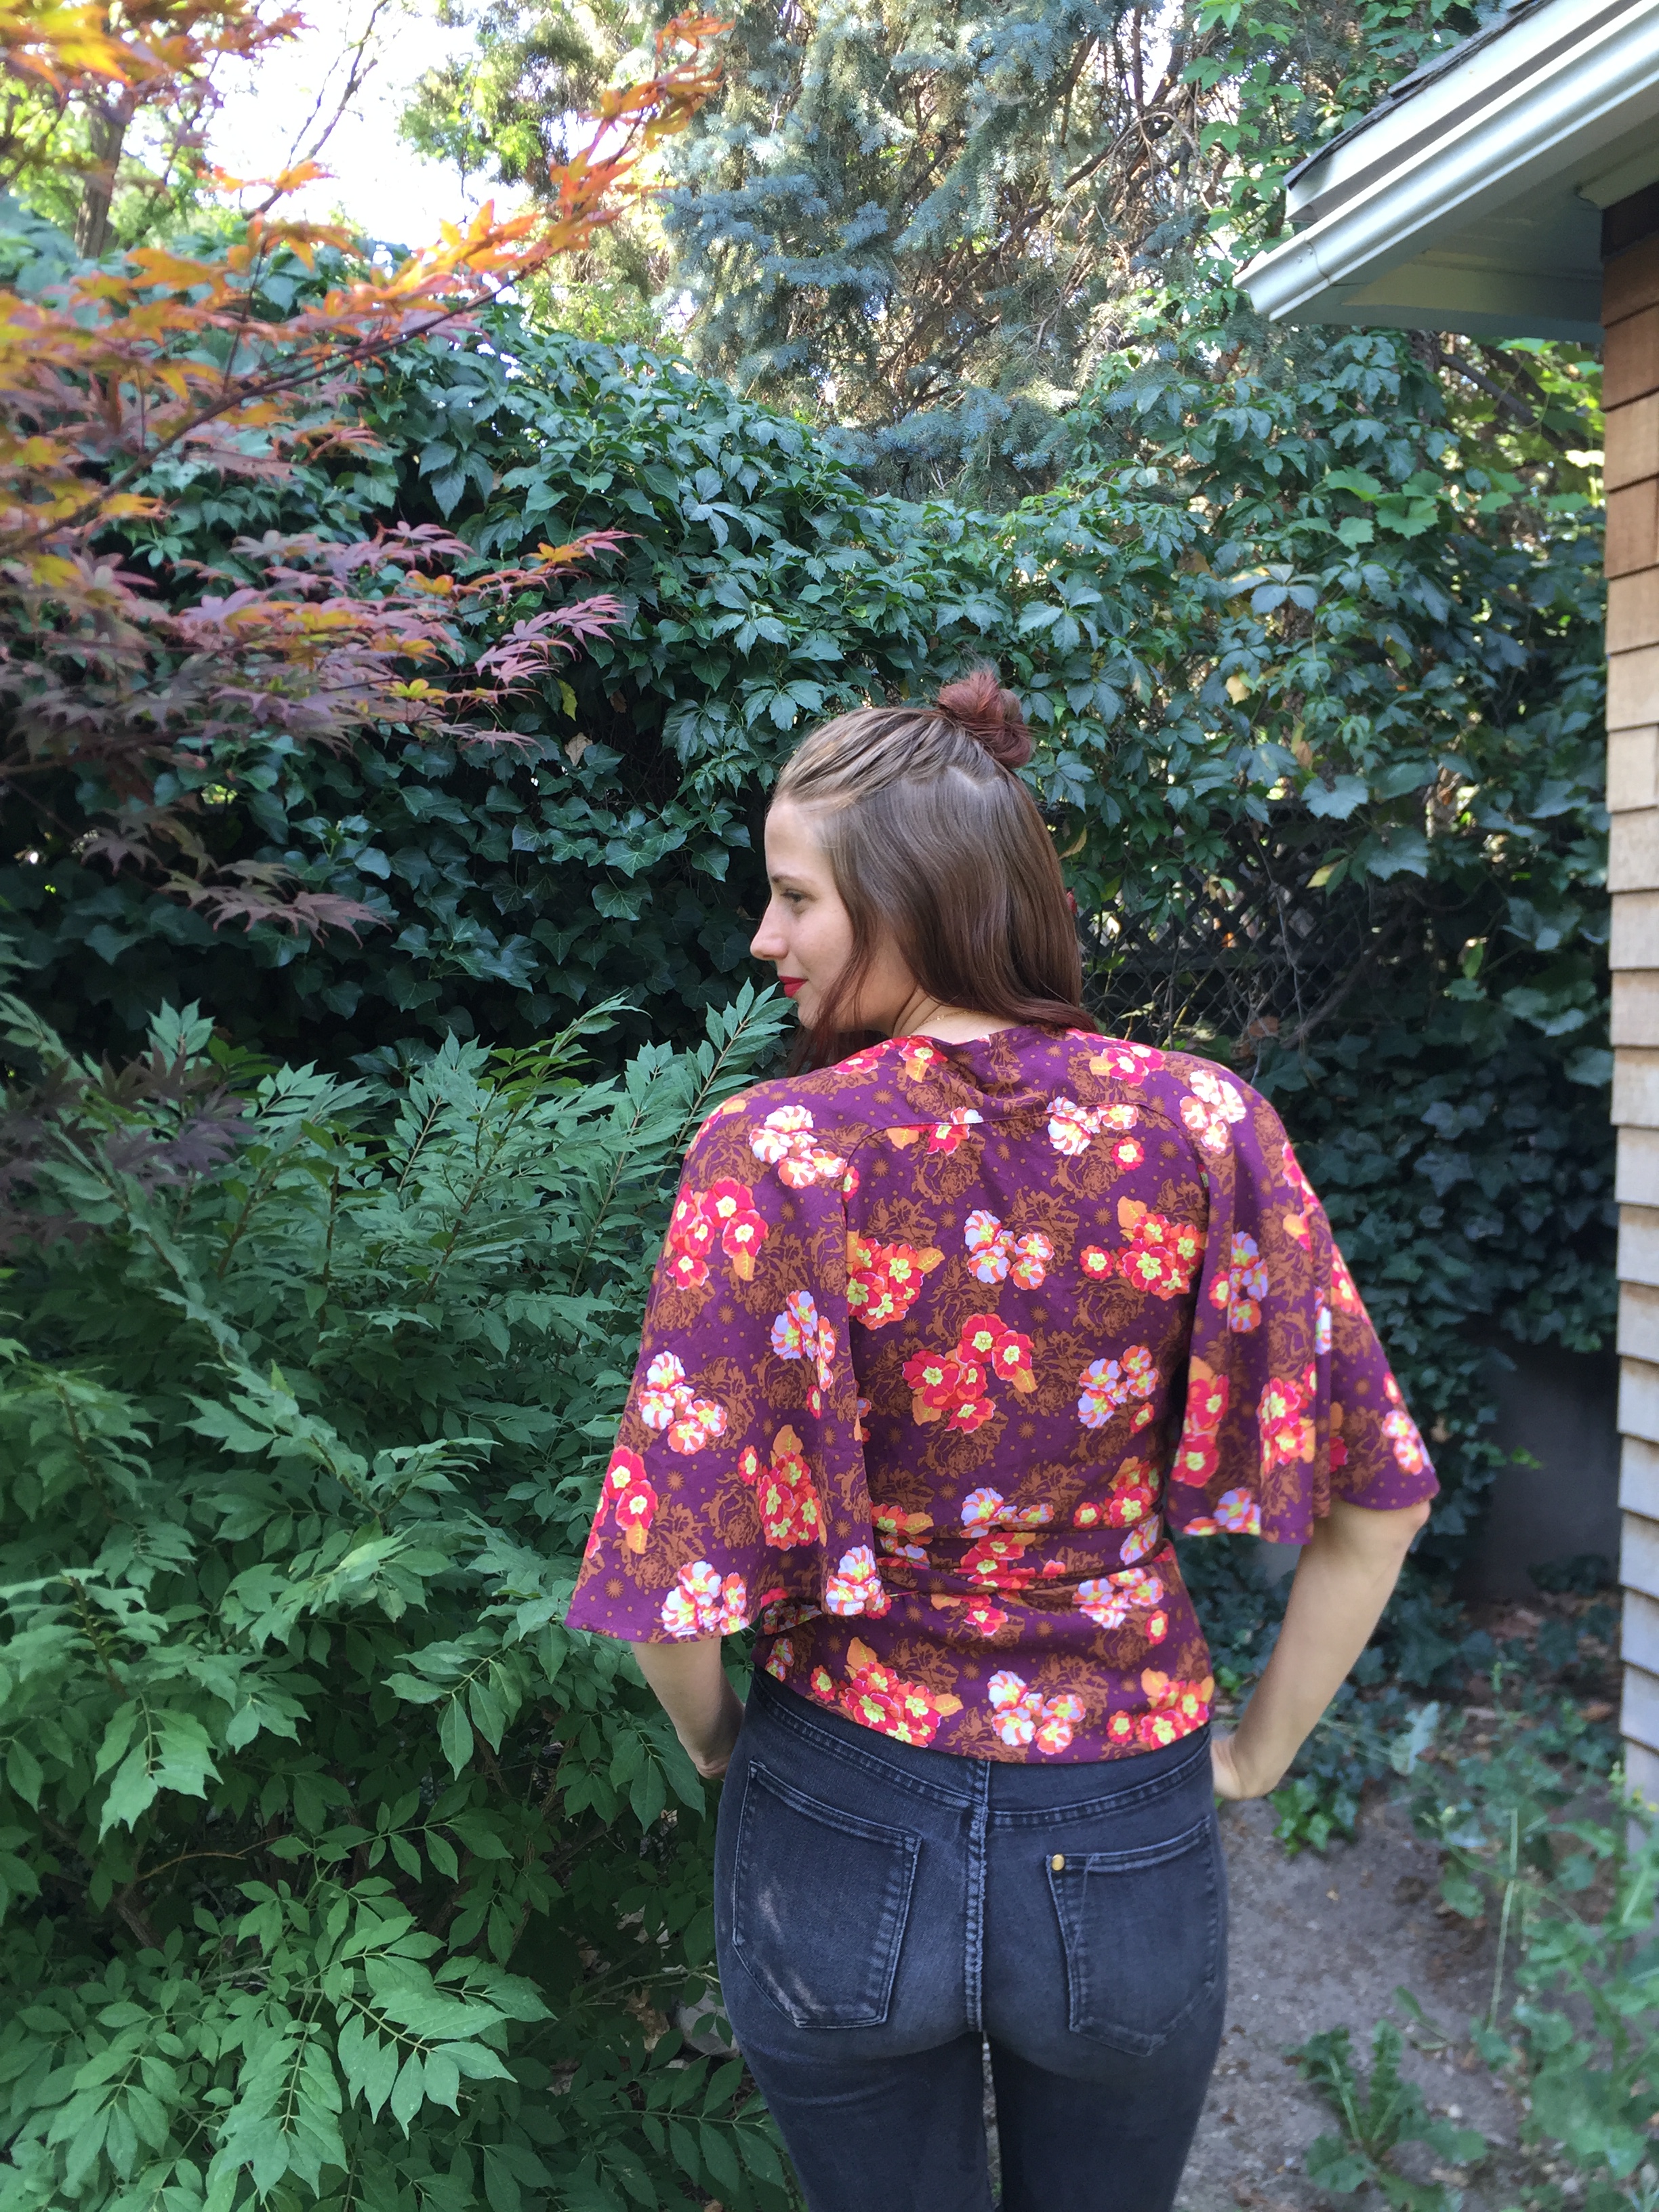
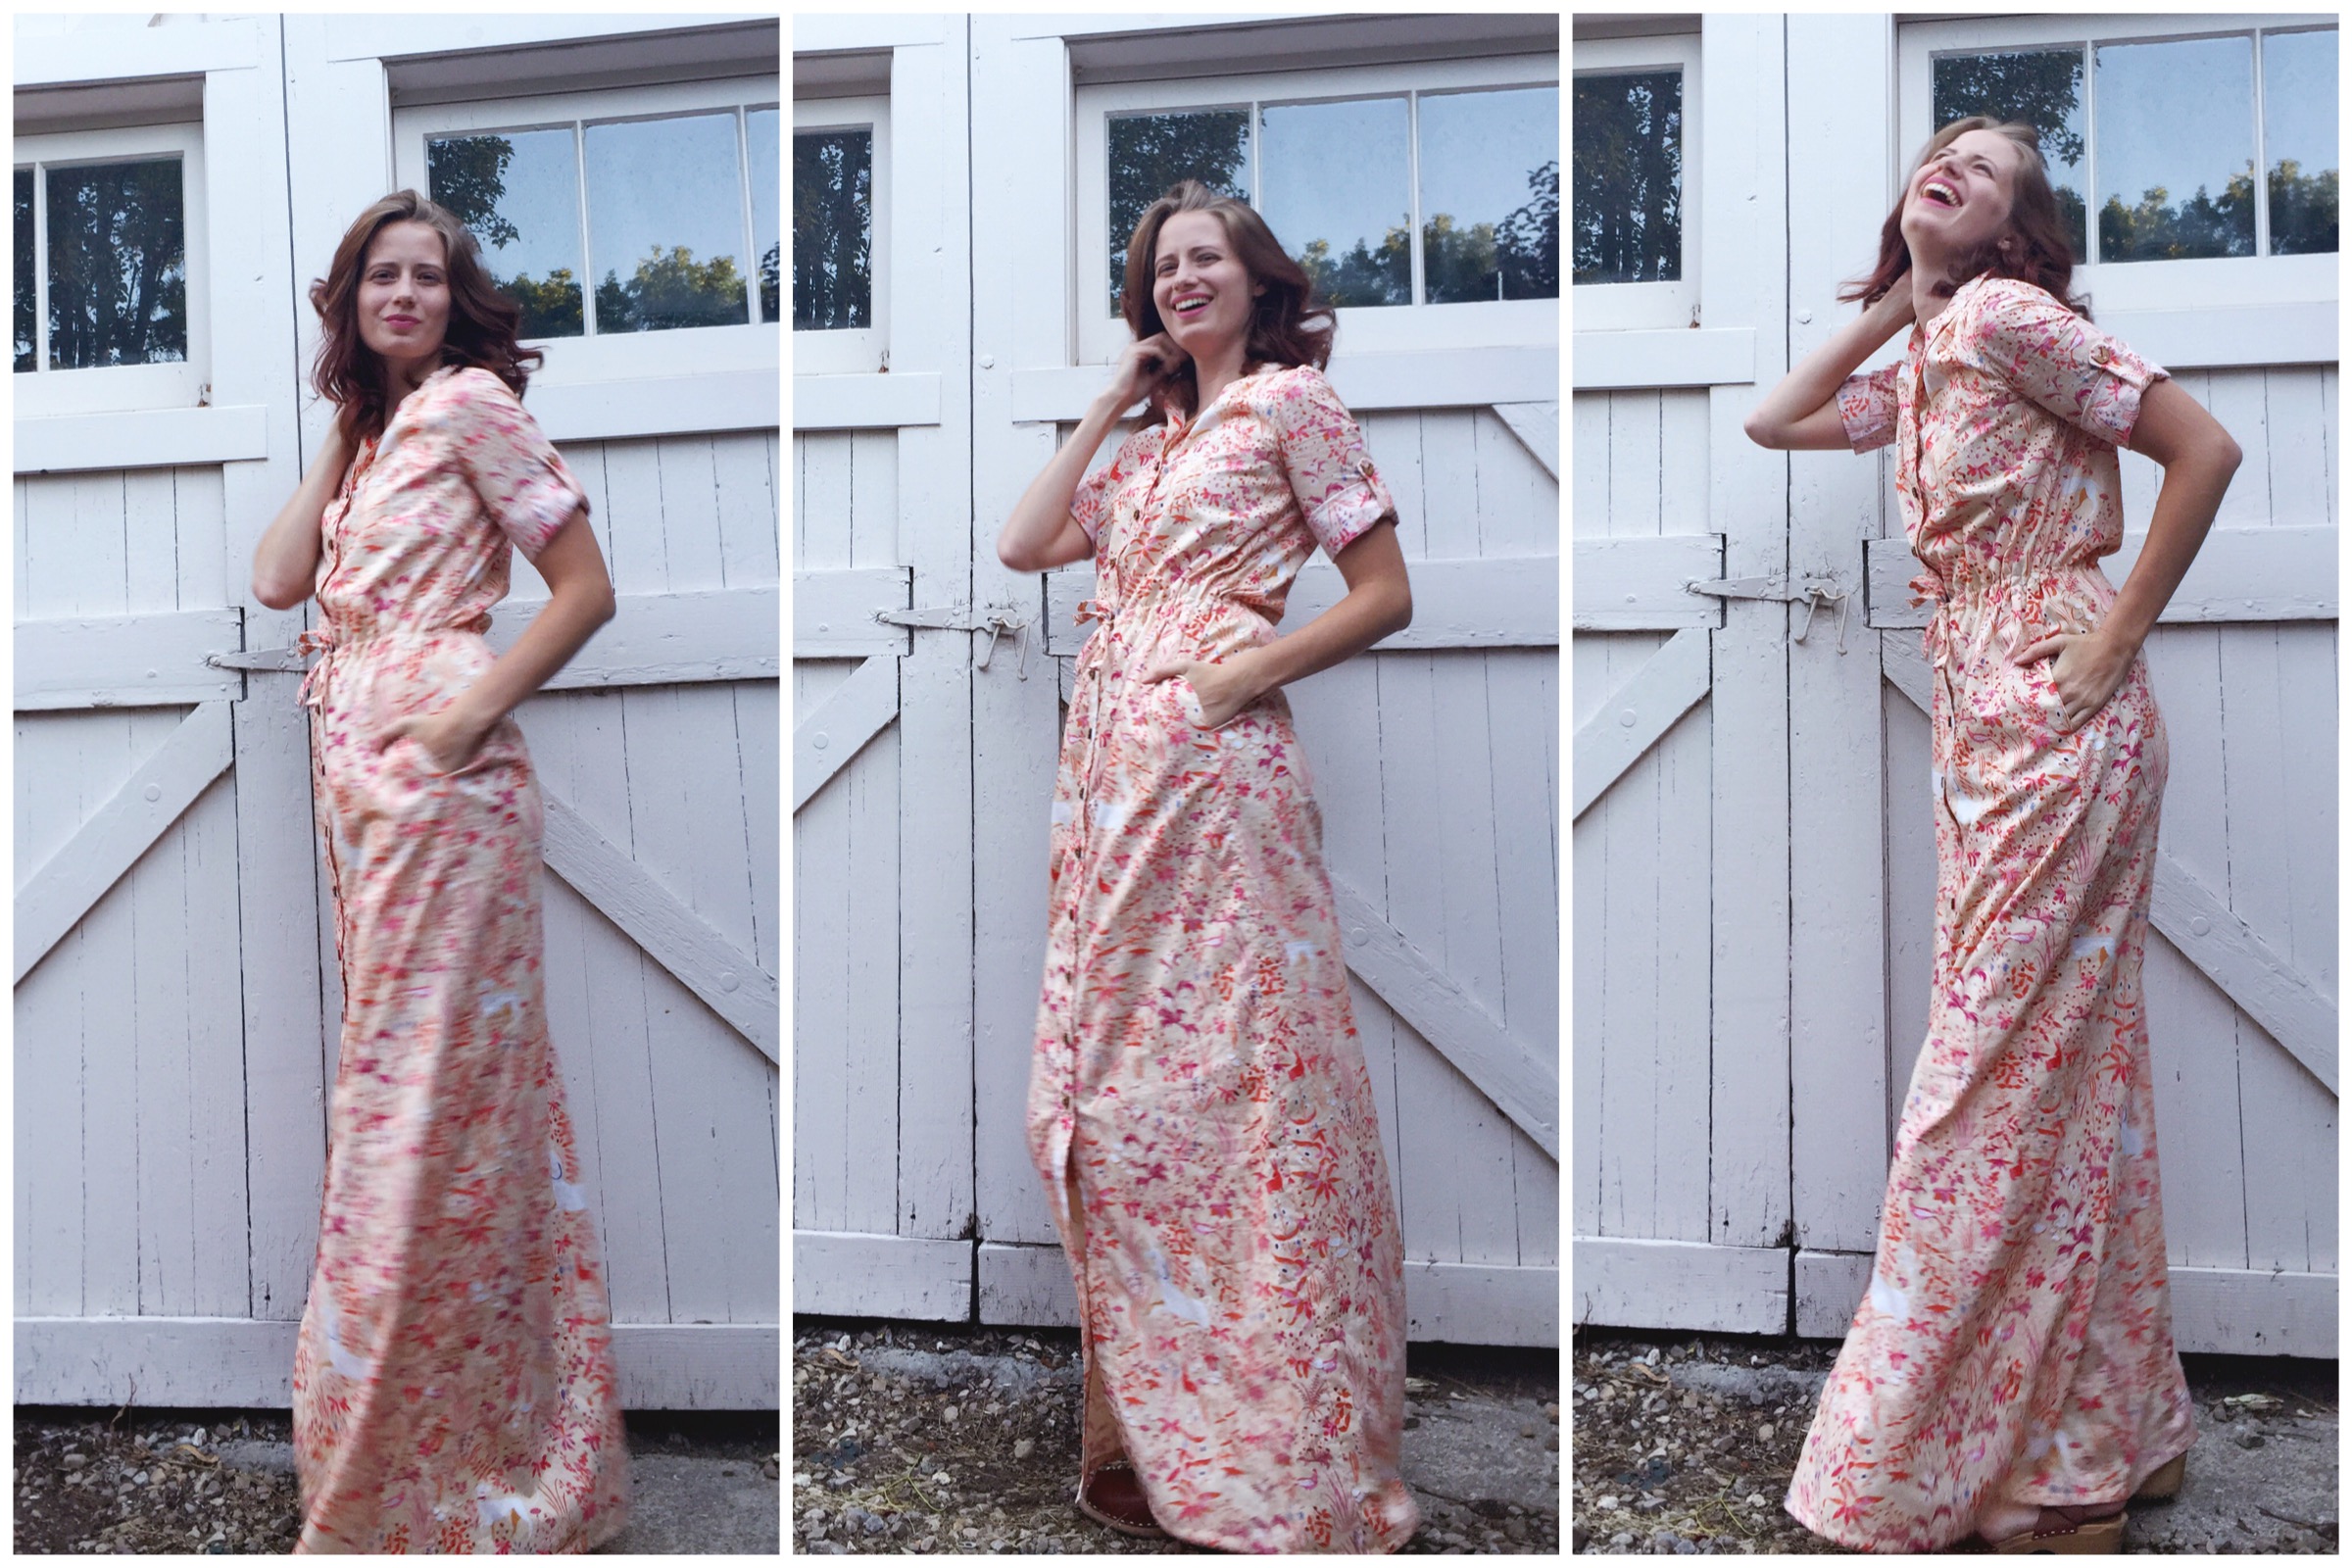
The photos above were taken using my self-timer so they’re a little blurry, but I love the way they show the movement of this dress.

I worked on this dress a little bit each month this summer and finishing it was the perfect way to celebrate a fantastic season. I selected this Lizzy House lawn from Suppose back in May and couldn’t wait to use it. Life got in the way so cutting the fabric wasn’t started until June. I sewed a step here and there throughout July, but really got to work in August when my wooden buttons arrived from Arrow Mountain.

image
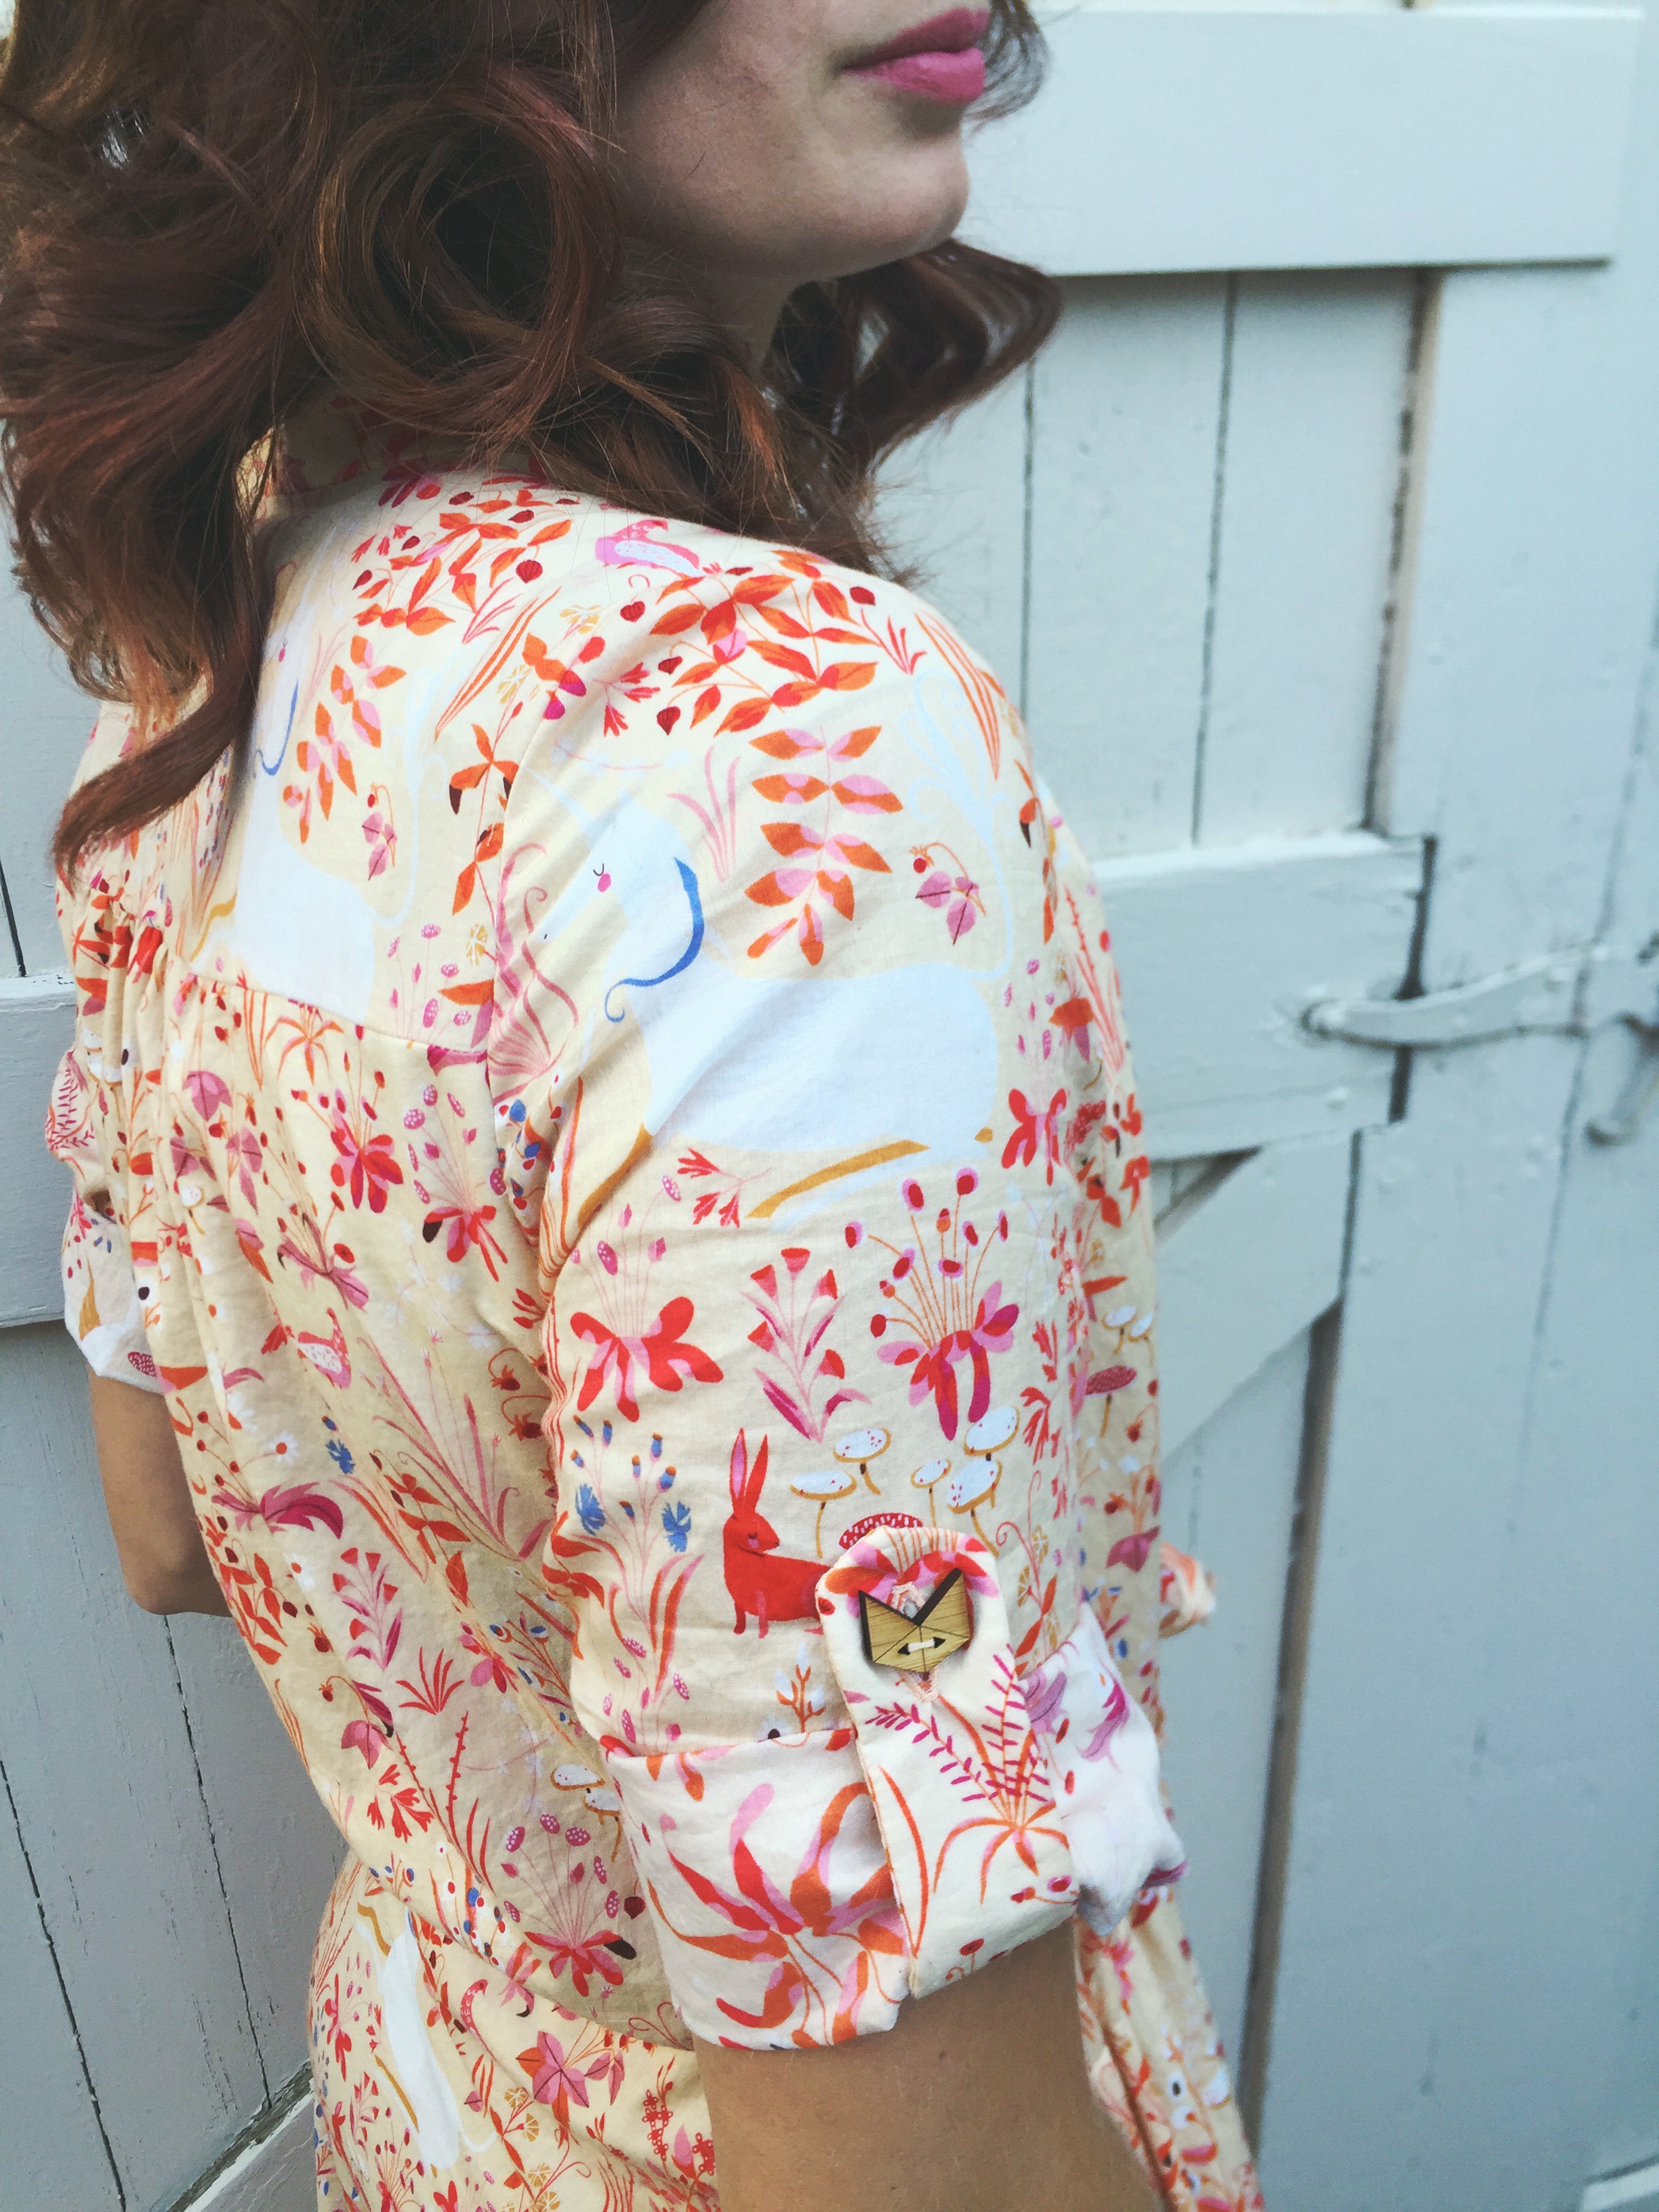
Here is a close-up view of the fox buttons I added to the sleeve tabs. The front of the dress uses the minimalist buttons also from Arrow Mountain.

My biggest challenge with the dress was sewing the waistline casing. When looking through all my handmade clothing, I was surprised to realize that I had never actually sewn a garment with a casing like the one in this dress. It really wasn’t too difficult, I was just too lazy to mark the waistline when I first sewed the casing. This resulted in a late-night Netflix binge while seam ripping my first attempt. On my second attempt I made sure to mark the waistline and sewing the casing was a breeze.

I’ve now worn this dress three times since finishing it in early August. The pockets have made it more functional and wearable than any other maxi dress I have owned.They’re just the right size for my phone and keys so I don’t have to carry a bag every time I leave the house.

image1 (2)image

I look forward to wearing this dress again and again. It will be a great transitional dress for fall and it’s sure to get a lot of wear. I’d love to hear about your favorite summer project. Did you make anything you absolutely adore this summer?