Style Maker Fabrics Spring Style Tour 2018

Hello! I’ve been anxiously waiting for this day since Michelle asked me to be part of this tour. Style Maker Fabrics is fully stocked with new arrivals. When I saw all the fabrics, my imagination ran a bit wild and I planned approximately fifty new projects. It took me a day or two to come back down to earth and realize making all of them might not be realistic on any sort of deadline. I spent about a week deliberating and finally narrowed my decision down to three projects and four fabrics.

IMG_8139

I know you’re supposed to save the best for last, but I’m bucking tradition here and going all in by talking about my favorite piece first. This woven stripe was love at first sight. Do you ever see a fabric and think “I need that on my body?” No? Just me? Well, that’s how I felt about this fabric. I considered some sort of button up shirt, but after scrolling through Instagram for inspiration I saw the Wiksten Oversized Kimono from issue 4 of Making Magazine (here) and couldn’t get the thought out of my head. Michelle was a great help in selecting a coordinating fabric and suggested this washed linen. They’re a match made in heaven, don’t you think?

IMG_8116

The over sized shape and giant pockets drew me in, but the possibility of making the kimono reversible is what sold me. If you’ve been following me for a while you might know that I like bold patterns and colors. My love affair with print and color has made my wardrobe a technicolor dream, but that does create some issues when putting outfits together. This way I can have bold, but it will also coordinate better with some of my louder pieces. I realize the over sized look isn’t everyone’s cup of tea although it is certainly mine. This is bound to get endless wear over the next few months and I envision it being my go-to on cold summer evenings.
IMG_8112

Next up, my latest Grainline Studio Lark Tee. Everyone has their favorite tee pattern, and this one is mine. I’ll be honest and say that I actually haven’t made any other basic tee pattern because I liked this one after the first try. I’ve made six or seven of them and wear them regularly.  I made a size 4 and in this coral jersey knit it’s my idea of a perfect fitted, but slightly slouchy tee.

IMG_8129

IMG_8135

Finally, let’s talk about these jeans. These were my second pair of Ginger Jeans (see my first ones here) and was able to sew them up in just a couple of days. I used this brushed denim and comfort is an understatement (hardware kit also available here). They are unbelievably soft and every bit as comfortable as the old worn-in mom jeans that I actually stole from my mom (a bit of a tangent about those on this post). Skinny jeans and comfort don’t usually go hand in hand, but in this case they get along quite nicely. I was careful not to over fit them and they’ll be just as nice to wear for a day at the park as they will be for date night.

IMG_8132

Lest I lead you astray, making these jeans wasn’t all sunshine and rainbows. This was my first attempt at installing rivets which ended up being a bit of an ordeal. First, I attempted to install them at home with a wimpy little hammer that promptly broke. Next, I secured a new hammer at my parent’s house and using an old skillet as a metal surface when I dented the skillet in several places (sorry mom and dad). Then, I dug through boxes and found a cast iron skillet, installed the rivets, and thought everything was complete. Upon a final pressing and inspection I noticed a few tiny holes near the back pockets. These holes were apparently made during my rivet installation fiasco and I almost cried when I saw them. For once, I decided to keep a clear head and find a solution right away. Finally, I settled upon the idea of a little visible mending. I stabilized the holes and used perle cotton to stitch the shape of an asterisk in four places. I chose to stitch four so that it would look more like an intentional design feature than a mistake that needed to be fixed. It may seem silly, but I often toss a project to the side when a mistake like this is made. The extra stitching actually adds a nice little detail and reminds me that sometimes you just have to “make it work.”

IMG_8134
IMG_8128

Now that I’ve gabbed on and on about my outfit, I just want to add on a little shout out to my husband who is the real MVP when it comes to these photos. Due to a small shipping delay and our schedules, the only time we had to take these photos was in the middle of wild winds and under threat of rain. I got dressed, we hopped in the car, and crossed our fingers that we could get the necessary photos. Guys, we took these photos in five minutes. After all the photos he’s taken for me, I think we’ve finally found our stride. The threat of rain and wild winds may have been a factor in making this photo session so quick, but I’m seriously impressed that we were able to just get it done. I’ll leave you with one last decent photo of my outfit and if you scroll to the bottom there’s one that will illustrate the hilarity of our 5 minute session.

IMG_8145

Now, I think that I’ve sufficiently run out of words. Are you ready to shop the Style Maker spring fabrics? Find the new arrivals here. Want more spring sewing inspiration? Check out yesterday’s post by Leslie (here) or see Lori’s post coming tomorrow (here). Want to be inspired by everyone on the Style Maker Spring Style Tour? Find links to all the tour posts here.

Finally, here’s likely the only reason you read or scrolled all the way to the bottom of this lengthy post:

IMG_8108

Whew! You’ve made it all the way to the end? Are you ready to read more? No? that’s cool this was a huge post. Yes? Here are links  to a couple of other projects I’ve made using fabrics from Style Maker. See my Joy Jacket here or my Gemma Dress here.

Closet Case Patterns Clare Coat and a Coat Making Party

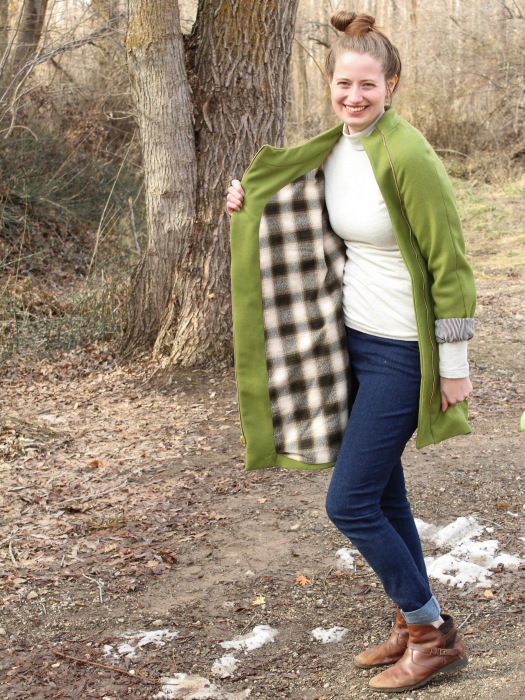
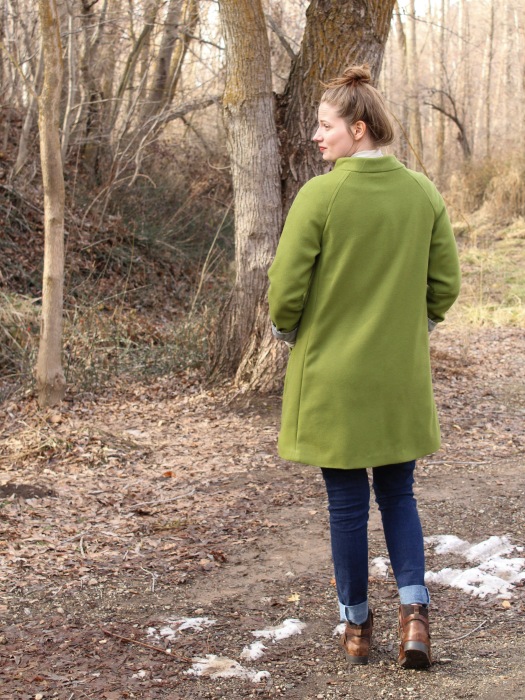
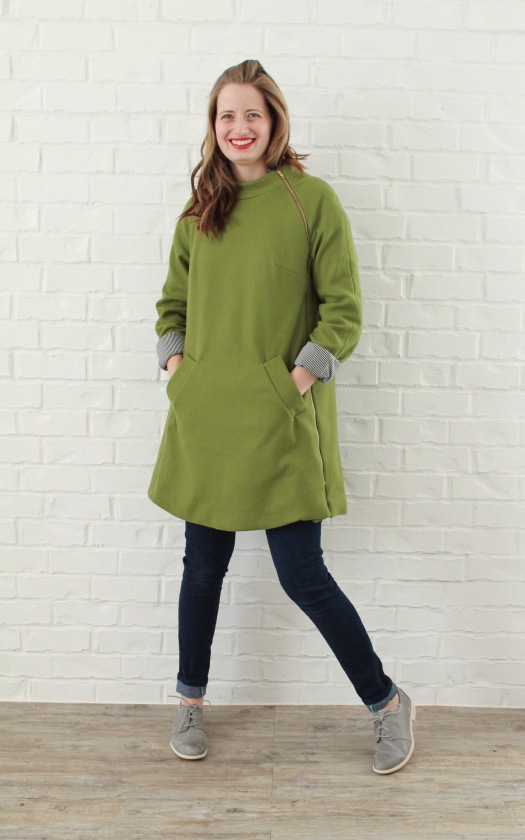
Can you believe it’s the first day of spring? I’m celebrating in unusual fashion by finally posting about my Clare Coat. Not unlike my Ginger Jeans, I’ve had the Clare Coat Pattern on my “to make” list for years. Luckily, my friends Rachel, Tiahna, and Jennifer wanted to make one as well. This last January we joined forces to host a Coat Making Party on Instagram. We were fortunate enough to work with a few generous sponsors, Riley Blake Designs, Raspberry Creek Fabrics, and Closet Case Files, who provided us with fabric and generous giveaways for participants. Without the motivation of sewing friends and our awesome sponsors, I’m not sure that I would’ve finished this coat, but I’m about to tell you why I’m so glad that I did.
IMG_2582

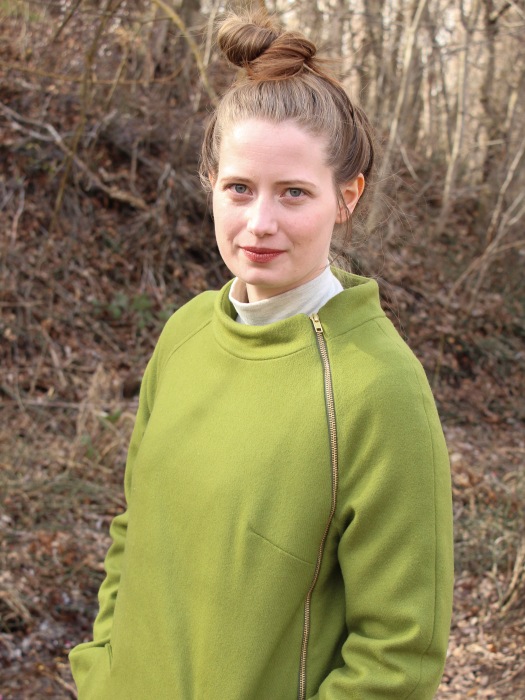
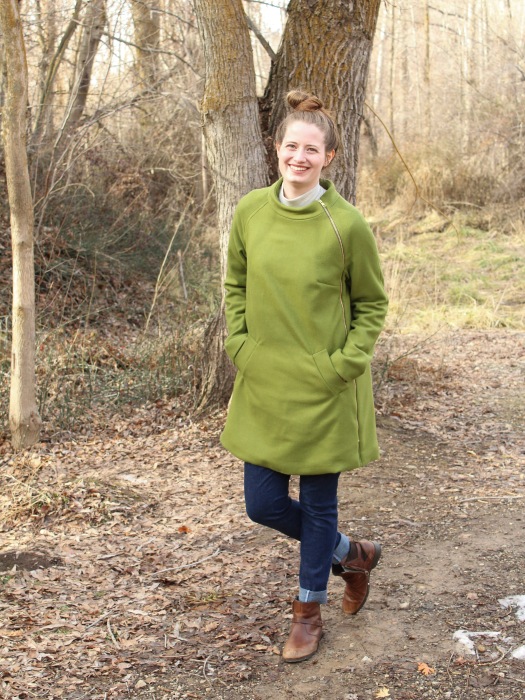
First, let’s talk about this olive green wool from Riley Blake Designs. Riley Blake was one of our sponsors and was gracious enough to provide each of us with wool to make the outer shell of our coats (see Rachel’s dark green one here, Tiahna’s pink one here, and Jennifer’s red one here). I chose this Olive colored wool and anxiously awaited its arrival. This wool is a mid-weight and seems similar to the weight of the fabric on my favorite ready to wear coat. I found working with it to be relatively easy and enjoyable. I did have a bit of trouble pressing, but this is likely due to the fact that I have a terribly cheap old iron and not an issue with the actual fabric.

IMG_2593

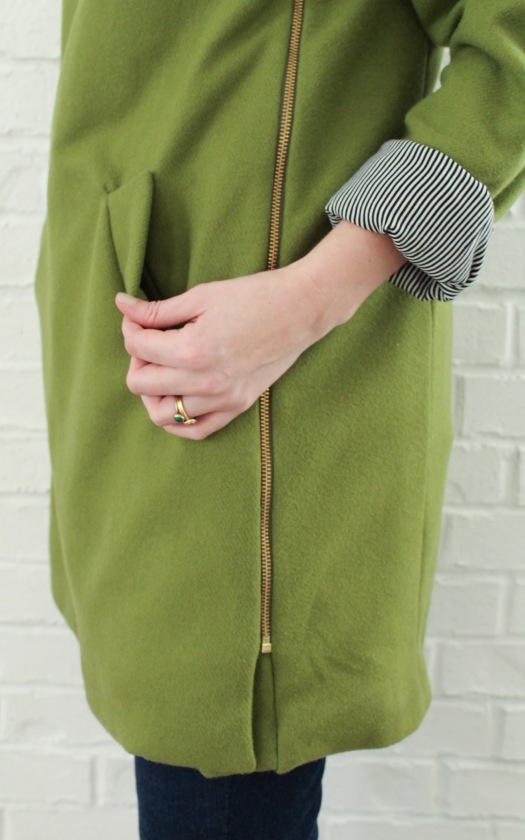
While the olive green shell of the coat is certainly striking, I think the lining is my very favorite part. Our other fabric sponsor, Raspberry Creek Fabrics, provided me with this Robert Kaufman Mammoth Flannel. I took a bit of a leap of faith selecting this without seeing it next to my wool and I’m so glad it turned out to be a perfect match. The flannel lining makes this coat extra cozy. It really feels like I’m wearing a secret blanket which is exactly how I want to feel in the winter. One aspect that I overlooked when planning this coat was the need for a sleeve lining that would be a bit more slippery to make the coat easier to put on and take off. I had already planned to use this black and white striped rayon challis as the lining for my Joy Jacket (see it here), so I simply added an extra yard to my order and used it to line my Clare Coat sleeves as well. I’ve found myself regularly wearing my sleeves rolled just to show off the fun striped lining.

IMG_2587

Now that I’ve talked your ear off regarding fabric choices, let’s talk about the actual process of making the coat. I spent four evenings preparing fabric, tiling the pdf pattern, and cutting out all the pieces to the coat. The amount of preparation that goes in to making a coat is something that I wasn’t wholly prepared for before I started this project. It likely would’ve only taken three evenings for the prep work if I hadn’t spent an entire evening tiling the pattern pieces for view b when I was supposed to be tiling the pieces for view a. How I assembled all the pieces before realizing it was the wrong view is beyond me. That is a mistake I plan to avoid in the future and a time-consuming lesson that I likely won’t forget.

IMG_2717

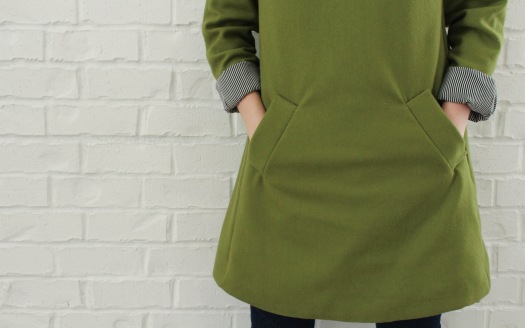
About halfway through January, I finally completed all the prep work and got down to business. These welt pockets on the front were the first and most time consuming aspect of the project. I spent my first evening focusing solely on them and despite a few minor imperfections, I think they turned out well. These perfectly-angled and flannel-lined pockets keep my hands nice and toasty when I forget my gloves (which happens almost every time I go out).

IMG_2719

Once the welt pockets were installed, the rest of the coat construction went rather smoothly. As a visual learner and first time coat maker, I found myself relying heavily on the sewalong (here) to understand each step. I was a bit nervous about the zipper installation, but soon found that I had no reason to worry. As it turns out, installing a separating zipper is even easier than a regular zipper. Who knew? I also got a bit confused about bagging the lining, but found it to be rather simple and magical once I followed the instructions and just went for it.

IMG_2722

Before I wrap this up, let’s talk for just a second about sizing and adjustments. I chose a size 10 for my Clare and because I wanted it large enough to fit over a bulky sweater. If I planned on only wearing thin layers underneath I could’ve possibly sized down to an 8, but I’m really happy with the fit of the coat as a 10. I only made one minor fit adjustment to the pattern and that was to use the full length (view b) sleeves and add 2 inches to their length.

IMG_2566IMG_2574

Honestly, January was a bit of a rough sewing month for me. I had a hard time getting back in the swing of things after the holidays and was seriously lacking in motivation. Most days I felt like sewing was more of a chore than a pleasure. This doesn’t happen regularly, but when it does I sometimes wonder why I sew. Looking back on January, I’m feeling grateful that I forced myself into the sewing room because I was able to accomplish two huge sewing goals , jeans (here) and this coat, that gave me the confidence boost needed to fall right back in love with sewing come February. Over the last few years of growth, parenting, and change, sewing has been the constant that reminds me I can do hard things, I can be proud of those things, and there’s always something to learn. In short, sometimes you won’t always love insert hobby or passion here, but that doesn’t mean it’s time to give up. It just might mean that it’s time to push through resistance because something great is on the horizon. It also might not mean anything, I’m not claiming any miracles here.

My First Pair of Closet Case Patterns Ginger Jeans

Jeans! The Ginger Jeans had been on my “someday I’ll make this” list practically since the day the pattern was released. Why did I wait years to finally make them? First, I made the excuse that I didn’t have time (I did have a 1 year old at the time so that was partially true). Second, I kept putting off buying quality denim. Last spring, I finally decided that 2017 would be the year I finally made jeans. I purchased the printed pattern and planned to start right away. Just a few days later, my husband was offered a great job and we decided to move.

After the decision to move, summer and fall moved quickly and I put the idea of making jeans out of my mind. Fast forward to the end of November when I received an exciting email from IndieSew. The email informed me that I had one their monthly giveaway and my prize was a jeans kit complete with 3 yards of denim and all the hardware needed for a pair of jeans. I was in the living room when I opened the email and immediately ran to tell my husband the news. I’m pretty sure he thought I was about to tell him that I’d won the lottery (which would be a bit difficult seeing as there isn’t actually a lottery in Utah). The hardware kit and denim arrived in early December. Since I had a lot of Christmas sewing at the time, I had to wait until after the holiday to get started.

IMG_2680

Finally, all of my excuses were null and void. I began cutting my jeans during the last week of December. I was all ready to finish a pair of jeans before the end of the year until my husband and I both got sick. After getting sick, it took me about a  week to get my sew-jo back. I was finally able to complete this first pair of jeans by the second week of January.

IMG_2696IMG_2689

First, Let’s talk fitting adjustments:

After taking my measurements, I determined that my hip was about a size 12 with my waist measurement sitting somewhere in between a 10 and 12. I decided to cut a 12 and adjust from there. I am about 5’10” and because of that, usually need a bit of extra length in the rise. I added 1/2″ to the rise and 2″ to the length of the legs. I added the leg length by adding 1″ at the lengthen/shorten line and 1″ below the knees. Once I made these initial adjustments, I basted everything together to check the fit.

I should’ve taken some photos to better document the fitting of these jeans, but I clearly didn’t quite have the foresight to do that. After my first baste fitting, I had a few major issues. First, the waist was gaping by about 1″ at the center back. Second, I had a a decent amount of extra fabric making lots of wrinkles under my bottom. Third, the legs were just a little too big. Here’s what I did to fix these areas:

  1. To fix the gaping at the center back, I took out a small wedge at the center back of the yoke. I drew a line that started 1/2″ away from the top of the center back and angled to the bottom of the center back yoke. I trimmed the yoke pieces along this line and then sewed everything according to the pattern instructions. FYI: this is definitely not the proper or recommended method, just what worked for me personally.
  2. To fix the excess fabric below my bottom, I followed the tutorial under the “Extra Fabric at the Seat and Thigh Pull Lines” header on this post. I know it says the adjustment is no longer necessary with the current file, but I did have a paper version of the pattern which may or may not be updated.
  3. The legs being slightly big was the easiest adjustment of all. Instead of using a 5/8″ seam allowance on the side seams and inseam, I simply used a 3/4″ seam allowance which seemed to remove the excess just fine.

I can’t say that my adjustments were all necessarily done the “right” way, but they seemed to work out just fine and I’m really happy with the overall fit of these jeans. Although the fit isn’t 100% perfect, they’re still the best fitting jeans I’ve ever owned and that’s a win for me.

IMG_2691IMG_2677

I know I won’t be the first person to tell you this; but after fitting, the construction was actually pretty easy. Thanks to my Lander Pants (here) and the two jean jackets (here and here) I made over the last six months, I was quite prepared when it came to topstitching and some of the other skills needed for these jeans. The actual sewing of these jeans came together quickly and took probably 6 hours or less. In fact, I was able to sew up my second pair in two days (more about those coming in a few weeks). Sure, a fly zipper can be intimidating (Until these jeans, it had been years since I last inserted one. I honestly didn’t find it any more difficult than a lapped or invisible zipper.

Overall, I found this jeans making experience quite rewarding. I’ve been wearing these non-stop and suddenly want to make all the jeans.  I have online shopping carts full of denim from at least three different fabric stores and just can’t decide which pattern or denim to use next. I keep kicking myself for waiting so long to finally make a pair of jeans.

IMG_2700

Have you made jeans yet? If the answer is yes, awesome! How did you feel about them? If the the answer is no, what’s stopping you? Is it the fitting (read this post)? Is it the construction intimidating (follow this sewalong)? Are you just nervous about the in-depth knowledge of your body shape that comes with sewing jeans (read this post)? I’m not saying you HAVE to make jeans, I’m just saying that I’m happy to be your cheerleader if and when you do. Now, go make some jeans, or pat yourself on the back for that pair you’ve already made.

All photos in this post were taken by my friend Kim of Sweet Red Poppy. She found this studio with the awesome pink wall and now I don’t want to photograph my makes anywhere else.

Joy Jacket by Chalk and Notch

IMG_8021

The Chalk and Notch Joy Jacket. Wow! What a pattern! I’m not entirely sure what I can say about it that hasn’t already been said. I’ve been anxiously awaiting its release since last October when Gabriela shared a preview on her IG (here). Following her post, I immediately set out to source my ideal fabrics. After a couple months of searching and indecision, I found this rayon/poly blend twill from Style Maker Fabrics. I’ve always been partial to jewel tones and this fabric was practically calling my name. It has a soft, lovely drape and smooth hand. It was fairly easy to work with as compared to a rayon challis and working with it was similar to the difficulty level of working with a lawn or voile. As someone who primarily works with prints, my only issue was differentiating between the right and wrong sides during assembly.

IMG_8015

As mentioned above, I regularly work with prints. While I wanted a solid colored outer shell, I wasn’t about to miss the opportunity to line my Joy with a print. I waffled back and forth between using a bold floral or a simple stripe and eventually decided on this black and white stripe rayon challis from Raspberry Creek Fabrics. Since I plan on regularly wearing this jacket unzipped, I wanted a lining that would be a complement to my somewhat bold wardrobe. I love this lining so much that I also used it to line the sleeves of my Clare Coat. I have nothing but good things to say about this fabric (and that amazing price). The only caveat is that I did have to take a few breaks when cutting the lining pieces because those tiny stripes were a bit hard on the eyes after too much concentration.

IMG_8032

While sourcing fabric was really only made difficult by my indecisiveness, sourcing the hardware  was a bit more difficult. I ordered my zipper from Zipperstop on Etsy (they also have their own website, I just had an Etsy gift card to use). I liked having the option to order a zipper in 1″ increments instead of being forced to buy the standard lengths available through most retailers. Find the specific listing I used here. I believe the color of this zipper is 530 which is not an exact match for this fabric, but certainly close enough.

When it came time to purchase grommets I just picked up these brass Dritz brand ones at my local JoAnn Fabrics. I can’t speak to the durability of these as I’ve only had this jacket for a couple of weeks at this point, but installation was quick and painless. I mean, really? Why did nobody tell me installing grommets was this simple? I would’ve started adding them to projects years ago.

Want to make sourcing hardware simpler? Gabriela will soon be offering a pre-order for hardware kits in several popular colors. I’ll be sure to update you when that’s available.

IMG_8030

Now let’s talk about the making of this jacket:

Since I had completed a Clare Coat one week before tackling the Joy, I wasn’t too nervous about making another piece of lined outerwear. I also have full faith in Gabriela’s drafting and instructions and knew I was in good hands. Don’t let the prospect of a lined jacket intimidate you though, the steps are clear and well written.

Honestly, cutting took me longer than the actual jacket construction. There are quite a few pieces to the Joy Jacket which contributed to the longer cutting time. Due to a bit of (manageable) chronic pain in my right hand, I had to take frequent breaks from cutting and took my time over the course of three evenings.

Once I got going, the jacket came together rather quickly. I did have some trouble with the pockets due to tension issues coupled with late-night sewing mistakes. While cutting took me three evenings, sewing only took two. I’m a very hands-on/visual learner and, because of this, sometimes have difficulty understanding written instructions. Thankfully, the pattern includes helpful diagrams all along the way. If you feel you need more help, Gabriela is also planning a detailed sew along set to begin next month.

IMG_8025

Now that I’ve pretty well said my piece, can I take a minute to mention a few of my lovely sewing friends? Several of us got together and pitched in to rent a photo studio for an hour for these photos. The photos in this post were taken by my friend Kim of Sweet Red Poppy and I really feel like she’s some sort of photo wizard.

IMG_8019

We were also able to get some photos of our Joy Jackets together. The photo below is one of my favorites and will probably end up on my bulletin board in my sewing room. My sewing friends have been a true joy and lifeline over the past year and I feel pretty dang lucky to have them in my life. If you want to read more about their Joy Jackets, read Tiahna’s post here, Tami’s post here, and Rachel’s post here.

joy-group-shot

Have you heard enough about the Joy Jacket yet? No? If you haven’t already, Head over to Leslie’s post (here) to read more about this patterns origins. Grab a tissue, you might need it.


My Son’s Jean Jacket and Tips for Working With Ottobre Patterns

Hello! I hope you’ve had a lovely holiday season. Today I’d like to share something that I made for my rambunctious four year old. You might recall that I made a Hampton Jean Jacket (here) back in October. My son almost immediately requested one of his own asking for “shiny buttons” just like mine. The boy was in luck because I had just a little over a yard of  Cone Mills denim (purchased from Threadbare Fabrics) left over from my jacket. Since my sewing queue was a bit full of Halloween sewing at the time, I promised him  a custom jacket for Christmas. I was able to pull it off just in time as I hammered the jeans buttons in place on Christmas Eve.

IMG_2481IMG_2486

I attempted convincing my son  to select some unique details for his jacket, (a different color of topstitching thread, different embroidery on the back, etc.) but he insisted that it be exactly like mine. I’m soaking in all these moments when he still thinks my style is cool because I’m sure those feelings are somewhat fleeting.

IMG_2491IMG_2507

You may notice, however, that there are a few details that vary from my jacket. These are all small details such as the absence of welt pockets, the jacket front pockets being sewn to the outside instead of the inside, and bias tape on the inside of the collar. These are all differences between Alina’s  Hampton Jean Jacket pattern and the Ottobre pattern used for my son’s jacket.

IMG_2502IMG_2503

Coming across the Ottobre pattern for my son’s jacket involves a bit of serendipity. I had been searching for a children’s jean jacket pattern, but hadn’t quite settled on one when my friend Lisa asked if I would like to have some of her old Ottobre magazines. I said yes and she brought them to our Modern Quilt Guild meeting the next day. I started to flip through them when I saw the back cover for issue 1/2011. This was exactly the pattern for which I had been searching.

IMG_4701

Ottobre is a well-known name in the sewing community so you may have heard of them. Ottobre is a Finnish company specializing in children’s wear patterns. They produce 5 magazines a year containing children’s clothing patterns as well as a special Ottobre Woman issue. In 2017 they also added an Ottobre Family issue bringing their grand total of issues to 7 each year. You can order both subscriptions or individual issues, although I’m not sure how easy it is to come by the older issues. Each issue is jam-packed with fun and stylish patterns. The specific one I’ve used here contains 40 different patterns. As you may have guessed, the sheer volume of patterns included comes with a few drawbacks.

First, in order to fit all the patterns on just a few pieces of paper, they are printed overlapping and on both  sides of each paper (see first photo below). I managed to make tracing bit more manageable by grabbing a permanent marker and my trusty Pattern-Ease (more about that here). I used the permanent marker to outline the correct size pattern pieces (see second photo below). This made tracing a bit easier on my eyes.

IMG_4697IMG_4700

Second, you have to add your own 3/8″ or 1 cm seam allowances. This isn’t a difficult step, just takes a bit of time.

Third, the instructions can be a bit sparse as each pattern only gets half a page of instructions. This specific limitation might be the most intimidating of the three. My recommendation for this is to select a project with techniques you have previously used. In my specific case, this worked out well because I had already made a jean jacket and was familiar with the top stitching, and other details associated with one. I actually used Alina’s Hampton Jean Jacket sewalong to help me clarify and understand some of the Ottobre instructions.

IMG_2490IMG_2522

Overall, these drawbacks added a bit more time to the project, but none of them would keep me from using another Ottobre pattern. The interesting style lines and endless variations on children’s basics mean I will likely turn to them again and again. I also love the fact that Ottobre makes a decent amount of patterns for boys. I’m sometimes discouraged when it comes to sewing for my son because the indie pattern world is largely dominated by patterns for women and girls.

IMG_2496

I’ll leave you with few more notes about my construction process. Every bit of my leftover yard of denim was used to make this jacket. This resulted in a serious game of pattern tetris as I worked to fit each and every piece. Cost-wise this was a relatively inexpensive project (less than $10) as I only purchased buttons and topstitching thread.  I sized up a couple of sizes in the hopes that my son will be able to get lots of wear out of this jacket. Another concession I made was to use mock flat-fell seams in order to save a bit of seam ripping and time.

I thoroughly enjoyed making this jacket as a present for my boy.  I do however, plan to wait a year or two before making another jean jacket because two within few months was a lot of work. Thanks for reading! Did you gift any handmade items this year? What did you make for the holidays?

Last Minute Gifts for the Seamstress, Sewist, or Sewing Enthusiast

Hello! Are you in the throes of holiday decorating, parties, and events like I am? I feel like the Christmas season snuck up on me this year and I was caught a bit off guard. I’m still gathering/sewing a few last minute gifts around here and thought you might be doing so as well. Does Santa, your mom, or your significant other help find items for your stocking or do you sometimes slip some of your own selections in there? However that stocking gets filled, here are a few of my last-minute favorites for inclusion. The best part about these suggestions? No last-minute sewing involved.

IMG_2436

Pattern Behavior (here): For the seamstress who also enjoys a good meme. Are you or is someone you know a millenial sewist? Have you ever wasted a bit (or too much) time browsing the internet for hilarious memes? No? Just me? If you or a seamstress you know has done this, this book might be for you. It’s not 100% sewing related as it’s photos of vintage sewing patterns with a little bit of social commentary added. I found it quite funny, but I also sometimes have text message conversations entirely using memes. The only caveat is that the book includes a small amount of profanity. Just thought I’d warn you in case that isn’t your cup of tea.

IMG_2446

Pattern-Ease: Anyone who sews clothing and traces a lot of patterns should have this stuff. I’ve been using Pattern-Ease for the last four years now and it’s been a total game changer. It is a non-woven tracing material made by Pellon. I’ll just share a few reasons my love for this stuff runs deep. First, It’s sold by the yard and 46″ wide which means I can fit almost any pattern piece into one section without having to join tissue or exam paper. Second, It’s made from polyester and is not easily ripped like tracing tissue. Third, and probably my favorite quality, liquid won’t destroy it. About a week ago, I absent-mindedly left a traced pattern piece out on the kitchen table. My son spilled milk on the table and it ran all over the piece. If I had used tissue paper, the piece would’ve been a goner. Thankfully, I simply picked up the piece of Pattern-Ease, very lightly rinsed off the milk, and hung it up to dry. Within about thirty minutes, the piece was dry and good as new.

IMG_2448

Cozy Socks: If you know me, you know that I am a serious lover of socks. They are practically my love language. The sewing community is sometimes a bit divided on their preference of sewing while barefoot, covered with socks, or even wearing shoes. I would say, however, that many seamstresses I know tend to sew at home while wearing socks. I love a good pair of socks for sewing because I sew most efficiently when I am comfortable, and my feet are literally always freezing. Really, socks are my default gift for everyone because they can be both practical and fun. Everyone needs socks and sometimes it’s fun to have a few quirky pairs for lounging/sewing at home.

IMG_2438

Mini Wonder Clips: If you’ve been around the sewing community for any amount of time, you’ve probably heard of Wonder Clips. They’re a fantastic alternative to pins in many situations and I use them often in both quilting and apparel sewing. What I LOVE about the mini version is their size and weight. The regular size wonder clips are great for most applications, but I’ve found the mini ones to be extremely helpful when sewing with lightweight fabrics such as rayon, lawn, and voile. Another great use is when sewing with knits. They don’t leave holes and damage the fabric like pins can sometimes do to knits.

IMG_2457

Washi Tape: Many apparel sewers (sewists?) use a large number of PDF patterns which means lots of glue or tape. I love using washi tape to assemble patterns, because it is easily repositionable. I purchased this washi dispenser set at Target and then proceeded to buy every one my local Target had in stock for gifting to my sewing friends. Bonus: it’s cute and I’m easily lured into using cute things.

IMG_2442

Flatter: This is a fabric smoothing spray that I use regularly when pressing. It reduces static and leaves fabric smelling glorious. My favorite is the pineapple scent, but they have several other scents and even an unscented version. I love the way this stuff makes my sewing room smell like a tropical vacation.

IMG_2450

Sewing Treats: This one will need to be tailored for the specific recipient. I love these gummy peach penguins because they aren’t sticky and won’t easily melt, the fact that they’re made almost entirely of sugar doesn’t hurt either. Find out your recipient’s snack preferences and find something that can be easily eaten and won’t leave a residue on fabric.

IMG_2445

Named Clothing Gemma Dress

Today I’d like to introduce you to my Named Clothing Gemma Dress. My inner 90’s girl jumped for joy when stretch velvet started making a comeback a couple of years ago. I first fell in love with the sweatshirt version of the Gemma pattern, but have yet to find the perfect fabric combination for it. When my cousin got engaged earlier this year and announced that she’d be married in December, I knew this was the perfect excuse for making a new winter appropriate dress.

IMG_2328IMG_2351

I snagged this olive colored stretch velvet and the Gemma printed pattern from Stylemaker Fabrics during their Black Friday Sale. I ordered on Thursday and had the goods in my hands by the following Monday. Michelle currently has a great selection of stretch velvet available and I’m doing my best to convince myself that I don’t need it in every color of the rainbow.

IMG_2343IMG_2336

Styling this dress presented me with a bit of a conundrum.  You may have noticed that I always wear the same few pairs of shoes. Almost two years ago, I decided to purge and scale back my shoe wardrobe. I had nearly 30 pairs of shoes that were rarely worn or falling apart because they were poorly made. I love a good pair of shoes, but these were just feeling like a waste of my space and money. I made a list of shoes that were necessary in my wardrobe (snow boots, athletic shoes, a pair of dress shoes, etc.) Eventually I whittled my collection down to 8 pairs of shoes. This system has worked quite well for me over the last few years. It’s encouraged me to be more intentional about shoe purchases and creative with my styling. I’m not great at scaling back in many areas of my life, but this one has brought me a little peace of mind. Here’s my little soapbox of the day: You don’t have to Marie Kondo your entire life to feel peace of mind. Find one thing that you can live with less of  (decorations, shoes, pants, t-shirts, pens, etc.) and start there. Maybe you’ll be surprised with what you can live without, or maybe not. I’m really no expert here.

IMG_2324IMG_2350

Now that I’ve presented my little soapbox, let’s get back to my styling conundrum. After seriously considering purchasing a new pair of shoes, I decided to dress the outfit down a bit by wearing my Teva ankle boots. While not the prettiest option, they were certainly my most practical when presented with the thought of walking on ice and winter slush. In order to make it work, I decided on a slightly boho vibe. I selected a pair of simple dangle earrings, patterned tights, and decided on a crown braid for my hair styling. The thought of a crown braid presented me with another issue: I cannot braid to save my life. Enter Vienna: My kind and beautiful friend Vienna of The Late Sew offered to braid my hair and assist me in taking photos. Sewing friends are some of the freaking best, seriously.

IMG_2354IMG_2345

Overall I couldn’t be more pleased with this dress and can’t wait to invent a million occasions to which I can wear such a lovely thing. Who am I kidding? I totally wore this to the grocery store, cooked dinner, and while sewing last night. I might never take it off.

IMG_2325

As always, I’ll leave you with a little note on sizing: I sewed a 38 graded to a 40 at the hips. My only other modifications were adding 2 inches to the length and sewing the slit closed an extra 4 inches for a bit more coverage on the back.

Want to see another Named pattern sewn up? Check out my Ronja Dungarees here.

Love the Gemma pattern? See my Gemma Sweater here.

Need a some more Gemma Dress inspiration? Check out Sara’s gorgeous maternity version here.

True Bias Roscoe Blouse

Hello and Happy Monday! My family and I took a mini vacation this weekend and decided to escape to the cabin owned by my husband’s grandparents. I used our weekend plans as motivation to finally finish sewing my True Bias Roscoe Blouse (purchase here). This Mountain Mirror rayon by April Rhodes (purchased from Imagine Gnats) was basically begging to be photographed in front of the mountains. Perhaps I just couldn’t resist the opportunity to photograph a mountain print top in front of all this beautiful scenery.

IMG_2244

We love spending weekends at the cabin because it always gives us time to reconnect as a family. There’s no internet and minimal to no cell service depending on where you stand on the property. We always come back home feeling refreshed and happy to have a break from our work and devices. Our four year old loves exploring and fighting imaginary monsters so that’s pretty much the only item on the itinerary when we visit. This last weekend we were greeted by snow covered mountains and frost dusting the ground. Once we got a fire started, we played my son’s version of Monopoly and cuddled while watching Spongebob. Not a bad evening if you ask me.

IMG_2249IMG_2253

We woke up the next morning, got ready for the day, and headed outside to snap these photos. As evidenced by the snow and frost on the ground, it was freezing outside. My son was bundled in his winter coat and having the time of his life chasing monsters. My husband and I, on the other hand, didn’t pack the appropriate outerwear and were a bit cold. If you look closely at the photos you may see my fingers turning red from the cold and goosebumps on my arms and neck. I did bring this rtw cardigan along and it made finishing this 15 minute photo session a lot more cozy. I love having items like this Roscoe Blouse in my wardrobe that are easily made cold-weather appropriate with the addition of a cozy cardigan or stylish jacket.

IMG_2291IMG_2270

While layering over the Roscoe to make it more winter appropriate was rather easy, I may have had more time to wear this sans layers had I finished it back when I originally started. I purchased this fabric and pattern sometime around the end of August as I intended to finish it before my early September trip to Colorado. Clearly, that did not happen. I had just started to sew my blouse and was on step 2 of the pattern when I made a HUGE mistake. I had attached the neckline facing and was cutting the neck slit. Feeling pretty accomplished, I lifted the fabric to realize that I had unwittingly cut a large hole into the middle of my blouse front. I pulled out my extra fabric and found that it was about 3 inches too short to cut a new front. I was frustrated to realize that I would need to purchase another yard to finish the blouse. I set the fabric and pattern aside and decided to revisit it at a later date.

IMG_2232IMG_2229  When I returned from Colorado, I hit the ground running and finished my Highlands Wrap Dress (here), Hampton Jean Jacket (here), and family Halloween costumes (here). I had all but forgotten about my Roscoe Blouse fail until a few weeks ago when Imagine Gnats announced a great sale on their rayons. I searched through their sale section and found this Mountain Mirror rayon which reminded me of my unfinished project. I quickly ordered a yard and waited for it to arrive.

I almost immediately cut out a new blouse front and waited for an opportunity to sew it up. This time I paid careful attention when cutting the neck slit and avoided my earlier mistake. I sewed this up in a time frame of about 3 days. I didn’t keep track of my actual sewing time, but I would estimate this took me somewhere around 3 hours total. It was a quick, easy sew and I love its relaxed, flowy fit. The voluminous raglan sleeves are one of my favorite design features and will make it perfectly breezy for eventual summer wear.

IMG_2260IMG_2258

I’ll leave you with a quick note on sizing. I sewed up a size 4 with the only alte,ration being 1″ added to the sleeve length and blouse length. I’ve sewn several True Bias patterns over the last year ( Lodo Dress, Hudson Pants, and Lander Pants) and have found the sizing on each pattern to be accurate according the measurements included. I’ve only made minimal length alterations to each and would highly recommend Kelly’s patterns.

IMG_2282

Thanks so much for reading!


Itch to Stitch Blog Tour: Hepburn Turtleneck

I’m thrilled today to be part of the Itch to Stitch Love Blog Tour.  Kennis of Itch to Stitch has quite the repertoire of well-drafted patterns under her belt and I’ve enjoyed sewing her patterns in the past (see those here, here, and here).  Recently, Kennis was on vacation and came home to find that her home had been burglarized. Thieves took her computers, machines, and many other things essential to her and her husband’s businesses. This tour came about because the sewing community joined together to support one of our own. Read to the end of the post for information on all the generous sponsors and talented bloggers joining together this week.

When I was invited to join, I searched the website to find inspiration and decide on a project. Upon seeing and buying the Hepburn Turtleneck pattern, I knew I had the perfect fabric/pattern combination.  I purchased this soft striped rayon french terry from Indiesew and it’s been sitting in my stash for months waiting for inspiration to strike.
IMG_2182

IMG_2199

Today I’m sharing my Hepburn Turtleneck styled two different ways. It’s been several years since I owned a fitted turtleneck and I wasn’t quite sure how to style it. The first look is a slightly dressed up classic look that I envision wearing for a night out or even to Thanksgiving dinner. I pulled my hair into a low bun, painted on red lipstick, and paired my new top with these denim Lander Pants (more about those here).

IMG_2183IMG_2193

This first look seemed like a simple and natural styling choice. I love the understated elegance of this outfit, but likely won’t dress up quite this much on a regular basis. My second look is a casual one that is less classic and more trendy. When styling this outfit, I pulled my hair into a top knot, applied minimal makeup, grabbed my Rifle Paper Co. Keds, and pulled out my vintage Levi’s 550 jeans.

IMG_2149IMG_2155

These jeans are my literal mom jeans because I took them from my mom’s closet. I’m pretty picky about jeans and only own one pair besides these. My mom wore these jeans when I was younger, and it seems only natural that I would wear them now that I’m a mother. They’re worn to comfortable perfection and have completely sold me on the mom jeans trend. I wasn’t sure how to feel about this outfit until I put it on and realized that it’s likely to become my winter momiform.

IMG_2173IMG_2175

My Hepburn Turtleneck has been worn at every opportunity since it was finished a few days ago. It’s the perfect fit and weight for winter layering and wearing as a transition piece in late fall and early spring. I’m already envisioning new ways to style this top and keep it in constant rotation. How would you style a fitted turtleneck? Which look do you prefer?

IMG_2195IMG_2166

A quick note on sizing: My bust measurement fell between the size 2 and size 4 with my hip measurement being a size 6. I opted to make a size 4 and grade to a 6 at the hips. I’m 5’10” and added 2″ to the body length and 1.5″ to the arm length.

Read below for more inspiration and instructions on entering a couple of great giveaways. 

Your ITS Love bloggers are:

Monday: Sew Sophie Lynn, Merritts Makes, Sewing with Sarah, Sewing with D

Tuesday: Shalini’s Blog, Auschicksews, Rebel and Malice, Sewing Vortex

Wednesday: Replicate Then Deviate, mahlicadesigns, Sewing with D, The Petite Sewist, kreamino

Thursday: Sewing Curves, Creative Counselor, Sew Mariefleur, Fairies, Bubbles & Co, Sewing by Ti

Friday: Harper+Lu, MeMade, On Wednesdays We Sew, Heather Handmade, Bellevi, and visit by mooglii on IG

The ITS Love Tour sponsors have been so generous in support of Kennis of Itch to Stitch that we’ve been able to put together several prize packages to share with you.
First, you may enter our giveaway to win one of three prize packs:

Prize Pack #1 includes:

5 Itch to Stitch patterns

$25GC to Simply By Ti

$50 Raspberry Creek Gift Card

$50 Bella Sunshine gift card

                  Prize Pack #2 includes:

$50 Knit Pop GC

$25 Designer Stitch GC

$25 Chalk and Notch GC

3 patterns of choice from Coffee And Thread

Prize Pack #3 Includes:

$15 Thread & Grain store credit

$25 Maker Mountain Fabrics GC

3 patterns from Halla Patterns

A Rafflecopter Giveaway

Your second way to win is to share with us your recent Itch to Stitch creations (made between October and November 2017). Add your creations to our Link Up Party before Nov. 20th for a chance to win one of two prize packs.

LinkUp Prize Pack #1 includes:

5 Itch to Stitch patterns

A $40 value PFRE Sly Fox Fabrics.

$25 Maker Mountain Fabrics GC

$50 Love Notions GC

LinkUp Prize Pack #2 includes:

$25 Stylish Fabric GC & sewing box kit

$25 Chalk and Notch GC

5 patterns from Rad Patterns

Pattern of choice from DG Patterns

Click here to view and add your links.

Matching Loungewear: Brilliant Idea or Fashion Blunder?

Way back in August, my son decided that he wanted to be Spongebob for Halloween and requested that I dress up as Squidward. Part of me was rather proud as I was a Spongebob fan back in the day. In the sixth grade I even got a Spongebob alarm clock for Christmas (It sang the “F.U.N.” song to wake me up and was a real treasure. I’m sure my parents were delighted when it finally broke).  I had spent a few weeks puzzling on how to execute my Squidward costume until I was in Denver and Emily made this Blueprints for Sewing Geodesic Sweatshirt. The wheels in my head started turning and I came up with the idea of a matching mint colored loungewear set.

IMG_2048

Emily’s lovely mauve french terry inspired me to check the Raspberry Creek Fabrics Etsy shop where I found this solid dark mint french terry. I knew that I would use the Geodesic pattern because I already owned it and had been planning to make the longer version eventually (see my cropped version here). I decided to purchase the True Bias Hudson Pants pattern (here) and the two together make a perfect pair.

IMG_2096IMG_2085

I sewed up a size C/D with no alterations in the Geodesic and it all came together rather quickly. My background in quilting is what drew me to the fun geometric lines of the Geodesic and I think it made the construction a little easier as well.

When cutting and sewing the Hudsons, I made a size 10 with the only alteration being an added 4″ in length. I only needed to add 3″ to the length, but I prefer my sweats a little extra long. It probably has something to do with the fact that nearly all rtw sweats are a few inches too short for my legs. Perhaps I’m just making up for years of wearing sweats that look like I’m expecting a flood.

IMG_2070IMG_2069

While I’m satisfied with both pieces individually, I’m still not sure that I’m sold on wearing them together. They kind of remind me of the blush velour sweatsuit I owned in middle school and I’m still trying to decide whether or not that’s a good thing. The comfort level of this outfit is unreal. I have been wearing it around the house all day today. I guess the point of loungewear is actual lounging though, so I will certainly wear these together during those times. My biggest question is whether or not I would wear matching loungewear out and about during everyday activities. How do you feel about matching loungewear? Is it something you would wear? How and where would you wear it?

IMG_2107

Thanks for reading! I’ll leave you with a quick iPhone shot of our Halloween costumes so you can see how I incorporated these matching separates into my Squidward costume.

IMG_3964.jpg